Monday, November 30, 2020

Evelin T Designs | Baby, It's Cold Outside


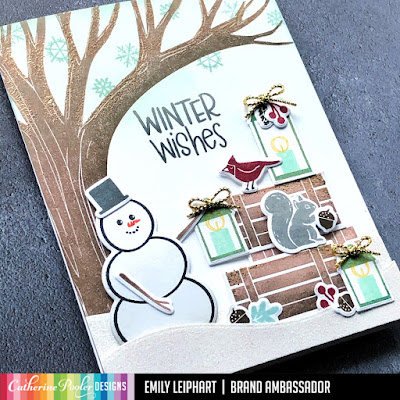
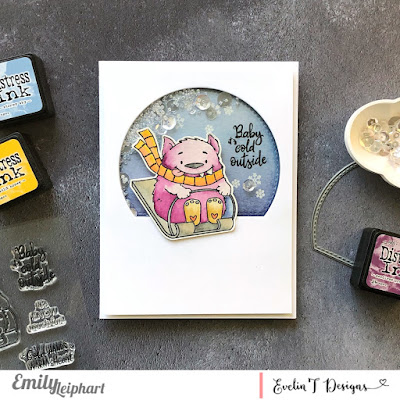
Today's fun winter card features the Baby, It's Cold Outside stamp set from Evelin T Designs' latest release. I just love this big illustration of a monster sledding! I haven't been sledding in ages and the monster's excitement makes me want to go, except I'm getting old and can't tolerate the cold much anymore so maybe not. LOL


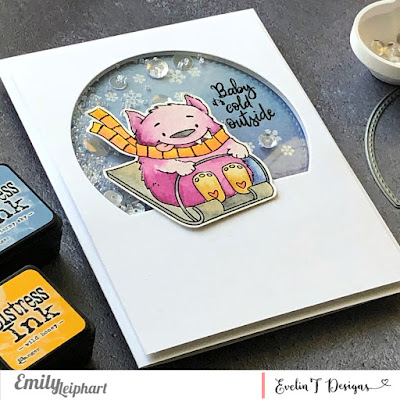
I started this card by selecting distress ink colours for my image. Then I stamped the images and sentiment with Versafine Onyx Black pigment ink and heat embossed them with clear embossing powder.  I die cut the background from a retired arch die from My Favourite Things. If you're looking for something similar, I've provided an alternate in the supply links below.


I also stamped tiny snowflakes with Versamark Watermark ink before ink blending the background with three shades of blue distress ink. I watercoloured the image, dried it with my heat tool and fussy cut it. To create the shaker, I added acetate to the front panel and used foam tape to build walls to house the sequins and seed beads from Studio Katia.


I love this idea for winter cards in lieu of holiday cards or in addition to Christmas cards. No doubt, this winter will feel extra long and we can all use as much happy mail as possible! I'm tempted to make a bunch of these in different colours.


Thanks so much for stopping by!

Supplies

Thursday, November 26, 2020

Catherine Pooler Designs | Winter Wishes + HUGE Black Friday Sale!


Happy Thanksgiving to all my American friends! I hope you all have a safe and relaxing Thanksgiving holiday. Today's card features Catherine Pooler's new Warm My Heart stamp set and coordinating dies. Can you guess why I had to have this set? Yes, of course it was that cute little squirrel!! 

This set was made as a second set for the Old Oak Tree Background, which I didn't have, so I had to get that, too! It's a fabulously versatile background because I love to make cute scenes with critters. That stack of crates is actually part of a wagon and I decided to use it to create a little nook for the snowman and his woodland friends! 

I used the rock 'n' roll technique on both the tree with Over Coffee and Icing on the Cake inks to create dimension and shadow. I also rolled embossing ink on the top edges and heat embossed Sandcastle Embossing Glitter for sparkle on the tree and crates. I love it and you can see the quick video showing that sparkle in real life on my Instagram feed.


I used almost all of the other little stamps from the Warm My Heart stamp set to finish the scene, including the snowman, snowflakes, cardinal, foliage and lanterns. The sparkly snowhills were created with the Melon Edge Dies, one of my favourite and most-used die sets. I used a combination of liquid glue, glue dots and foam tape to assemble the scene, which has a lot of dimension and visual interest.


Catherine Pooler's Black Friday Sale is on NOW! For the first time ever, inks are included in this sale!! The more you buy, the more you save. Sale ends Monday, November 30, 2020. Shop before your favourites are sold out!


Thanks so much for stopping by and happy shopping! ;)

Supplies

Wednesday, November 18, 2020

Studio Katia | Holiday Cheer

The weather has gotten a lot colder all of a sudden and that's a sign to hunker down and make Christmas cards! I've been wanting to use Happy Snowmen for a while now and today's the day. I'm pairing it up with the Zig Zag Stripes rubber cling background stamp and the Snow-fetti Stencil.

I started by stamping and heat embossing all of the images with Versafine Onyx Black pigment ink and super fine clear embossing powder. Then I used distress inks to watercolour the images and you can find all those colours in the supply links below.


I set aside the images to dry and stamp the Zig Zag Stripes rubber cling background stamp with pumice stone pigment ink on an A2 panel. I trim a second panel from watercolour cardstock and ink blend it with weathered wood distress ink, then use stormy sky distress ink to ink blend the Snow-fetti Stencil over top. To add some sparkle, I splatter shimmer spritz on the panel and blot it with a paper towel.


I add 3/4" Scor-Tape to the bottom of the top panel and press Frost Glitter into it to create a snowy base for my scene. Then I heat emboss the two-part sentiment, again using Versafine Onyx Black pigment ink and super fine clear embossing powder. I assemble the card with foam tape and mini glue dots, then finish with Bora Bora Pearls on the tree.


Thanks so much for stopping by!

Supplies

Thursday, November 12, 2020

Winter Trio Hop with Catherine Pooler, Heffy Doodle, and WOW!


Welcome to the Winter Trio Blog Hop with designers from Catherine Pooler, Heffy Doodle and WOW! Several design team members from each of the three companies are combining 
products from all three companies on their projects! I've seen the projects and they are absolutely stunning so I can't wait for you to hop along and be inspired. We also have giveaways from all three companies so be sure to hop along and leave comments for your chance to win!


I'm sharing three tags made with Catherine Pooler's Alpine Village, Heffy Doodle's Wanna Build a Snowman, Mini Essentials Dies and First Snow Stencil. I used Catherine Pooler's inks for all of the stamping, ink blending and watercoloring. The colours I used are Samba, Shea Butter, Garden Party, All That Jazz, Stone Blue, Twilight, Black Jack and Midnight.


First, I created two base tags using the small tag die from Heffy Doodle's Mini Essentials Dies. The top die is the original size and I modified the bottom tag using the partial die cutting technique to extend its length so there was enough room for both a stamped sentiment and handwritten message.


I used Heffy Doodle's First Snow Stencil to create two hills at the bottom and heat embossed the falling snow with WOW! Sandcastle Embossing Glitter.


I stamped and die cut the trees with Catherine Pooler's Alpine Village and the stamped snowman and penguins from Heffy Doodle's Wanna Build a Snowman with WOW! White Puff Twinkle Embossing Glitter. This makes them look like they have falling snow stuck to them, which is really cute!


To finish, I stamped a custom sentiment at the base of the longer tag and tied white twill ribbon with metallic gold cord, embellished with little gold bells.


GIVEAWAY

Make sure to comment along the way for your chance to win! Both Catherine Pooler and WOW! will be giving away $25 to their respective stores and Heffy Doodle will be giving away £20 to their store.

Each company will post their random winner on Tuesday, November 17th at 10AM EST. Make sure to check the Catherine Pooler BlogHeffy Doodle Blog and the WOW! Blog to see if you’re a winner!

Thanks so much for hopping along with us!

Supplies

Wednesday, November 4, 2020

Studio Katia | Happy Birthday to You!


Hello, crafty friends! I hope you all had a lovely weekend! Mine was super packed and busy but it was nice to have plans and get things done. Alas, weekends are never long enough. I'm sure you will agree! Plus, it snowed last night so I thought I'd make something bright and cheery.


I used the Party Balloons Stencil and Ink Blender Brushes with distress inks on watercolour cardstock to create the balloons. Then I splattered the panel with shimmer spritz for a beautiful shimmery confetti effect. I dried the panel with my heat tool before heat embossing the balloon strings in gold and the sentiment with sparkle embossing powder. Both the balloon strings and sentiment are from the It's Your Birthday mini stamp set.


To finish the card, I cut a strip of gold glitter cardstock, adhering it to the left side of the card base. Then I attached the panel and embellished the card with gold sparkle crystals.


Thanks so much for stopping by!

Supplies