Thursday, December 31, 2020

Catherine Pooler Designs | Cocktail Pup New Year


Happy New Year's Eve! I hope you're all hunkered down warm and cozy with your families, eating delicious food and enjoying spirits of all kinds. We've been playing a lot of board games and will have a quick dinner before watching a movie and trying to stay up 'til midnight. ;)


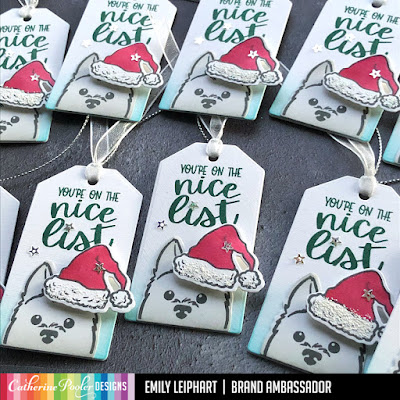
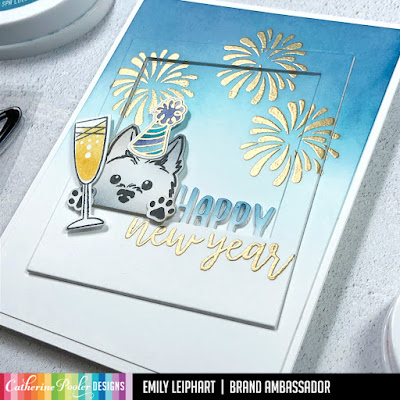
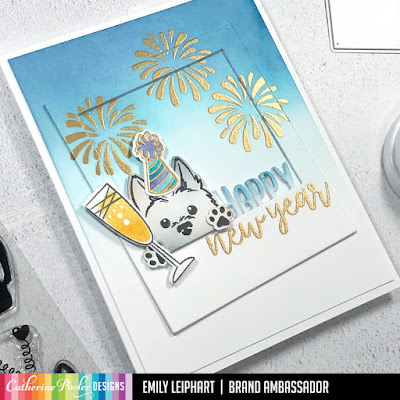
This was a custom design for close friends of ours. They have an Australian Shepherd with three colours so I stamped the pup from Peeking Pets in Midnight and shaded him with Twilight and Over Coffee


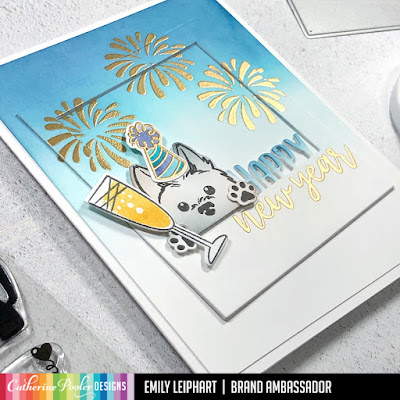
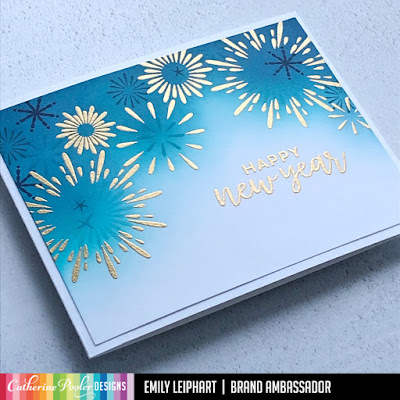
I stamped the champagne glass from Cocktail Party in Black Jack and rock 'n' rolled the champagne in Shea Butter and Sauna. Then I set those pieces aside while I heat embossed the fireworks from Sparkle and Pop in WOW Metallic Gold Rich Embossing Powder on a 4" x 5.25" panel which I then ink blended with It's a Boy, Fiesta Blue, Daydream and Juniper Mist.


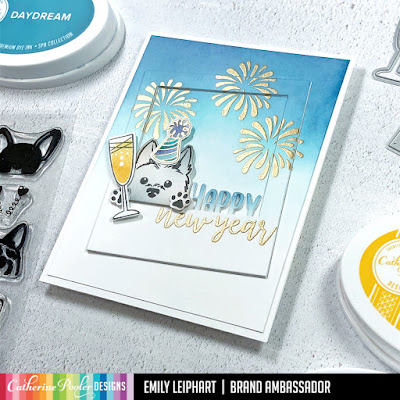
Next, I used the Instant Happy Dies to die cut the polaroid from the panel and heat embossed 'new year' from Cocktail Party in WOW Metallic Gold Rich Embossing Powder. I also stamped and heat embossed the party hat from Peeking Pets and watercolored the stripes with It's a Boy, Fiesta Blue, Daydream and Juniper Mist. I popped up the polaroid on two layers of cardstock and adhered the pup and champagne using liquid glue and foam tape.


Thanks so much for stopping by! I wish you all health and happiness as 2021 begins! 

Supplies

Thursday, December 24, 2020

Studio Katia | Hello 2021


Happy Holidays, my crafty friends! It's hard to believe that it'll be New Year's Eve in one week. I still remember going into lockdown for the first time back in March and wondering how we will survive this. Then my mom passed away in April and the year changed forever. Currently, my dad is not doing well so I hope my family can still enjoy the holidays before we're burdened with more sadness. I feel like 2020 was such a waste of a year but at this point in my life, I'm sad to have lost that valuable year. I'm not sure how I feel about starting a new year when I didn't accomplish much this year.


That being said, I love making New Year's cards so I pulled out the You're So Ranunculous stamp set which has a gorgeous large image, perfect for covering an entire card and is so relaxing to watercolour.


I stamped the image with watermark ink on watercolour cardstock and heat embossed it with sparkle embossing powder.  Since I wanted to create a soft look, the sparkle in the powder helps makes the image pop. After the panel was dry, I used the largest frame from Dotted Patterns Set 1 to dry emboss the panel and trimmed it down to 4" x 5.25" so the toffee card base would create a frame.


Next, I die cut the scripted hello from You're So Ranunculus Dies and 2021 from Chunky Numbers  both in heavy white cardstock and glitter gold cardstock. Using Stick It Adhesive, I layered the white and gold layers together and adhered them to the watercolored panel for a bit of dimension.


To finish, I adhered the panel to the card base using a tape runner and added a few vanilla lustre fusion sequins using liquid glue and an embellishment wand


I really enjoyed making this card and hope you feel encouraged heading into the New Year!

Thanks so much for stopping by! 

Supplies

Wednesday, December 23, 2020

Catherine Pooler Designs | Holiday Tag Commission #3


I can't believe it's two days before Christmas! How did we get here?! I feel like this has been both the longest and shortest year in history and therefore I have conflicting feelings about this year coming to an end. Since Christmas is upon us and the first two sets of tags were for gift-giving, I thought I'd make a set of tags just for saying thanks since we always need those last-minute gifts for any surprises or unexpected and socially-distanced visits.


I used six sets to make these tags. Can you name them all? First, I die cut 24 tags from Layered Tags Dies from toffee cardstock and used the edge of the Essentials Slimline Dies to create the slashes on the side of the top layer to create a road or anchor for the truck.

Next, I die cut the truck and tree from Sleigh Ride, one of my favourite stamp sets from the Deluxe Club Sursee collection from October 2019. I created an ombre look for the truck by stamping it with Twilight and Black Jack ink. The wheels were stamped with straight Black Jack. The trees were stamped with Grass Skirt and Deck the Halls.


Next, I die cut the stack of gifts from Warm My Heart and ombre stamped those with Polished and Rockin' Red, Shea Butter and Sauna, Grass Skirt and Deck the Halls, It's a Boy and Fiesta Blue, and Sweet Sixteen and Pixie Dust.

Before adhering the images to the tags, I used Midnight ink to stamp the sentiment from Best in the Patch, one of my favourite and most versatile sentiment sets. Then I used the best white pigment ink to stamp the stars from Here We Come A-Caroling, a long-time Christmas favourite.

I used liquid glue to attach the gifts to the trucks before popping them up on foam tape over the trees for dimension. To add bling and ornaments to the trees, I used seed beads and sequins from the Vegas, Baby sequin mix. White hemp cord finishes off the tags and, of course, they all open to accommodate a personal message.

Thanks so much for stopping by!

Supplies

Thursday, December 17, 2020

Catherine Pooler Designs | Holiday Tag Commission #2


I apologize in advance for the photo-heavy post. The adorable Hang Your Stocking Dies from Catherine Pooler make the best shaped tags! I couldn't stop photographing these in various ways and then I couldn't decide which photos I liked better so I'm sharing them all. I hope you enjoy them! 


Much like Part 1 of my holiday tag commission, these stockings open so a handwritten note can be written inside. I die cut all of the stocking pieces from white linen cardstock and stamped the top layer with the Plaid Background using Cranberry Fizz ink. I was able to stamp two stockings at the same time using my MISTI stamping tool.


Using liquid glue, I adhered the three white pieces to each stocking. Then I die cut all the floral pieces from smooth white cardstock. The poinsettia and foliage are from the gorgeous Let's Go Skating stamp set and coordinating dies.


The poinsettia was stamped with watermark ink and heat embossed with gold tinsel embossing powder. The holly leaves and stem were stamped with Spruce and Icing on the Cake inks, respectively.


Using an acrylic block, I stamped the sentiment from Best in the Patch using Black Jack ink before using liquid glue to attach the holly leaves and popping up the poinsettias with foam tape. To finish, I scored the bottom half of the stocking and secured it to the top of the stocking with 2" tape to create a folding note tag.


Thanks so much for stopping by!

Supplies

Tuesday, December 15, 2020

Catherine Pooler Designs | Holiday Tag Commission #1

I received a large tag commission from one of our friends so I thought it would be fun to split it up and make three different designs. That way, they can choose which design best suits the recipient. This first set is based on their Australian Shepherd and, of course, I used none other than the popular Peeking Pets stamp set and coordinating dies! All of these tags open up like a card to accommodate a handwritten message.

I started by die cutting the tags from the Layered Tag Dies. Next, I stamped the sentiment from the Nice List stamp set using Deck the Halls ink. Then I use a blender brush to ink up the bottoms of the tags with It's a Boy ink.

Next, I stamped and die cut the pup and Santa hats using Black Jack ink. I used a blender brush to ink up the bottoms of the pups with Twilight ink. To embellish the hats, I used Cranberry Fizz to watercolour the hats - albeit very quickly since they were not stamped on watercolour cardstock - and used an embossing pen to add white puff twinkle embossing powder. This makes the fluffy part of the hats very textured and sparkly.


I used scor-tape to adhere the pups flat to the card and used foam tape to adhere the hats. To finish, I looped sheer organdy ribbon through the holes in the tag and tied it with metallic silver cord. Then I added crystal stars to add a bit more shine for another festive element.


Thanks so much for stopping by!

Supplies

Sunday, December 13, 2020

Catherine Pooler Designs | Happy New Year


I love making New Year's cards! If there's one thing I love making more than Christmas cards, it's Happy New Year cards. It's also rare to see great Happy New Year sentiments so when I see one, I have to have the stamp set and that's why I love Cocktail Party so much!

This time, I wanted to pair up the Happy New Year sentiment from that stamp set with the fabulous Sparkle and Pop stamp set, which is perfect for celebrations of all kinds, but especially New Year's.


There's usually a lot of gold involved in a New Year's Eve celebration so I wanted to do a lot of heat embossing with WOW! Metallic Gold Rich embossing powder. Using my MISTI stamping tool, I stamped the sentiment first and arranged the fireworks around it.


I heat embossed the gold fireworks first, then used life changing blender brushes to ink up the top of the card, using It's a Boy, Fiesta Blue, Daydream and Juniper Mist, in that order.

After the ink blending was done, I stamped additional fireworks in the four blues - It's a BoyFiesta BlueDaydream and Juniper Mist - to fill in the ink blended spaces. This filled up the sky with bursts and added lots of dimension to this flat, easy-to-mail card.

Thanks so much for stopping by!

Supplies

Thursday, December 10, 2020

VIDEO | Taylored Expressions | Like Gnome Other Kit

I'm so excited to present the new Like Gnome Other Kit from Taylored Expressions! I haven't worked with a lot of kits but I'm raving about this one because it's jam-packed with awesome, versatile products. At first glance, this kit is definitely perfect for all your Valentine's Day needs but it works for birthdays, general hello, friendship and anniversary celebrations. 

My first project is a card and I featured all of the kit ingredients on it, including the Like Gnome Other stamp set and coordinating dies, Layer It - Toadstools Dies, Cable Knit Background, Build a Scene - Heart Fence & Hill Dies and Bits & Pieces - Hearts. Plus, I also used the Set the Scene - Clouds stencils on the background.

All of my stamping and ink blending was done with Taylored Expressions inks and blender brushes, and you can find all of those colours in the supply links below. I've also included the Copic markers I used to colour the gnomes. I also used Taylored Expressions cardstock. 

You can probably tell that I had a lot of fun creating this scene. There are just so many ways you can arrange these fun elements. I added a lot of depth with both ink blending and foam tape.

To create the two tags using Tag Stacklets 2 dies, I just used the leftover pieces from the card. They're almost like mini versions of the card itself and since I had already prepared everything in the beginning, they were super quick to assemble.

I definitely need to make more because I don't see myself giving these away anytime soon. LOL Do you make things you love to much that you want to keep them for yourself? ;)

Would you believe that my favourite part of making tags is choosing the ribbon and/or cord? The chevron ribbon and metallic silver cord are by May Arts Ribbon but you can also find the cord in the Taylored Expressions store.

Thanks so much for watching!

Supplies

Wednesday, December 9, 2020

Catherine Pooler Designs | Beautiful New Year Release


Catherine Pooler's Beautiful New Year Release is live! You can shop all of the new products in the store HERE or using the shop links below. Today's post features my favourite set from this release, Cocktail Party and I drew my colour inspiration from the Pop the Bubbly Slimline Patterned Paper.

I started by stamping all of the outline images in various colours. I stamped almost all of the outline images using two different colours, one for bowl and one for the stem, which was so easy with the perfect stamping block. Then I stamped the coordinating solid images to 'fill' the drinks. I love it when I don't have to colour!


I used all but one of the colours included in the Pop the Bubbly Slimline Patterned Paper pack, which are Pink Champagne, Green Tea, Eucalyptus, Hot Tub, Daydream and Twilight. I double-stamped the sentiment in the centre using Daydream and Versamark Watermark ink before heat embossing it with clear sparkle embossing powder.


I used temporary adhesive to attach the drinks to the panel and die cut the heart using the Nested Stitched Hearts Dies. I used a larger heart to dry emboss another panel, which I cut down so I could add strips of Pop the Bubbly Slimline Patterned Paper at the top and bottom of the card base before adhering all the layers and popping up the drinks with foam tape.

Thanks so much for stopping by!

Supplies