Monday, May 31, 2021

Ellen Hutson | Two Graduation Cards + Memorial Day Sale!

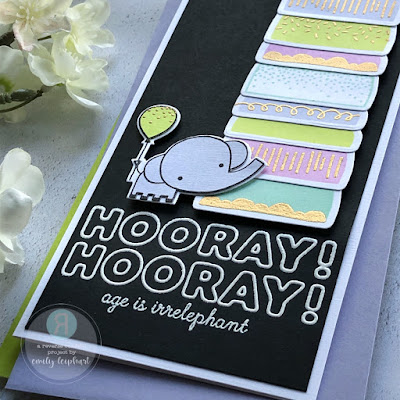
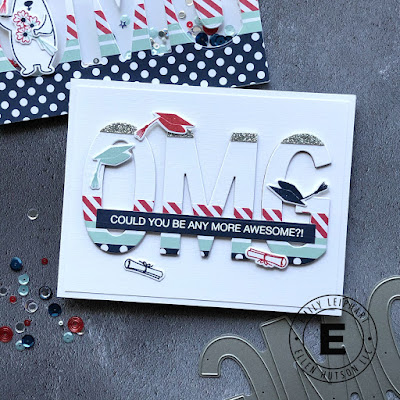
Hello, crafty friends! Today, I'm sharing a couple of graduation cards using a suuuper fun die called Mondo OMG that is new to my stash. Since this die cuts out the jumbo letters, resulting in both negative and positive pieces, I thought I'd go the 2-for-1 route which I almost never do. This die definitely made it easy to design two quick and easy cards.

You know I'm a huge fan of shaker cards so it was a given that I'd use the negative space to create a shaker, which I filled with Catherine Pooler's Berryton, Tinseltown and Pretty Pink Posh's Sparkling Clear Stars sequins.

Both my card bases and front panels were cut from white linen cardstock. First, I cut strips of silver glitter cardstock and patterned paper from Catherine Pooler's Great Start 6x6 paper pack and adhered them to the front of the panel with a tape runner.

Also featured are the little bear from Bear Ware 4 and his graduation cap, diploma, flowers and secondary sentiment are from Bear Ware 3. I love this little bear that holds things and he fit perfectly into the big letter O. I used Catherine Pooler's Rouge, Hot Tub and Juniper Mist inks to stamp the images and secondary sentiment. Using an acrylic block, I rock 'n rolled the bouquet to get all three ink colours on the image.

On the second card, I also used a sentiment from the Nice of You stamp set. To get the strip to match the patterned papers, I used the direct-to-paper technique and swiped the Juniper Mist ink pad on Neenah solar white cardstock and allowed it to dry before heat embossing the sentiment in white. I stamped the graduation hats and diplomas to match and adhered everything with micro glue dots and foam tape.

I also die cut the Mondo OMG three more times from white linen cardstock, and red and navy cardstock from my stash to give the letters more dimension. You can see how much it adds in terms of visual interest in the close-up photo.

Today ONLY, take advantage of the Flash Sale at EllenHutson.com! Save $20 off purchases of $100 or more using code MEMORIAL2021.

Thanks so much for stopping by and happy shopping!

Supplies

Monday, May 24, 2021

Reverse Confetti | Birthday Fishes Shaker Card


We're still in lockdown and museums, art galleries and other similar venues have not been open since November 2020. It makes me so sad since there are so many new exhibits that haven't had any visitors in over six months. For today's card, I thought about the aquarium and decided to make a shaker card using Punny Party, Cup of Friendship and the Oval Window Cover Panel.


I cut the Oval Window Cover Panel from white linen cardstock and used it as a guide for the background. First, I head embossed the long floral image from Cup of Friendship, then I ink blended the panel with Catherine Pooler inks - from top to bottom, I used Melon Ice, Mint To BeTranquil and Sweet Sixteen.

I also used Copic markers to no-line colour the three fish from Punny Party. This was my very first time no-line colouring and it was very satisfying to see the results! I'm starting to wonder why I've never tried it 'til now. LOL I stamped the fish using Sea Salt ink and used Copic markers that coordinate with the ink blended background. You can find all of those colours listed in the supply links below.

Before creating the shaker part of the card, I stamped the sentiment using Cove Blue ink and adhered the fish to the background using liquid glue. I added googly eyes using micro glue dots. Then I used foam tape to build up the walls to house four types of sequins and, after adding the front panel with acetate, my card is finished!

You have five more days to participate in this month's Stock Your Stash Challenge at Reverse Confetti which is all about Birthdays so I invite you all to play along for a chance to win. All you have to do is make a birthday-themed card using Reverse Confetti and link up HERE. The winner will be chosen randomly from all entries to win a $20 gift certificate to shop at Reverse Confetti!

Thanks so much for stopping by!

Supplies

Wednesday, May 19, 2021

VIDEO | Taylored Expressions | Theater Fold -- Interactive Birthday Card

Hello, crafty friends! I'm so excited to present my new Taylored Expressions tutorial on the new and super innovative Theater Fold Frame Die! You've probably seen a lot of design team samples and also Taylor's video on this new interactive concept but there are so many ways to use this die and I provide lots of tips and ideas for using this die.


Some of the products designed to work with the Theater Fold Frame Die include the Oh My Word - Happy Birthday stamp set and Bitty Borders stamp set and coordinating dies. There are two other stamp sets with hello and thank you themes and they all coordinate with the images from Bitty Borders.

The Oh My Word - Happy Birthday stamp set is sized to fit perfectly in the window of the Theater Fold Frame Die and you can see that it can also accommodate a secondary sentiment from the same stamp set, or even a smaller one from Bitty Borders, even though you're most likely to stamp those on the inside of the card.


I ended up heat embossing my main sentiment with black twinkle embossing powder to add impact and the all-important wow factor. I love how perfectly it fits together and splits apart in that window!


On the inside, I used the Rectangle Masking Stencils and the Cloud Stencils to create the background and wings of the theater. It's another little detail that sets this card apart from regular cards. Of course, you can leave this plain or get as creative as you like with both stencilling and patterned paper!


I used two of the adorable images from Bitty Borders and coloured them with Copic markers. You can watch me colour them in the video and I've listed all the colours in the supply links below.


After die cutting the coloured Bitty Borders images, I used their coordinating dies to create a shadow from black glitter cardstock. This helps them stand out from the cloud background, as well as each other.

For a limited time, you can purchase the Theater Fold Starter Bundle, which is a steal at $46 since the Theater Fold Frame Die itself is $38. The start bundle provides you with all you need to make at least two Theater Fold cards! I promise you'll be addicted once you get started. ;)

Thanks so much for watching!

Supplies

Tuesday, May 18, 2021

Spellbinders | May 2021 Clubs Inspiration Blog Hop + Giveaway

I'm thrilled to be part of the Spellbinders May 2021 Clubs Inspiration Blog Hop! You should've arrived from Jenny Colacicco's blog and I have the full list of participants below. There are also details on the generous giveaway so be sure to read 'til the end. For this hop, I've combined the Small Die of the MonthLarge Die of the Month and Clear Stamp of the Month! They're all so amazing and work marvelously together.


I started by using the small bar die from the 
Small Die of the Month and cutting it from Audrey Blue, Green Apple and Lemon Chiffon cardstock. I cut two of each colour and also six additional die cuts from Neenah heavyweight so I could stack them two high using liquid glue. The fine tip nozzle on the Bearly Arts glue is perfect for intricate dies like this.


I set aside those layers to dry under a stack of large acrylic blocks. Then I die cut the flower and two leaves from 
Large Die of the Month using black cardstock and embroidered those with coordinating threads. I used 1/8" Scor-Tape on the back to keep the loose threads and knots from coming undone and peeking out from behind the edges of the die cut. Then I layered those finished pieces on a second black die cut.


Next, I trimmed a piece of ivory cardstock, stamped the sentiment from the Clear Stamp of the Month and heat embossed it with clear embossing powder. Then I carefully lined up all the coloured die cuts and used liquid glue to adhere them to the panel.


I attached the ivory panel to a white linen card base and popped up the flower and leaves with small foam squares. To finish, I used a jewel picker to insert tiny pearls in the die cut strips that coordinate with the coloured cardstock.


I hope you enjoyed today's card combining the 
Small Die of the MonthLarge Die of the Month and Clear Stamp of the Month! You have until May 24, 2021 to subscribe for these particular kits. Don't forget to check out the Spend $100+ and Get $25 Promotion going on now!

HOP ALONG!

Spellbinders Blog
Becca Feeken
Tina Smith
Desiree Kuemmerle
Sandi MacIver
Bibi Cameron
Annie Williams
Becky Roberts
Yasmin Diaz
Jennifer Snyder
Marie Heiderscheit
Jill Hilliard
Ilina Crouse
Dilay Nacar
Jean Manis
Rosemary Dennis
Norine Borys
Betty Wright
Jenny Colacicco
You are --->   Emily Leiphart   <--- HERE!
Natasha Vacca
Vera Yates
Amanda Stevens
Kathy Clement

GIVEAWAY

To celebrate this release, we are giving away a $50 gift certificate to 3 lucky blog readers – selected from the comments on our blog. Giveaway closes on Sunday, May 23rd, 11:59 pm MST. The winner will be announced in this blog hop post the following Tuesday. The winner is responsible for shipping cost, duties and taxes.

Please note, store credit (gift certificate) cannot be applied to Club Subscriptions. Store credit can be applied to shop past Club products, Club extras and regular releases.

Your next stop is Natasha Vacca and, if you wish, please head to the Spellbinders Blog to begin the hop. Thanks so much for hopping along with us!

Supplies

Monday, May 17, 2021

Catherine Pooler Designs | You're the Greatest feat. *NEW* Beach Retreat Inks

I'm here to share a card combining two stamp sets that were added to the Catherine Pooler shop for Spring! First Place and Superlatives were originally part of the Deluxe Club Sursee Subscription in March 2021 but now they're available for individual purchase. I fell in love with them the moment I saw them and you'll see why they'll be getting a lot of use in my craft room!

For my colour palette, I used all four of the Beach Retreat inks along with Shea Butter, which goes incredibly well with the new blues and greens! I started by stamping three trophies from First Place in Tranquil, Cove Blue and Shea Butter. I just love how the coordinating dies cut out the space for the handles.

Next, I stamped the laurel leaves for the Shea Butter trophy in Bay Breeze and the laurel leaves for the other two trophies in Sea Glass. The row of three stars is from First Place and the single large star is from  Superlatives. I stamped those using watermark ink and heat embossed them with WOW metallic gold embossing powder.

To create the background, I used the GREATEST word die from First Place Dies to die cut it six times in random places from the front panel. On a slightly smaller panel, I used blending brushes and all six ink colours including the Beach Retreat inks and Shea Butter to add colour behind the die cut words.

After I stamped the sentiment on the Shea Butter trophy, I also used the tiny bubbles image from Good Times Bits and Borders to add black dots behind the ends of the GREATEST cutouts. Then I attached both panels to the card base and popped up the trophies on the card. To finish my card, I used two strands of metallic gold thread and added little bows underneath the heat embossed stars.

Be sure to check out the Waves of Happiness release which coordinates beautifully with the Beach Retreat inks!!

Thanks so much for stopping by and happy shopping!

Supplies

Sunday, May 16, 2021

Reverse Confetti | May 2021 Stock Your Stash Challenge: Birthday


Hello, crafty friends! This month's Stock Your Stash Challenge at Reverse Confetti is all about Birthdays so I invite you all to play along for a chance to win. All you have to do is make a birthday-themed card using Reverse Confetti and link up HERE. The winner will be chosen randomly from all entries to win a $20 gift certificate to shop at Reverse Confetti!


What originally started as an A2 shaker card turned in this slimline card, featuring Punny Party, Have Your Cake and the Hooray gift with qualifying purchase! If you enjoyed my first card featuring Have Your Cake, you'll understand my desire to make another one in similar fashion with solid cake layers and gold embossing.

As always, I started by picking my colours for the cake layers and I used Melon Ice, Mint To BeTranquil (*NEW* colour) and Sweet Sixteen. I stamped each of the colours multiple times, in both solid layers and patterned layers. Then I added the gold embossed details on some of the solid layers.

For the baby elephant, I used the ink-to-paper technique on white linen cardstock using Tranquil for the elephant and Melon Ice for the balloon. Once dry, I fussy cut the pieces and glued them on to a white die cut. I love that the Tranquil ink colour works so well for the elephant. This colour has quite a chameleon effect and can appear to be blue, grey or purple, depending on the other colours it's paired up with. I love that!

To finish, I heat embossed the large bubble sentiment twice in white on black cardstock. Then I stamped the scripted sentiment from Punny Party so it ties in with the elephant. I think this is such a fun design and would make a great birthday card for a kid or an adult but I think an adult would enjoy it more. ;)

Thanks so much for stopping by and don't forget to play along HERE!

Supplies

Friday, May 14, 2021

Spellbinders | May 2021 Large Die of the Month + Promotion!


Yay, it's finally Friday! Today, I'm sharing another card featuring the May 2021 Large Die of the Month and this time I used the largest two of the seven dies included in this month's club kit. This month's stitching die gives April's Small Die of the Month a run for its money but I'm in love with both! I also used the Spellbinders May 2021 Clear Stamp of the Month for the sentiment. 


I started by die cutting the stitching plate from Neenah heavyweight 110lb cardstock. I chose six colours of embroidery floss, including three shades of coral/peach for the biggest flowers. I also included pale yellow for the smallest flower/wishes, pale mocha for the largest flower centres and mint for the leaves.


It's easiest to complete all the embroidery for each colour and move on to the next. I completed the flowers first, then embroidered the centres, and finished with the leaves and stems.


I loved the way the Bazzill butter mints cardstock looked behind the white panel with these colours so I used the largest frame die to cut the Bazzill butter mints cardstock panel. Then I stamped the sentiment from Spellbinders May 2021 Clear Stamp of the Month with Versamark watermark ink and heat embossed it with gold embossing powder.


I used 1/8" Scor-Tape (perfect for the width of the frame) and mini glue dots (behind the flower centres closest to the sentiment) to secure the embroidered panel on to a second die cut, then I attached it to the sentiment panel and, finally, a white linen card base. Please note that the dimensions of this card are 4.25" x 5.625", which is 0.125" or 1/8" taller than the standard A2 card.


Be sure to take advantage of the current promotion at Spellbinders. You get $25 off orders of $100+ after discounts/coupons, PLUS free U.S. shipping! Discounts will be automatically applied at checkout, if the order qualifies. This promotion runs through May 18, 2021 11:59 p.m. MST.

Thanks so much for stopping by and happy shopping!

Supplies