Tuesday, March 29, 2022

VIDEO | Taylored Expressions | Celebrate You Cardmaking Kit


Taylored Expressions has a new cardmaking kit and it's a fun one! This kit is filled with supplies for shaker cards to celebrate all sorts of occasions, including birthdays, anniversaries, graduation, retirement and more. I used everything included in this kit at least once to show you a wide range of design possibilities.


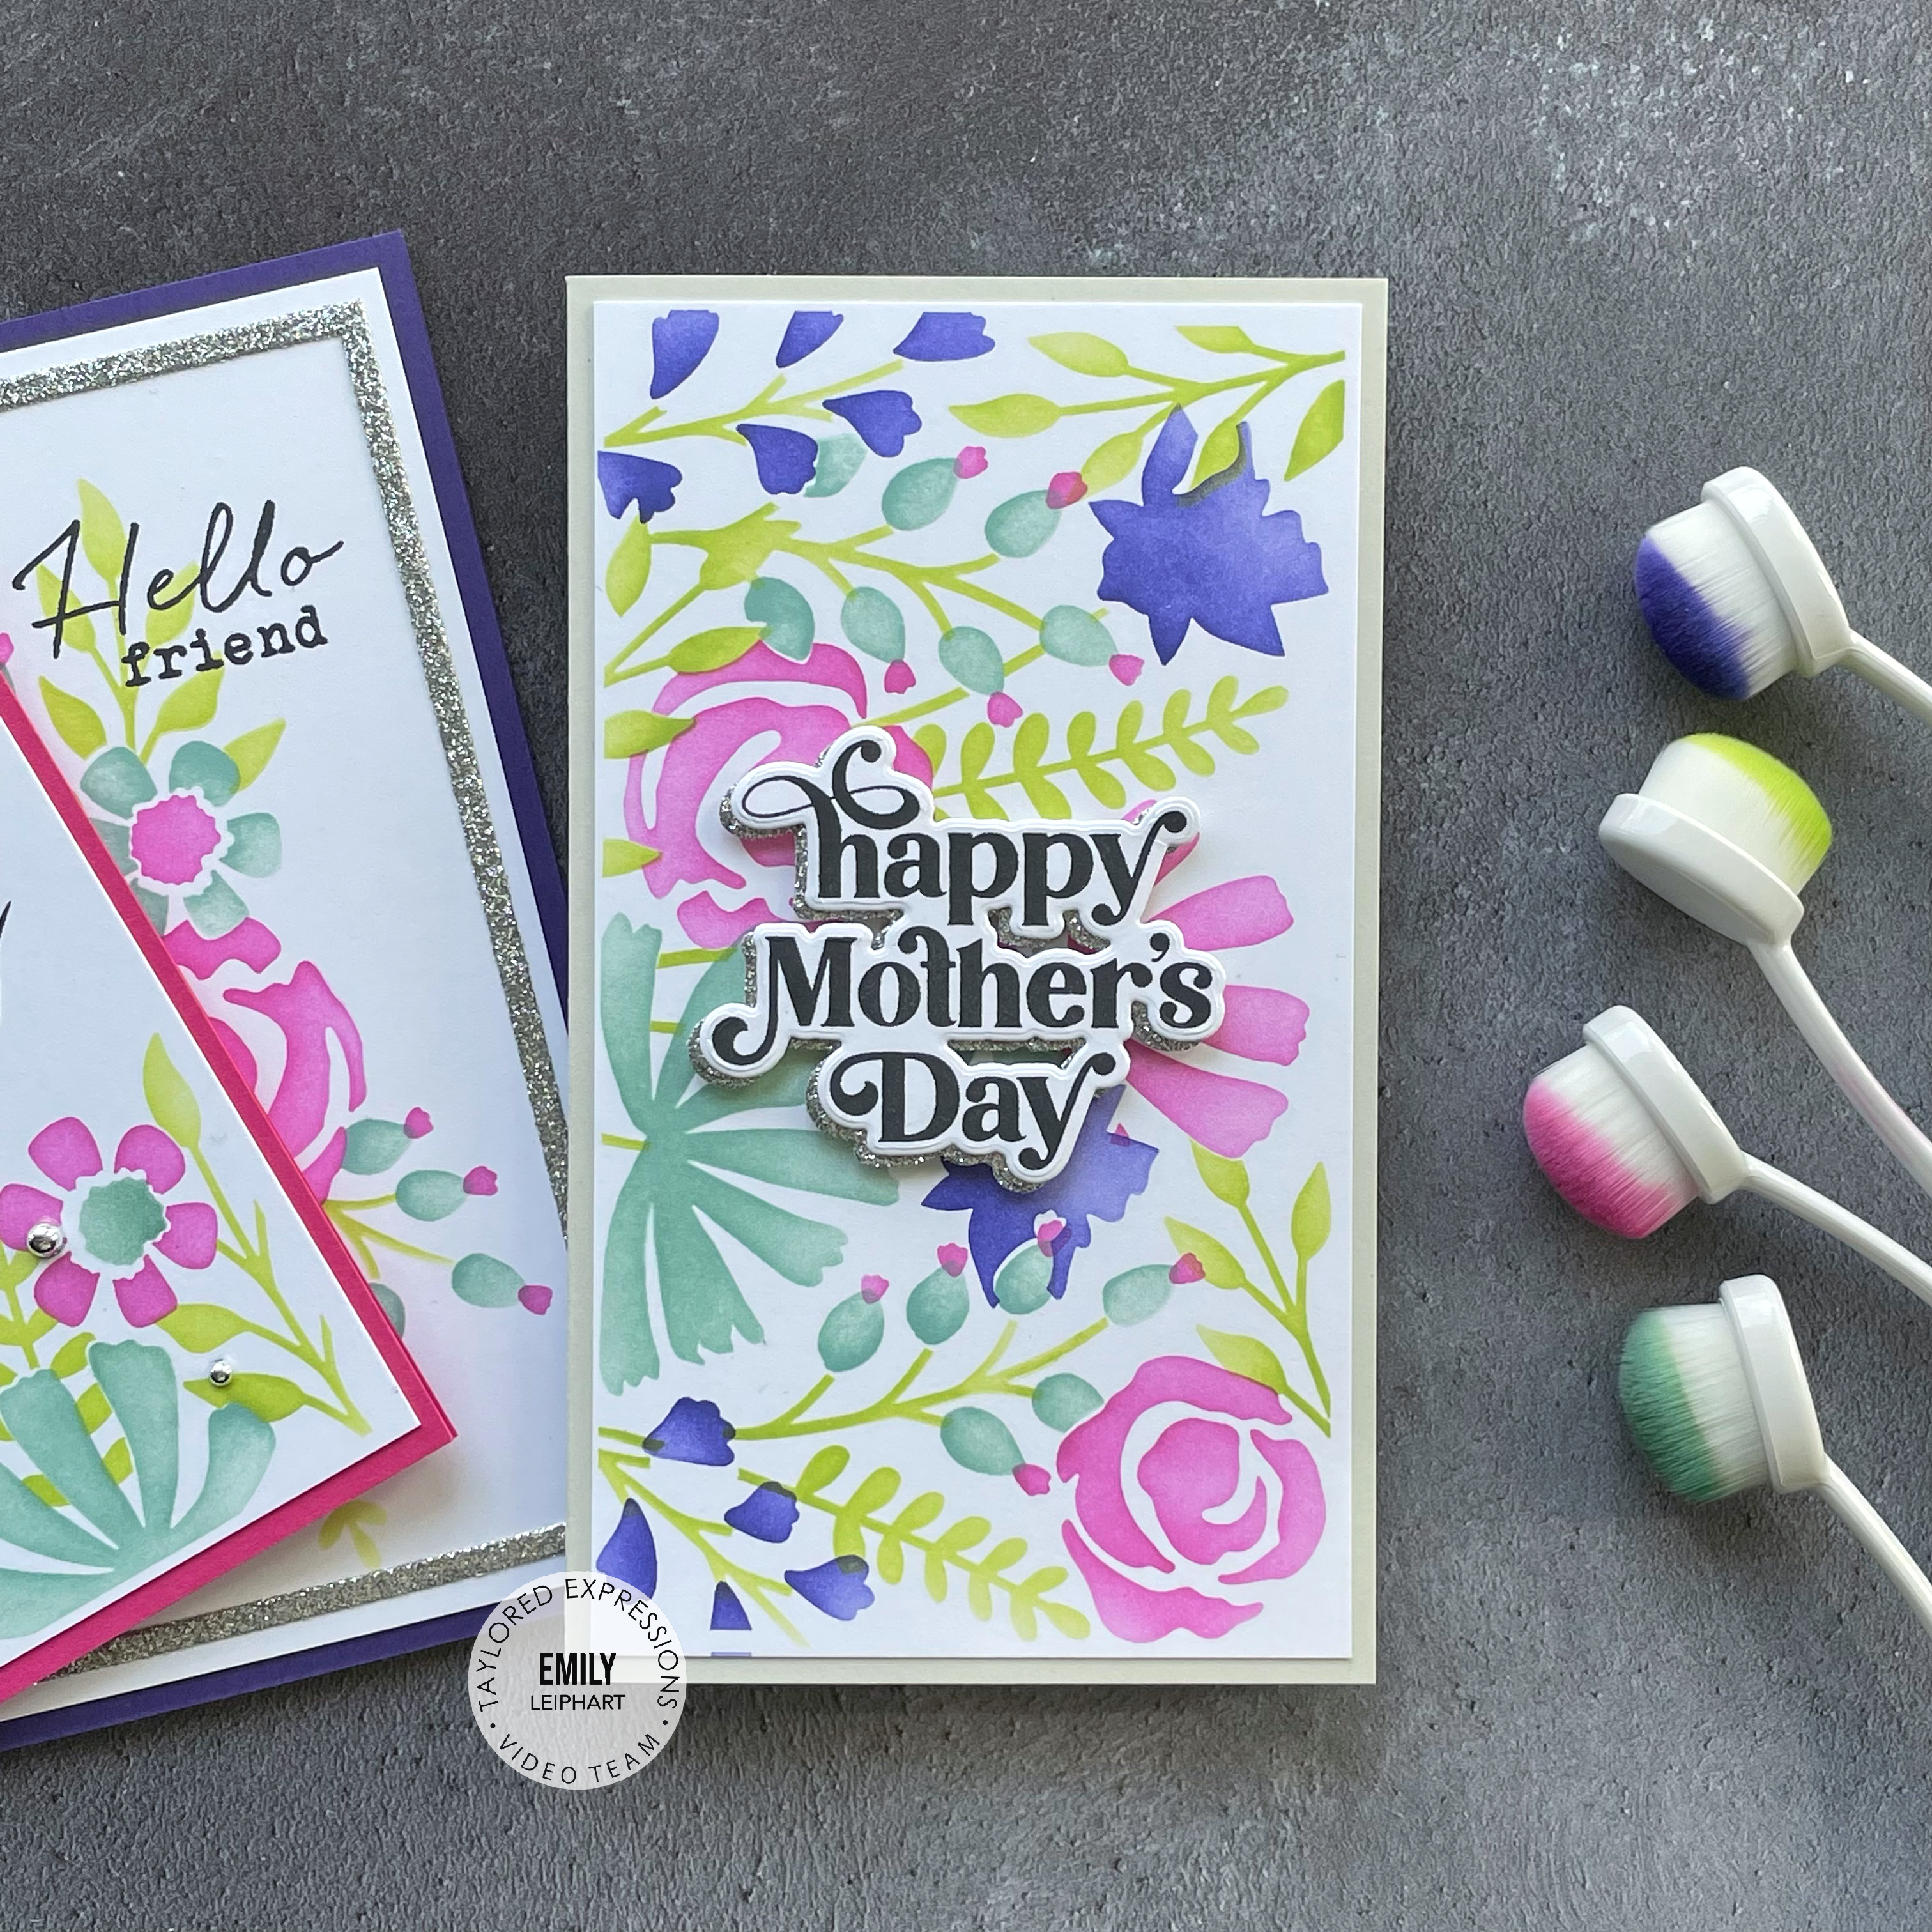
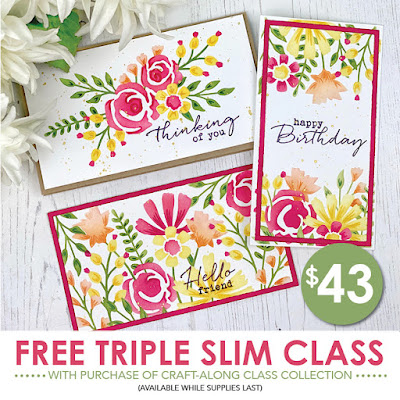
I used the envelopes included in the kit as my colour inspiration and these include Lollipop, Candy Corn, Lemon Meringue, Key Lime and Plum Punch. I made four cards, two packed with colour and two with simpler designs and lots of white space.


This first card uses the Let's Celebrate You Background and the A2 Infinity Shaker Panels. I inked up the background stamp with LollipopCandy CornLemon MeringueKey Lime and Plum Punch ink cubes to create a rainbow sentiment. 


I also used the Diagonal Stitch Rectangle Stacklets to create a border around the sentiment. Then I added Confetti Shaker Bits to finish. I imagine the recipient will have lots of fun shaking this card over and over!


For my second card, I stamped the Mini Strips - Let's Celebrate in both Oreo and Sugar Cube ink, then heat embossed with white embossing powder, all on Sugar CubeLollipopCandy CornLemon MeringueKey LimePlum Punch and Oreo cardstock. The mini strips were cut from the new Mini Strips - Flags Die, sold separately. I selected sentiments in rainbow order to create a longer sentiment that reads well and adhered them with foam strips.


The two panels were cut from Sugar Cube and silver glitter cardstock using the Petite Scallop Rectangle Stacklets and the Stitched Rectangle Stacklets, respectively. I also added a few stars in coordinating colours, cut from the Confetti Maker Die.


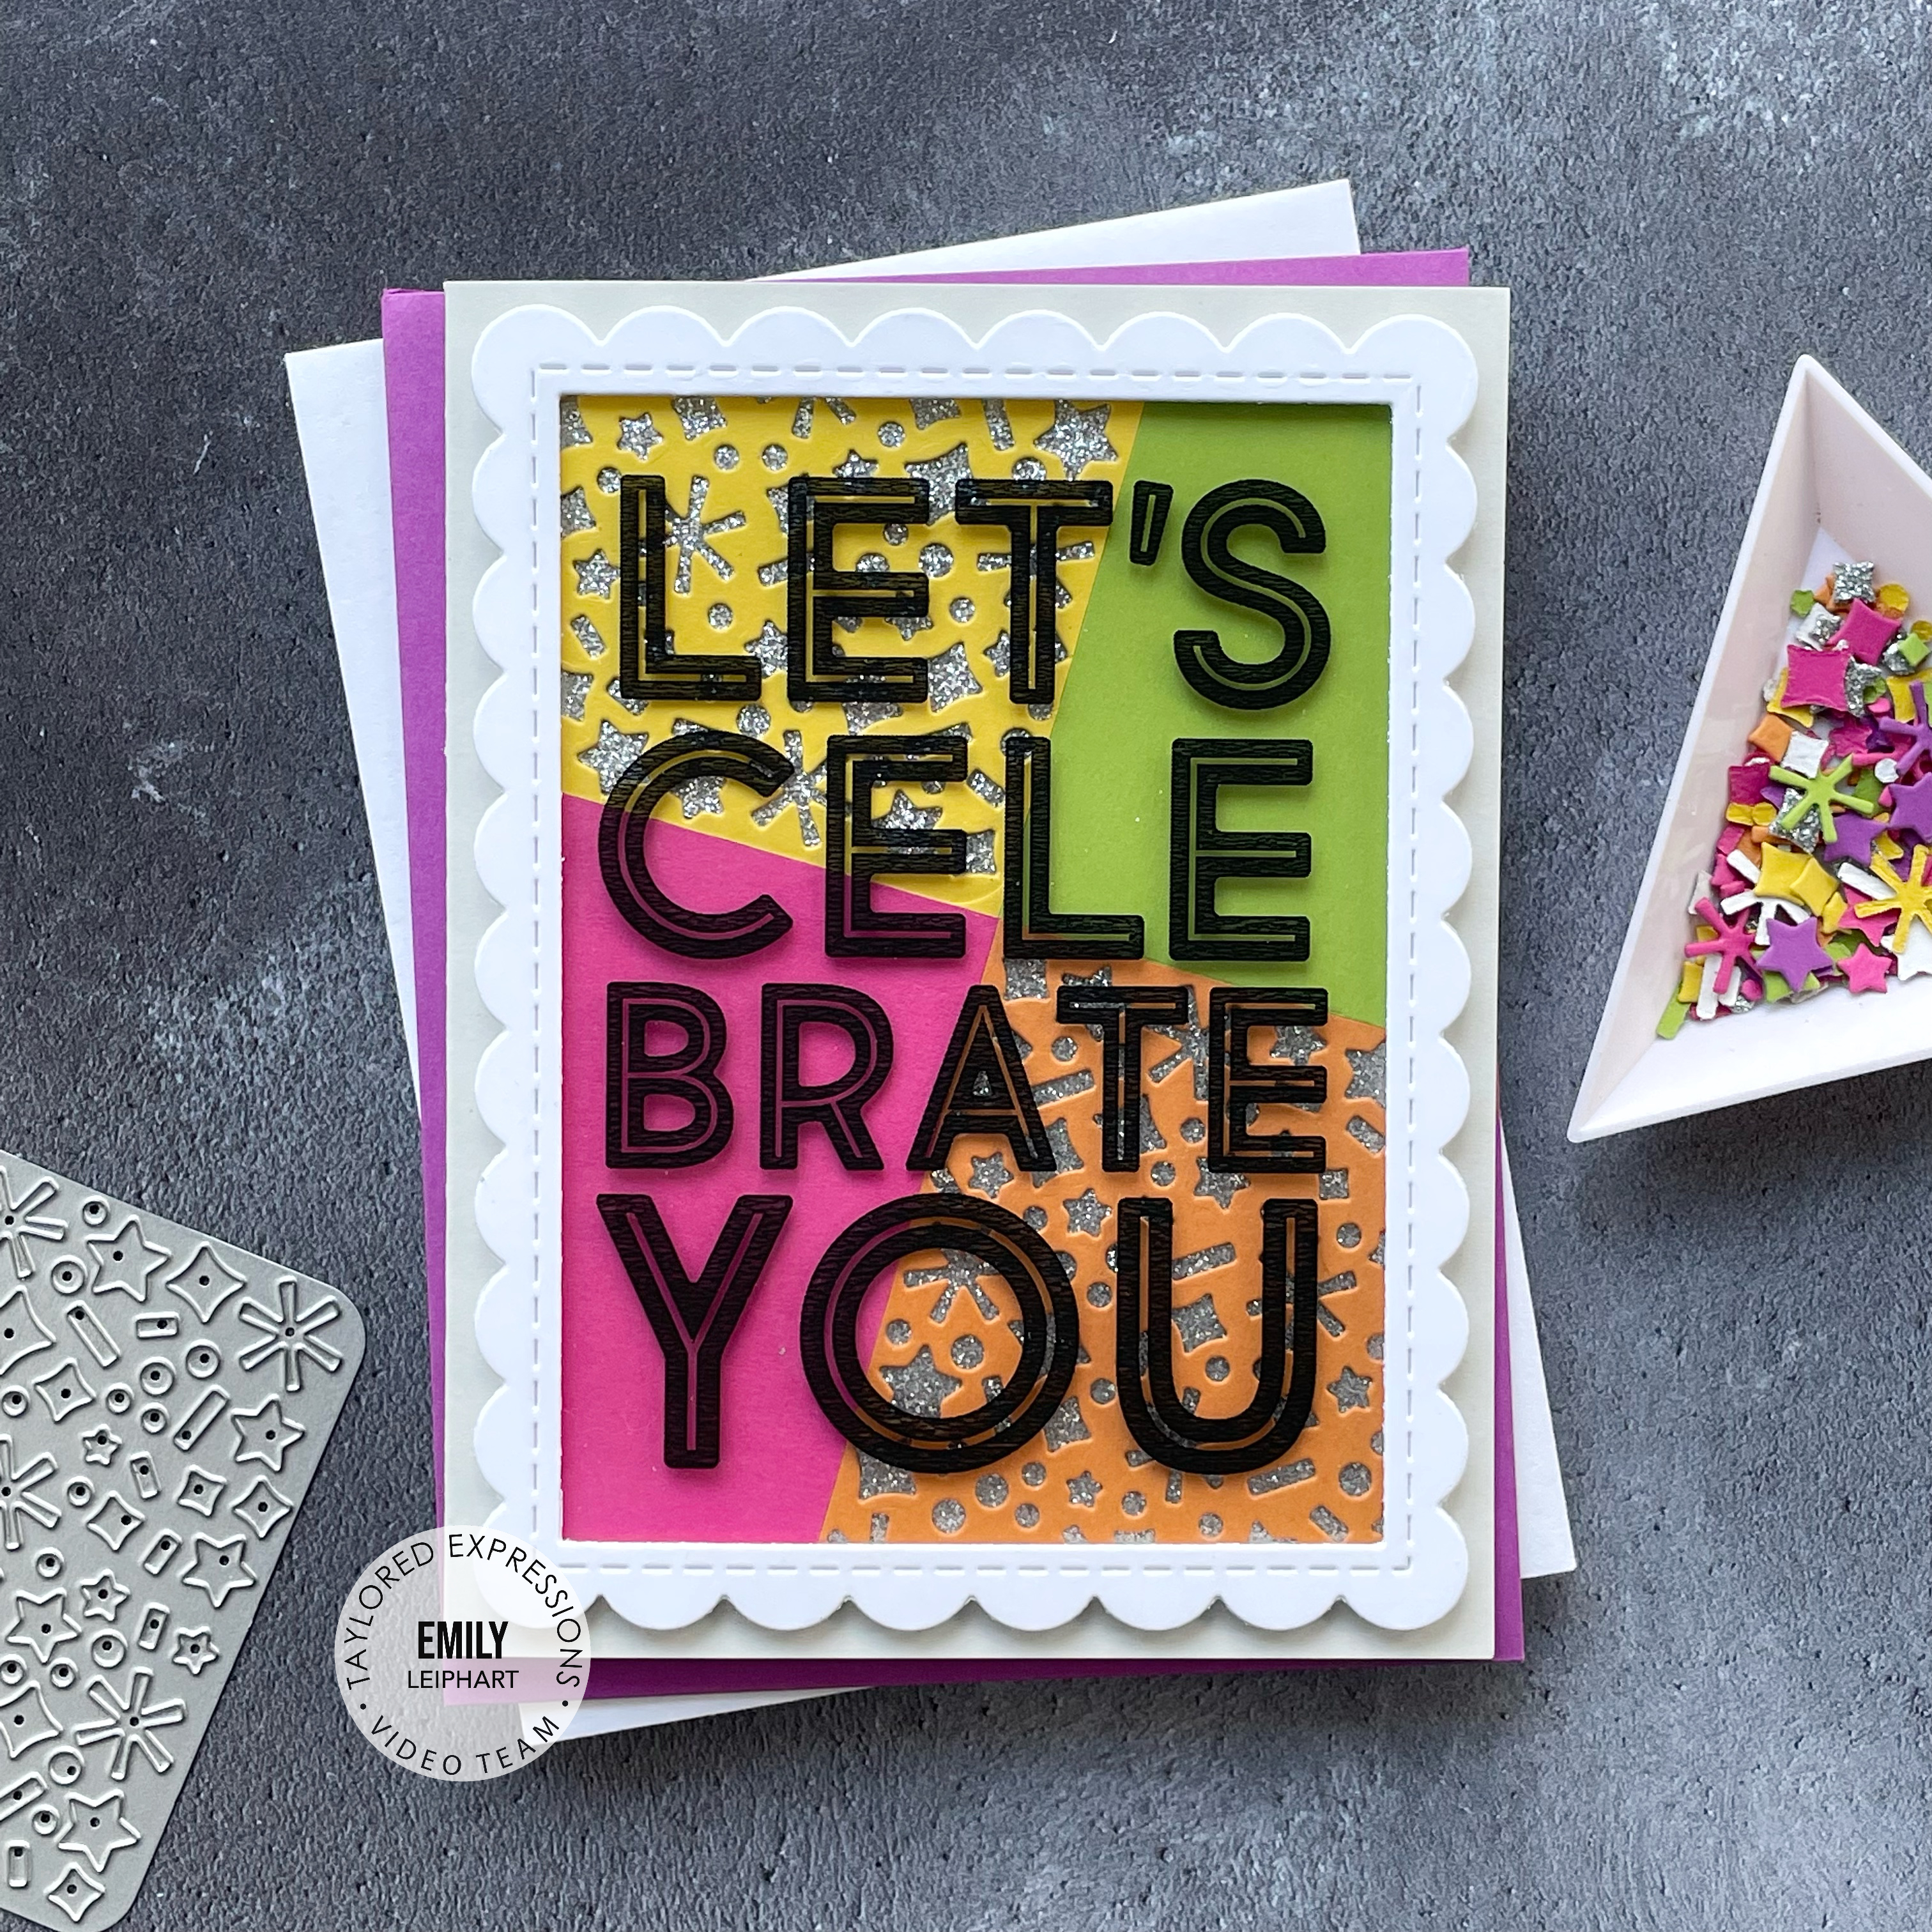
While I'm a huge fan of the previous card, this third card is definitely my favourite. I created an angled panel for the background using four pieces of LollipopCandy CornLemon Meringue and Key Lime cardstock. I taped them together before using the Confetti Maker Die on two of the panels, which I backed with silver glitter cardstock for added bling.


I created a Sugar Cube frame using the Frame in Frame 2 Cutting Plate before adhering one of the Acetate Foil It - Let's Celebrate You Panels, and popping that up with foam strips before attaching it to the angled background panel and the Sea Salt card base.


My final card is another clean and simple design, using one of the Celebrate You Envelope Seals as the sentiment and focal point. I cut LollipopCandy CornLemon MeringueKey Lime and Plum Punch cardstock using the Easy Strips 1/8" and Easy Strips 1/4" dies.


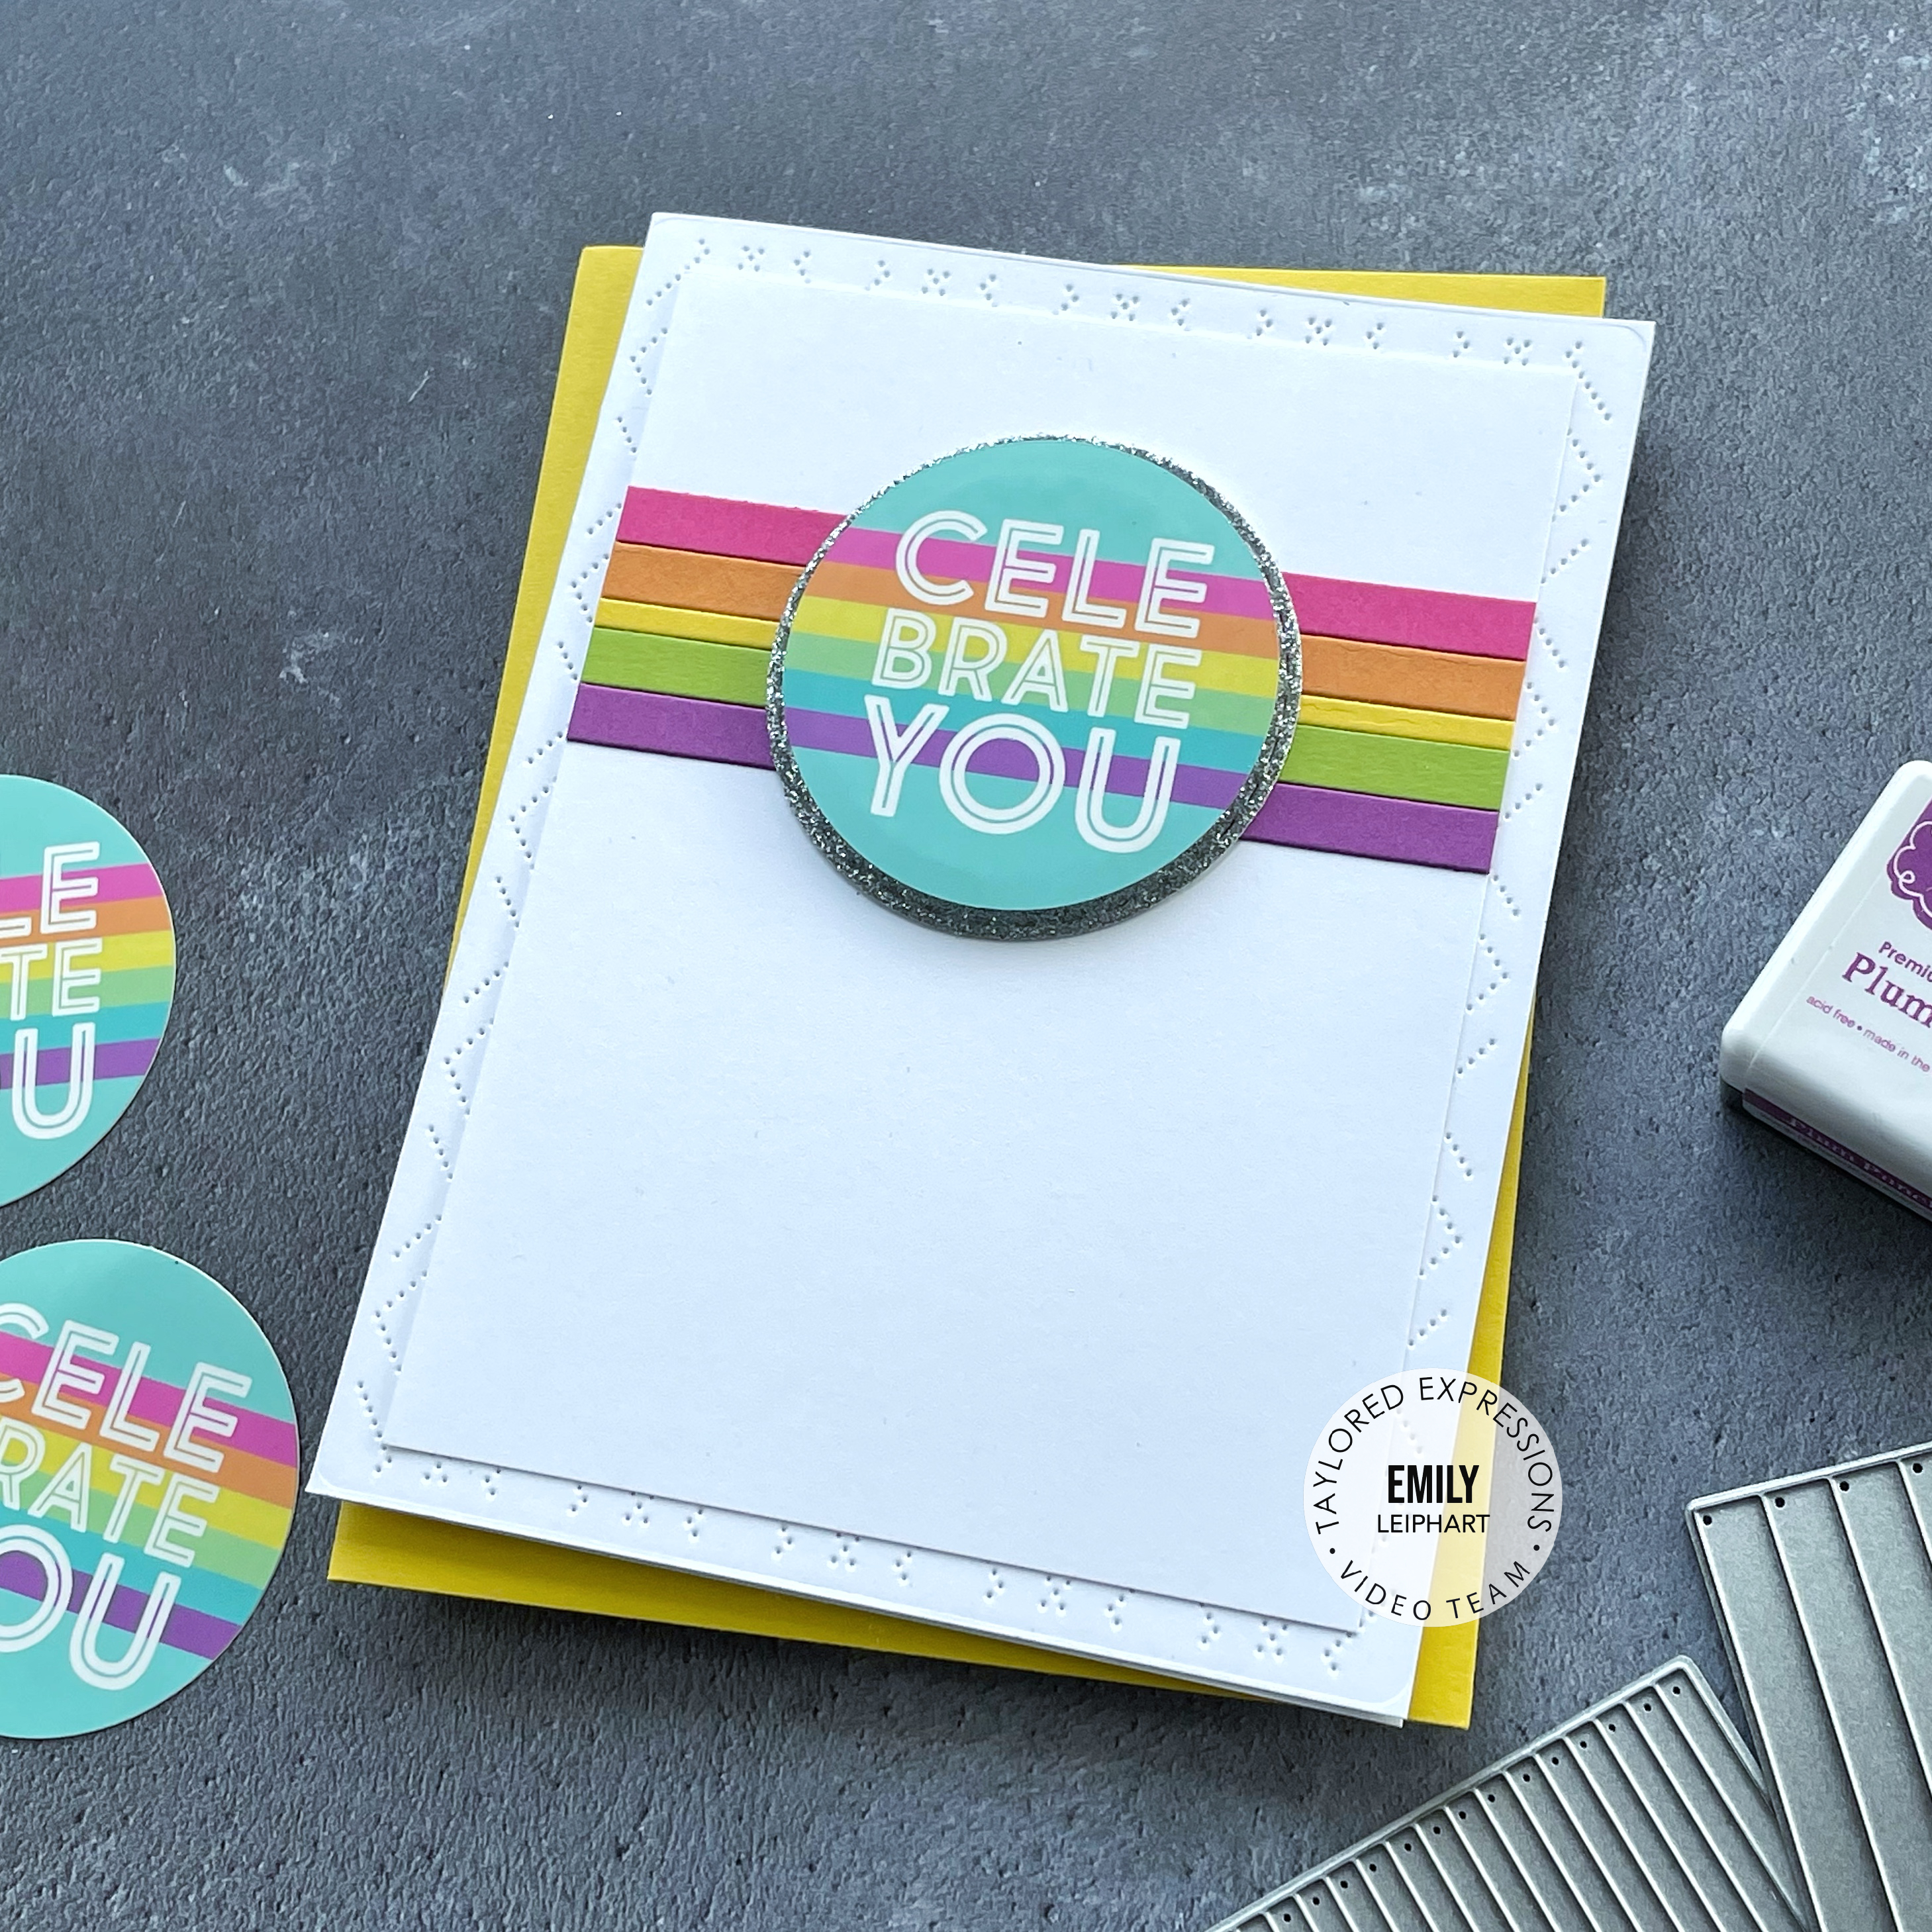
Using the Stitched Circle Stacklets, I cut a circle from Sugar Cube cardstock and adhered it to the back of the envelope seal for stability and popped it on to a slightly larger circle cut from silver glitter cardstock. To create additional detail, I used the Diamonds Piercing Plate on the card base before adhering the panel and popping on the envelope seal with foam tape.


There are some new rules for this year's kits. Individual items will no longer be sold individually at a later date nor will kits be restocked. For these reasons, if you see a kit you love, grab it before it's gone!


I hope you'll be inspired to use my design ideas with similar products listed below. I've also included a list of my videos featuring other Mini Strips HERE:

Thanks so much for watching!

Supplies


Friday, March 25, 2022

Concord & 9th | Flower Power Release | Feature Friday Week #3 + Giveaway!


I'm back to share more inspiration for Concord & 9th's Flower Power Release! In this third and final week, I'm sharing two cards featuring the Simply You Bundle and the Magnolia Messages Bundle. I'm also giving away one $25 gift certificate so please be sure to read 'til the end for details.


My first card features the Simply You Bundle and I started by stamping the background image from the Simply You stamp set in Ballet Slipper ink. I then cut out a mask for the tiny tulip and stamped a shadow image behind each existing tulip using Stardust ink.


I used the coordinating scalloped frame from the Simply You dies and stacked it two-high. I stamped the word 'miss' in Midnight ink and also die cut two layers of the word 'you' from Midnight cardstock. 


Since this is a very clean and simple design, I added a panel cut from the Stitched Vines Card Front and trimmed down to 4" x 5.25" to show the Dove cardstock base. I'm completely obsessed with the Stitched Vines Card Front and want to use it on every card! It adds so much detail without overwhelming the overall design.


I already shared the small floral die from Magnolia Perfect Pairings in my second card for Week #1 so my second card for this week features the large floral border. This border is absolutely stunning and I knew I wanted to cut it up with different colours of cardstock to create a fresh, spring look!


I started by die cutting the border from white, Buttercup, Sprout, Parsley and Clover cardstock. I used the white base to glue the pieces from the four colours. I used my scissors to snip sections from each colour, starting with colours that would be at the base so the consecutive colours would overlap.


I used Sprout for the small, solid leaves; Parsley for the detailed magnolia leaves; Clover for the small posies; and Buttercup for the magnolias. For more details, I added white flowers using the Friendship Garden dies. To finish, I stamped a sentiment from the Magnolia Messages stamp set using Mushroom ink.


GIVEAWAY
Concord & 9th is sponsoring one $25 gift certificate on this post. Please leave a comment here and/or on my two corresponding Instagram posts (HERE and HERE) by 11:59pm EST on Sunday, March 27, 2022. You must be following me @emily.leiphart and @concordand9th. The winner will be selected randomly on Monday, March 28th and be notified by email or direct message.

Thanks so much for stopping by!

Supplies

Wednesday, March 23, 2022

Concord & 9th | Flower Power Release | Bonus Feature Day Week #3


I'm back to share more inspiration for Concord & 9th's Flower Power Release! In this third week, we're posting twice. For the first of two posts this week, I'm sharing a card featuring the Grateful Blooms Bundle and Stitched Vines Card Front Die.


In last week's post, I made a card using the scalloped circle and doily from the Grateful Blooms Bundle so I wanted to focus on the smaller stamps this time. I also wanted to use the other sentiment since it's a two-part sentiment with a completely different feel. I love that both sentiments have coordinating dies.


First, I chose my colour palette for this design which includes Poppy, Sorbet, Grapefruit and Sea Glass. The neutrals I added are Dove and Mushroom. I started by cutting an A2 panel and die cutting it with the Stitched Vines Card Front Die. I trimmed it down to 4" x 5.25" and attached it to a white card base.


Using the MISTI stamping tool, I stamped the four small images with PoppySorbetGrapefruit inks. I stamped the large sentiment with Mushroom ink and die cut it a second time from Poppy cardstock. Then I heat embossed the small sentiment with white embossing powder on Mushroom cardstock. 


I arranged the sentiment and all of the die cut leaves on the panel before popping them on with foam tape. Then I added Dove and Mushroom enamel dots in three sizes to fill in some of the remaining space. I love the way they look like little pebbles between the leaves.


I'll see you again on Friday with more inspiration featuring products from the Flower Power Release. Thanks so much for stopping by!

Supplies

Tuesday, March 22, 2022

VIDEO | Taylored Expressions | In the Garden Triple Slim Layering Stencils

I just know that these new Triple Slim Layering Stencils are flying off the shelves because they're pure genius and absolutely gorgeous! If you're a fan of the Create-in-Quads Layering Stencils, then you're sure to fall in love with these. I'm thrilled to be introducing In the Garden Triple Slim Layering Stencils, the first of the Triple Slim series. These work exactly like the Create-in-Quads but result in three mini slim cards, as opposed to four A2 cards.


As with all of the Create-in-Quads Layering Stencils, each of the three panels has a different layout. I used the same four ink colours for this project - Lollipop, Lime Zest, Spearmint and Eggplant. I used the Bitty Blender Brushes here but the original Blender Brushes would work well, too.


My first card features the fully-stencilled panel, which I attached to a Sea Salt card base. I stamped the Get the Word Out - Mother's Day sentiment with Oreo ink on Sugar Cube cardstock and die cut it using the coordinating die. I cut the die a second time from silver glitter cardstock. I popped on the sentiment with foam strips.


This second card is my favourite of the bunch and it features the a stencilled bouquet. I attached the panel to an Eggplant card base and die cut a silver glitter frame using the Mini Slim Thin Frame Cutting Plate.


I used the third largest frame from the Mini Slim Thin Frame Cutting Plate and removed a section on the top left side so it wouldn't cover the stencilled image. The result is a modern, refreshing design. The sentiment on this card and the next card are from the Signature Sentiments stamp set.


Signature Sentiments is a must-have because it combines my favourite mix of classic typewriter and scripted fonts. There are 10 sentiments that cover a huge range of occasions. All of the longer sentiments fit nicely in that empty space on the third stencil, framed by the two sections of gorgeous flowers. I used a Lollipop card base here and embellished the flowers with silver drip drops.


Taylor and Heather are teaching a FREE Triple Slim Class and it's available to you if you purchase the In the Garden Triple Slim Layering Stencil and Signature Sentiments stamp set together, using this link HERE or by clicking on the image below. Purchasing the two items individually will not get you the free class. You need to click on the In the Garden Craft-Along Class Collection. This offer is only valid through March 27th or while supplies last.

Thanks so much for watching!

Supplies

Monday, March 21, 2022

Pigment Craft | Happy Spring Card


Happy Spring! I hope you all had a wonderful weekend ringing in Spring! Even though we had a bit of rain and fog, I was happy it was fairly mild. I can definitely feel that spring is coming and it's the perfect time to share a spring card using more products from Pigment Craft's March 2022 Release!

This card uses my favourite set from the release, Spring Basket with must-have coordinating dies, and I say that loosely because it's so hard to choose a favourite. However, I do see myself using this set year round which is why it's at the top of my list. Of course, you can't have spring without these gorgeous eggs from the Eggcellent stamp set.


I stamped the basket with Monstera ink and the ribbon with Tajine and Blush. The five eggs were stamped with BlushTajine, TurmericLagoon, Juniper, Ficus and Monstera. I really loved seeing all these colours come together on the floral eggs! I attached all the eggs together with a combination of liquid glue and glue dots. I then glued the basket on top of the eggs and attached the ribbon with glue dots. I stamped the sentiment in black before popping the assembled basket on to the Dashed Diamonds II Cover Plate with foam tape.

If you missed my previous post featuring more of Pigment Craft's March 2022 Release, be sure to check it out HERE or by clicking on the image below.


Thanks so much for stopping by!

Supplies

Sunday, March 20, 2022

Pigment Craft | Anniversary Card + March 2022 Release Review and Ink Refresh Video


Today, hubby and I are celebrating our 18th wedding anniversary. It's hard to believe all these years have gone by but we've had some fabulous years, the most amazing son and so many fond memories - from meeting in Indianapolis, having our first date in Italy, getting engaged in London, England, getting married in San Diego and making Toronto our current home. Before I get into the card I made for my husband, I wanted to share the video I posted yesterday.


Pigment Craft's March 2022 Release is a big one, filled with all things fresh and fun, not just for spring and Easter but year-round essentials, too! In my video, I give you a close-up look at all of the release products, as well as review both ink releases so you can see all 21 scrumptious ink colours which are now back in stock.


My card features three new stamp sets and three new die sets, plus six ink colours. The large hearts with flowers and the sentiments are from the Hole In My Heart stamp set, the flower stamps are from the Hold In My Heart Fillers stamp set, the small hearts are from the Printed Heart stamp set, and the frame is from the Nested Postage die set.


The flowers can be cut straight out of the heart with a border to create a shaker, or without a border for a more intricate look. Both these die options come with the Hole In My Heart Fillers die set. I inked up the large hearts with Aloe ink, stamped the stems with Monstera and filled in the leaves with Lagoon. I stamped the flowers with Rosewood ink, filled the centres with Turmeric and added highlights with Blush.


The small hearts were stamped with Monstera ink and I layered them with silver glitter cardstock for a bit of sparkle. I determined my layout before gluing the Nested Postage frame and stamping the 'love you' in Rosewood ink. The rest of the pieces were popped on with foam tape, I trimmed off the tip of the heart at the bottom and my card was complete.

Thanks so much for stopping by!

Supplies

Friday, March 18, 2022

Concord & 9th | Flower Power Release | Feature Friday Week #2


I'm back to share more inspiration for Concord & 9th's Flower Power Release! In this second week, I'm sharing cards featuring the Stitched Vines Card Front Die and the Friendship Garden Bundle.


On my first card, I created a background panel from four pieces of Honeysuckle, Dove, Sprout and Aqua Sky cardstock, which was cut into quarters on an angle and then pieced together before the panel was run through the die cutting machine with the Stitched Vines Card Front Die.


I used the Grateful Blooms Bundle to create the centrepiece and sentiment. I die cut the scalloped circle from Mushroom cardstock and overlaid it with the doily which was cut from vellum cardstock. I also cut the doily from cardstock matching the colours in the background panel and inserted the corresponding hearts. 


I stamped the sentiment with Mushroom ink and cut it using the coordinating die. I popped it on to the vellum doily using foam tape. Then I used Mushroom enamel dots to help hold the vellum piece in place.


My second card is a 3.5" x 6" mini slim card which features the Friendship Garden Bundle, which is hands down my favourite of this release. I just love all these beautiful layering dies which make the cutest little garden pieces that will perk up any card!


I used the same four colours as my first card -- HoneysuckleDoveSprout and Aqua Sky cardstock. I also added Mushroom and Silver Glitter cardstock to the mix because everything is better with a little sparkle!


To assemble this card, I made sure that three of the four main colours, plus silver, were represented equally on all of the images. I gauged their positions on the panel before stamping the sentiment from the Friendship Garden Stamp Set in Mushroom ink. Then I cut a panel of Aqua Sky cardstock and die cut it on the left side using the Stitched Vines Card Front before glueing both layers on the card base and popping up the die cut elements with foam tape.


Registration for C9 Summer Camp 2022 has begun and you can find all of the details HERE or by clicking on the graphic below!


I'll see you again next week with more inspiration featuring products from the Flower Power Release. Thanks so much for stopping by!

Supplies