Showing posts with label Hemptique. Show all posts

Sunday, August 18, 2024

Lunar New Year Challenge | The High Tops You've Always Wanted


Hello, crafty friends! I'm back with my second card for the August Lunar New Year Challenge and this one features products from our annual sponsor My Favorite Things. All four of our sponsors are giving away ONE $25 gift certificate each so that means there's a total of $100 in giveaways in August!


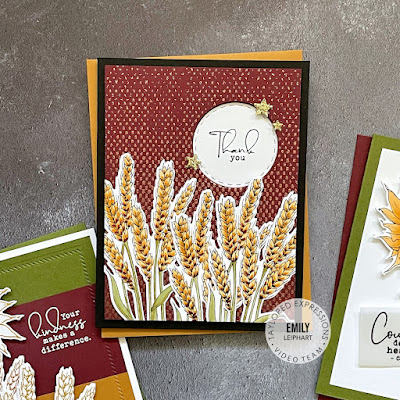
Today's card was inspired by THIS card created by my Challenge teammate Amy Tsuruta back in March. It took me a while to get my hands on the All-Star High Top dies from a local craft store but I couldn't wait to make these Chinese New Year high tops which I totally want for myself. Amy used a dragon on her high tops but I wanted to use flowers in Gold Hot Foil. I looked through my stash and the Flower Delivery bouquet was perfectly-sized.


I wasn't sure about all the black on this card but I think it balances the red, white and gold beautifully. Plus, high tops aren't high tops without the white sole and black piping. Did you know they sell customized versions where you can pick any colour you want for every panel? I used the Black and White Stripes 6x6 Paper Pack for the base panel and cut the vellum with the A2 Stitched Rectangle STAX Set 1 dies.


The sentiment from Celebrate Everything was stamped with VersaFine Clair Nocturne ink, then heat embossed with a combination of gold and clear embossing powder. I simply sprinkled gold embossing powder on the bottom before topping it off with clear embossing powder. To finish, I added stars cut from gold foil, glitter red and glitter black cardstock, then strung up the high tops with black cord.


The rules are simple. You must create a new Lunar New Year, Chinese New Year or a 2024 Dragon Birthday card and add the link to your post in the link-up party. Multiple entries are allowed. Backlinking to an older project is strictly prohibited.

Our August Lunar New Year Challenge will run from 12:00am EST on August 1, 2024 through 12:00pm EST on August 31, 2024. We would love to see you using products from our four generous sponsors! The four lucky winners will be randomly selected from all eligible entries and announced at the start of the September Challenge. 

(save and share with your project)

Visit the August Link-Up Party post HERE to see all of the design team projects and be inspired to create your own! When sharing your challenge entries on social media, feel free to save this badge and post it along with your project. Please tag us @lunarnewyearchallenge on Instagram and use the hashtag #lunarnewyearchallenge so everyone can find and be inspired by all your amazing projects.

If you're inspired, affiliate links are included below at no extra cost to you. Thanks so much for stopping by and I'll see you again soon!

Supplies

Thursday, February 17, 2022

VIDEO | Taylored Expressions | Easter Tags feat. Spring Squad Die & Clear Combo


Hello, crafty friends! I hope you're all well. We're heading into a four-day weekend here and I'm looking forward to chilling out and getting a lot of crafty deadlines met. If you loved the Snow Squad Die & Clear Stamp Combo, you're sure to love the new Spring Squad Die & Clear Stamp Combo from the Easter Release by Taylored Expressions.


I love these adorable springtime animals and look forward to mixing and matching them with the previously-released bear, penguin and snowman, even if they might not normally hang out in real life. LOL


I wanted to create tags that open up for a message so I die cut two each of the largest Pierced Tag Stacklets 2 Dies from Mint Julep, Sprinkles and Guava cardstock. I partially die cut the top tag to make it shorter in a design that would allow the sentiment to show at the bottom.


I die cut the Tag Reinforcements from the same three colours and rotated them so that all three colours would be represented on each tag.


Using Cherry Pop, Guava, Peaches 'n Cream, Pineapple, Potato Chip, Sugar Cube and Sea Salt cardstock, I die cut all the parts for each of the animals and used corresponding Peaches 'n Cream, Pineapple and Sea Salt ink and Bitty Blender Brushes to add depth and dimension to some of the larger pieces.


Before popping up the animals with foam tape, I die cut the Build a Scene - Rolling Hills from silver glitter cardstock. Then I heat embossed the Mini Strips - Easter sentiments on Poppy Seed cardstock and die cut them with the Mini Strips - Asymmetrical Die.


Be sure to check out the rest of the Easter Release and take advantage of the class with purchase and other freebies!


Thanks so much for watching!

Sources

Thursday, September 23, 2021

VIDEO | Taylored Expressions | Wheatfield Dreams Card Kit

I'm excited to share inspiration using the Wheatfield Dreams Card Kit from Taylored Expressions. I love the rich colours of this kit -- Mulled Wine, Honey and Sweet Basil. The gorgeous images illustrated by Lori Craig inspired three easy cards.

For my first card, I created a colour blocked background and added texture using the largest of the Diagonal Stitch Rectangle Stacklets. Then I added images that were ombre stamped with five different ink cubes -- Dijon, Honey, Mulled Wine, Avocado and Sweet Basil.

I stamped the sentiment with Sugar Cube ink and heat embossed it with white embossing powder. I adhered the images with foam tape at the top and liquid glue at the bottom.


My second card features three Copic-coloured sunflowers which are adhered with foam tape at the top and liquid glue at the bottom. To create the tag, I stamped the sentiment on vellum using black pigment ink and heat embossed it with clear embossing powder. Then I used the smallest of the Tag Stacklets 2 dies, using partial die cutting to shorten the tag.


For my third card, I heat embossed the burlap background using the copper embossing powder included in the kit. Then I cut a "moon" from the panel using the third smallest of the Stitched Circle Stacklets.


I added three Copic-coloured wheat images to the heat embossed panel with glue dots, trimming off the overhanging pieces before popping it on to the card base with foam tape. To finish, I added three small stars from the Gathered Stars Die, leftovers from my previous video.


I hope you're inspired to create with this kit! It's so inspiring for year-round thank you and encouragement cards. There are so many ways to use the beautiful kit ingredients and the possibilities are endless.


No doubt, this kit will be as popular as Lori's previous kits -- Field Notes and Field Notes 2 -- so be sure to grab one while you can! The September 2021 gift with $100+ purchase is a layering stencil set and it's so beautiful.


Thanks so much for watching!

Supplies

Wednesday, August 11, 2021

Catherine Pooler | Boho Fall Release Day!

Catherine Pooler's gorgeous Boho Fall Release is now available for purchase! I love making tags but always forget to make them so I made a set using the Painted Leaves Bundle, Give Thanks Sentiments and a plethora of older fall-themed sets.


I made one tag for each of the leaves in the Painted Leaves stamp set. For the layers, I used WOW! embossing powders in Rockin Red, Lavaburst and Sunburst. I used Rockin Red on the Mandarin Spice oak leaf, Lavaburst on the Orange Peel oak leaf and Clay Mask aspen/birch leaf, and Sunburst on the Catching Rays maple leaf. The details are so beautiful and vibrant!


I cut the tags from the Hearts-n-Tags dies and stamped the Light as a Feather Background in Tranquil and Cove Blue inks, then cut two tags from each to layer. I secured the two layers together with liquid glue before stringing white and black Hemptique cord. 


The smaller leaves stamped with Bay Breeze ink are from Love Grows Here and Autumn is Calling. The squirrel from Warm My Heart, bird from Love Grows Here, mug from Pumpkin Season, pumpkin from Hey Pumpkin, and all the sentiments were stamped with Merlot ink.


I varied the colours on all the other small elements, like the acorn, heart, and pumpkin stem and leaf. This ensured that the maximum number of colours were represented on each tag.


There are two layers of foam tape holding the elements on their respective tags. The first layer is the large leaf from Painted Leaves and the second layer is the group of additions from previously-released fall-themed sets. I love how well everything paired up with the Painted Leaves Bundle and Give Thanks Sentiments.


I have linked to all of my product supplies below and you can also click on the image below to head to the shop for all of the Boho Fall Release goodies and more!

Thanks so much for stopping by and happy shopping!

Supplies

Thursday, May 6, 2021

Reverse Confetti | May 8th Release | Countdown to Confetti Day 2

Hello, friends! I'm so excited to be joining the Countdown to Confetti with Reverse Confetti for their newest release. It's a big one because it's Reverse Confetti's 8th Birthday! There are 6 new stamp sets and 9 new die sets, plus there's the free stamp set with every qualifying purchase. There will be sneak peek posts every day until the release on May 8th. The full hop list and complete giveaway details are below so let's take a look at my projects!


My first card features the Beautiful Balloons stamp set and coordinating dies. I love these whimsical balloons and the florals in this set! Plus, the sentiments are so beautiful and you know how important fonts are to me! Both the balloons and the sentiments are large, which makes them totally perfect for clean and simple cards.


I time-travelled back quite a few years to a time when I used a significant amount of patterned paper in my card making. Boy, have I missed it! The only thing I'm missing is my sewing machine, which has not been in working order for about two years. I used beautiful papers from a retired paper pad called Stitched by Amy Tangerine, the same one I used for the border on yesterday's Father's Day card. I've listed three good alternates in the supply links below, if you'd like to give this design a try!


I started by choosing the patterns for the accent trip and the main panel, which are ombre striped peach and mint cloud patterns. Then I chose three bold and contrasting patterns for the balloons, which are chevron yellow, love red and speckled white. I used more subtle washes in coordinating colours to paper piece the bouquet on the balloon.


I layered the patterned balloons on heavyweight cardstock to keep them sturdy, especially since I was tying white hemp cord strings to their bases. The sentiment and paper pieced bouquet were stamped using grey pigment ink. The yellow chevron balloon was attached flat to the panel and the red and white balloons were popped up on foam tape. I used glossy accents to secure the strings to the panel.


My second card features the ultra fun Have Your Cake stamp set and coordinating dies. This is a layering stamp set, which means there's an outline for each cake layer, plus a solid filler that adds colour and multiple detailed layers for each section of cake. I don't mind colouring but I really appreciate the option of not having to colour and this stamp set does just that!


I started by choosing my ink colours for the cake layers and I didn't use the outline stamp on this card. From top to bottom, I used It's a Girl, Do-Si-Do, Bellini, Orange Twist and Be Mine. They're so pretty together, especially with the Audrey Blue panel die cut from the Oval Window Cover Panel


After I allowed the ink on the cake layers to dry, I used an anti-static pouch on the layers before heat embossing the gold details on them. I left the top layer plain since I was adding the gold embossed flowers on top. I used all five ink colours to ombre stamp the candles to match the cake, then I heat embossed just the top of the candles with gold. I did some stamp surgery on the sentiment from the Hooray stamp set (free with qualifying purchase) in order to make it wrap around the top of the Oval Window Cover Panel


PRIZES
We're giving away a $15 gift certificate to one blog commenter and a $15 gift certificate to one Facebook commenter. The more you comment, the higher your chances of winning, so be sure to leave some love at every stop and be sure to head over to Reverse Confetti's Facebook Page following each countdown day's blog hop. Comments close at noon CST on May 7, 2021 and the winner will be announced at 5:00pm on May 7, 2021 on the Reverse Confetti Blog and Facebook Page.

Thanks so much for hopping along!

Supplies

Wednesday, December 23, 2020

Catherine Pooler Designs | Holiday Tag Commission #3


I can't believe it's two days before Christmas! How did we get here?! I feel like this has been both the longest and shortest year in history and therefore I have conflicting feelings about this year coming to an end. Since Christmas is upon us and the first two sets of tags were for gift-giving, I thought I'd make a set of tags just for saying thanks since we always need those last-minute gifts for any surprises or unexpected and socially-distanced visits.


I used six sets to make these tags. Can you name them all? First, I die cut 24 tags from Layered Tags Dies from toffee cardstock and used the edge of the Essentials Slimline Dies to create the slashes on the side of the top layer to create a road or anchor for the truck.

Next, I die cut the truck and tree from Sleigh Ride, one of my favourite stamp sets from the Deluxe Club Sursee collection from October 2019. I created an ombre look for the truck by stamping it with Twilight and Black Jack ink. The wheels were stamped with straight Black Jack. The trees were stamped with Grass Skirt and Deck the Halls.


Next, I die cut the stack of gifts from Warm My Heart and ombre stamped those with Polished and Rockin' Red, Shea Butter and Sauna, Grass Skirt and Deck the Halls, It's a Boy and Fiesta Blue, and Sweet Sixteen and Pixie Dust.

Before adhering the images to the tags, I used Midnight ink to stamp the sentiment from Best in the Patch, one of my favourite and most versatile sentiment sets. Then I used the best white pigment ink to stamp the stars from Here We Come A-Caroling, a long-time Christmas favourite.

I used liquid glue to attach the gifts to the trucks before popping them up on foam tape over the trees for dimension. To add bling and ornaments to the trees, I used seed beads and sequins from the Vegas, Baby sequin mix. White hemp cord finishes off the tags and, of course, they all open to accommodate a personal message.

Thanks so much for stopping by!

Supplies

Thursday, October 1, 2020

VIDEO | Taylored Expressions | Hey There Kit

Hey there! ;) I'm here to share some inspiration using the new Hey There Kit from Taylored Expressions! This is one fabulous kit filled with loads of awesome, easy-to-use ingredients. I love that the sentiments are large for clean and simple cardmakers, and it's genius the way the simple stencilling is incorporated to give these sentiments big impact.


I stamped all of my Hey There sentiments on Sugar Cube cardstock using the Hey There Stamp & Stencil Combo. In my video, I show you how easy it is to add the coloured shadows with Blender Brushes and five ink colours inspired by the envelopes included in the kit.


I used the off-the-edge die cutting technique to create cards that would fit into A2 envelopes, stamped secondary sentiments from the Good Vibes stamp set and heat embossed patterns using the Dotty Ray stencil.


I had so much fun stamping and stencilling the big Hey There sentiment so I created two more. Their size makes them perfect shaped-tags so I turned them into little note tags with room inside for a little message.

Please click on the image below to shop the kit and check out my shop links below for all of the colours and materials I used in my video.

Thanks so much for watching!

Supplies: