Showing posts with label dry embossing. Show all posts

Tuesday, February 24, 2026

VIDEO | Spellbinders | Chinese New Year Cards feat. Good Fortune Horse


After a long break away from making videos, I'm back with a set of four cards I made to ring in Chinese New Year! The Year of the Fire Horse began on February 17, 2026 and I was thrilled that Spellbinders released the Good Fortune Horse [available from SB | SBC | SSS] die and clear stamp set just for the occasion.


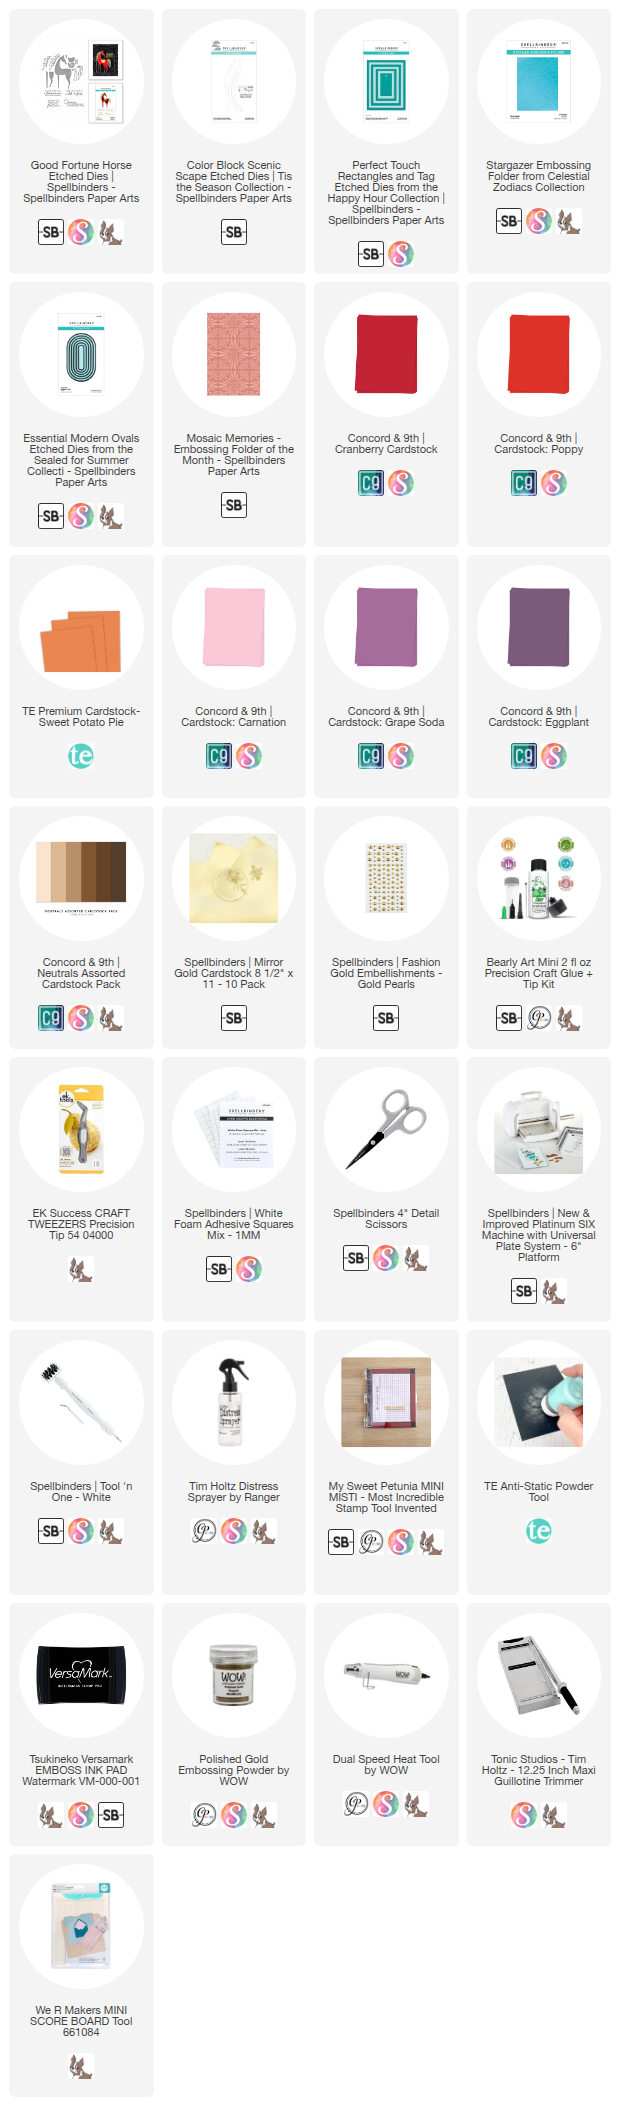
The colour palette I selected was inspired by Marina Zlochin's work and I'm sure you will find her illustrations equally inspiring! The cardstock colours are mostly from Concord & 9th with Taylored Expressions and Spellbinders, too: Cranberry, Poppy, Sweet Potato Pie, CarnationGrape Soda, Eggplant, Almond and Mirror Gold.


This first card features an Almond card base with Color Block Scenic Scape hills cut from Mirror GoldGrape Soda and Eggplant. The horse was cut from Poppy and Cranberry, the mane and tail from Carnation and Sweet Potato Pie, the saddle from Sweet Potato Pie and Almond, and the hooves from Mirror Gold.


I used my favourite sentiment from this set which is the perfect Chinese New Year sentiment. I stamped it in my mini MISTI using Versamark Watermark ink and heat set it with WOW Polished Gold embossing powder.


My second card features a Poppy card base cut from the largest of the Perfect Touch Rectangles [available from SB | SBC]. The horse was cut from Grape Soda and Eggplant, the mane, tail and saddle from Mirror Gold and Almond, and the hooves from Mirror Gold.


Again, the sentiment was stamped it in my mini MISTI using Versamark Watermark ink and heat set it with WOW Polished Gold embossing powder. To finish, I added five Gold Pearls.


This third card features a Carnation which I partially dry embossed using the Stargazer embossing folder [available from SB | SBC | SSS]. I misted the cardstock before running it through the die cutting machine to get the best impression and prevent cracking. This horse was also cut from Grape Soda and Eggplant, the mane and tail from Poppy and Cranberry, the saddle from Sweet Potato Pie and Poppy, and the hooves from Mirror Gold.


Since this sentiment was off-centre, I shifted it to the left and the horse to the right so that the front two hooves lined up above the height of the letters r and s on the cursive word cheers.


My card features an Eggplant card base cut with one of the Modern Essential Ovals [available from SB | SBC | SSSand the outer frame dry embossed with the Mosaic Memories embossing folder. The horse was cut from Poppy and Cranberry, the mane and tail from Almond and Mirror Gold, the saddle from Mirror Gold and Carnation, and the hooves from Mirror Gold.


Due to the design of the oval and textured frame, I wasn't able to stamp this sentiment right on the Eggplant card base so I stamped it on a piece of Almond cardstock and trimmed it to fit. The oval insert and all of the horses were attached using 1mm foam squares.


I appreciate you stopping by and, if you're inspired, please shop my affiliate links below. Thanks so much for your continued support!

Supplies

Saturday, December 27, 2025

Our Family Christmas Cards

(Can you guess who made each card?)

Hello, crafty friends! It's been a lifetime, hasn't it? Well, only nine months but it feels like much longer! I've missed crafting and, if you can believe it, I almost forgot how. I decided to start a new tradition and do a family cardmaking day for Christmas. I did a ton of die cutting to prepare multiple pieces to choose from. We had the best time creating our individual cards! My husband still makes me a lot of cards year-round but it's been so long since my son has crafted. Do you remember when he used to film videos with me?!

(Click on any photo to enlarge)

The focal products of these cards is Lawn Fawn's Build-a-Bunny and Build-a-Critter Winter Accessories. We love bunnies so this set was perfect and a lot of fun to play with. The bunnies were cut from PortobelloPebble and White cardstock, with Ballet Slipper, Briar Rose and Black accents.


This was our first time using these sets, along with the Riverside Backdrop: Landscape which I bought to go with the capybaras. The Stitched Rectangle Frames fit perfectly over this backdrop.


Most of these backgrounds were cut from Brushed White cardstock with skies dry embossed with the Sparkling Snow 3D Embossing Folder. Other background colours include Sea GlassBriar Rose and vellum-covered snowflakes.


Patterned papers featured on these cards are from Snow and Cocoa by Crate Paper, one of my dozens of 6x6 paper pads, many of which are retired. A currently available alternative with similar colours is Simple StoriesHard Candy Christmas.


We all wear glasses so I was delighted to discover that the Spellbinders' Smart Glasses fit on the bunnies perfectly! I cut all of the frame styles and tried them out. They were so adorable and made us laugh.


Some of the other accessories featured on the bunnies are the gift and wreath from Spellbinders' Playful Penguins, the rounded mug and whipped cream from Rocky the Dancin' Yeti, and the drum sticks from Dancin' Nutcracker Fritz.


The sentiments are from a combination of Mistletoe Greetings, Christmas Magic (the retired hot foil version of Christmas Memories Enclosed and die cut using a speech bubble from the Dad Jokes Die Cuts), and retired Glitter Wishes, die cut with a banner from retired Mini Everyday Sentiments.

If you’re inspired, some affiliate links are included below at no extra cost to you. Thanks so much for stopping by and I’ll see you again soon!

Supplies:

Saturday, March 1, 2025

Year of the Snake Shaker Card


Welcome to the March 2025 Lunar New Year Challenge! Once again, we’ve partnered up with your favourite craft companies all year long so that means there are giveaways every month! This month, we’re giving away ONE $25 gift certificate to Lawn Fawn, ONE $25 gift certificate to Altenew, ONE $25 gift certificate to Sunbird Spark, and ONE $25 gift certificate to Whimsy Stamps. That’s a total of $100 in giveaways in March!


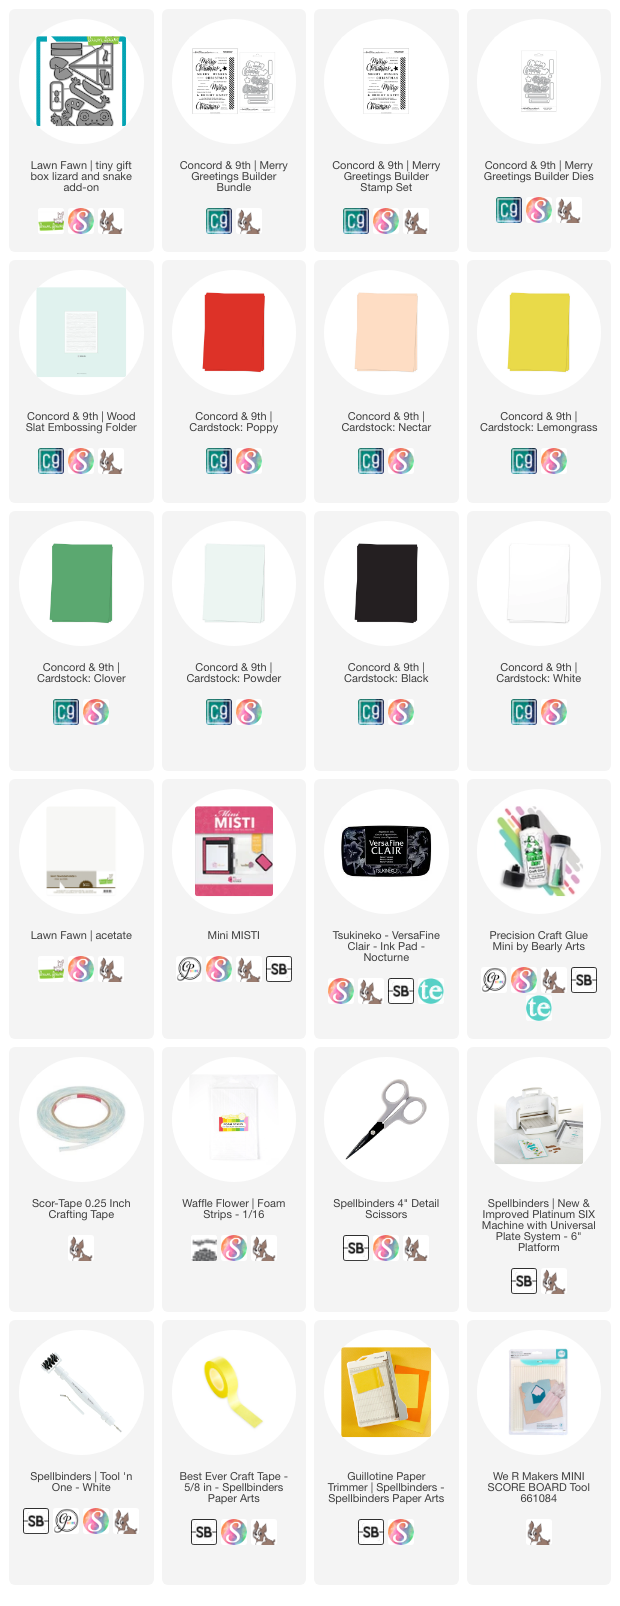
My first card for March features the Tiny Gift Box Lizard and Snake Add-On from our returning annual sponsor Lawn Fawn, plus cardstock and a sentiment from our quarterly sponsor Concord & 9th! I partially cut the snake head so I could extend the body down. The coils you see are actually legs for the lizard and I love how I was able to make it look like a big snake coiled around itself a few times.


I cut the snake from Lemongrass cardstock and its details were cut from Nectar and Black. The background of the shaker was cut from Clover cardstock and the circle frame was cut from Poppy. To create the texture on the card front, I embossed a piece of Powder cardstock with the Wood Slat Embossing Folder, which is perfect since this is a Wood Snake Year! I created a custom sentiment using three separate sentiments from Merry Greetings Builder Stamps and curved them on the inside of the circle. Then I filled the shaker with sequins from my stash.


Visit the March Link-Up Party post HERE to see all of the design team projects and be inspired to create your own! You can find the Challenge Rules HERE. Please tag us @lunarnewyearchallenge on Instagram and use the hashtag #lunarnewyearchallenge so everyone can find and be inspired by all your amazing projects.

If you’re inspired, some affiliate links are included below at no extra cost to you. Thanks so much for stopping by and I’ll see you again soon!

Supplies

Saturday, October 26, 2024

Spellbinders Guest Post feat. the Shine Bright Collection by Carissa Wiley


Hello, crafty friends! I'm on the Spellbinders Blog with three cards featuring the Shine Bright Collection by Carissa Wiley, one of many awesome releases now available in the Spellbinders store!


Affiliated product links are listed below at no extra cost to you. Details on how I made each card and more photos are on the Spellbinders Blog. Thanks so much for stopping by!

Supplies

Friday, October 25, 2024

Spellbinders | October 2024 Small Die, Glimmer Hot Foil Kit + 3D Embossing Folder of the Month


I'm back with two more cards combining three October 2024 Monthly Club Kits from Spellbinders. The first card features the "Festive Friends" Small Die of the Month and the second card features both the "Festive Lights" Glimmer Hot Foil Kit of the Month and "Joyful Candy Canes" 3D Embossing Folder of the Month. Club Kits close on the 27th of each month so get them while you can!


My first card features Festive Friends and I normally don't get this club kit but it's so adorable and one of the best I've seen! I wanted to keep it simple and let the polar bear and penguin shine.


I kept the colours simple with a palette of Briar Rose, Carnation and Rainforest, with basics of Onyx, Fog and Snowdrift. To make the card festive, I created the lights and star using Matte Gold Foil Paper and Gold Glitter Paper.


The sentiment from Glitter Wishes was heat foiled with Champagne Hot Foil on Onyx cardstock and used the medium fishtail die from Mini Everyday Sentiments.


The Briar Rose background panel was misted with water before I embossed it with the Argyle Socks Embossing Folder. I think it complements the bear's turtleneck and the penguin's accessories nicely!


For my second card, I started by misting a Mahogany panel with the Joyful Candy Canes 3D Embossing Folder and set it aside to dry.


I focused on the poinsettia in the embossing folder so I pulled the Holiday Blooms Dies and die cut a bunch of them in two sizes using Briar Rose cardstock.


Next, I die cut the two styles of leaves from Rainforest cardstock, and the pine boughs from Gold Glitter Paper.


After assembling each of the poinsettia with the foliage, I heat foiled the sentiment from the Festive Lights Glimmer Hot Foil Kit using Champagne Hot Foil on white linen cardstock.


I placed the sentiment before deciding where to adhere each of the poinsettia. To finish, I added a few Fashion Gold Pearls and trimmed the excess off the top and bottom edges.


Please visit my previous post with more inspiration featuring the October 2024 Monthly Club Kits HERE.


Here's a list of monthly club kits I share, as well as some of the value kits offered by Spellbinders:


If you're inspired, please shop my affiliate links below and remember to accept your cookies so I can be credited for the referral. Spellbinders would love to know that you were inspired by me. Thanks so much for your continued support!

Supplies

Tuesday, October 22, 2024

Spellbinders | October 2024 Large Die + Stitching Die of the Month


Hello, crafty friends! Today, I'm showcasing the October 2024 Monthly Club Kits from Spellbinders. The first card features the "Cozy Toes Slippers" Large Die of the Month and the second card features the "Merry & Bright Cloche" Stitching Die of the Month. Club Kits close on the 27th of each month so get them while you can!


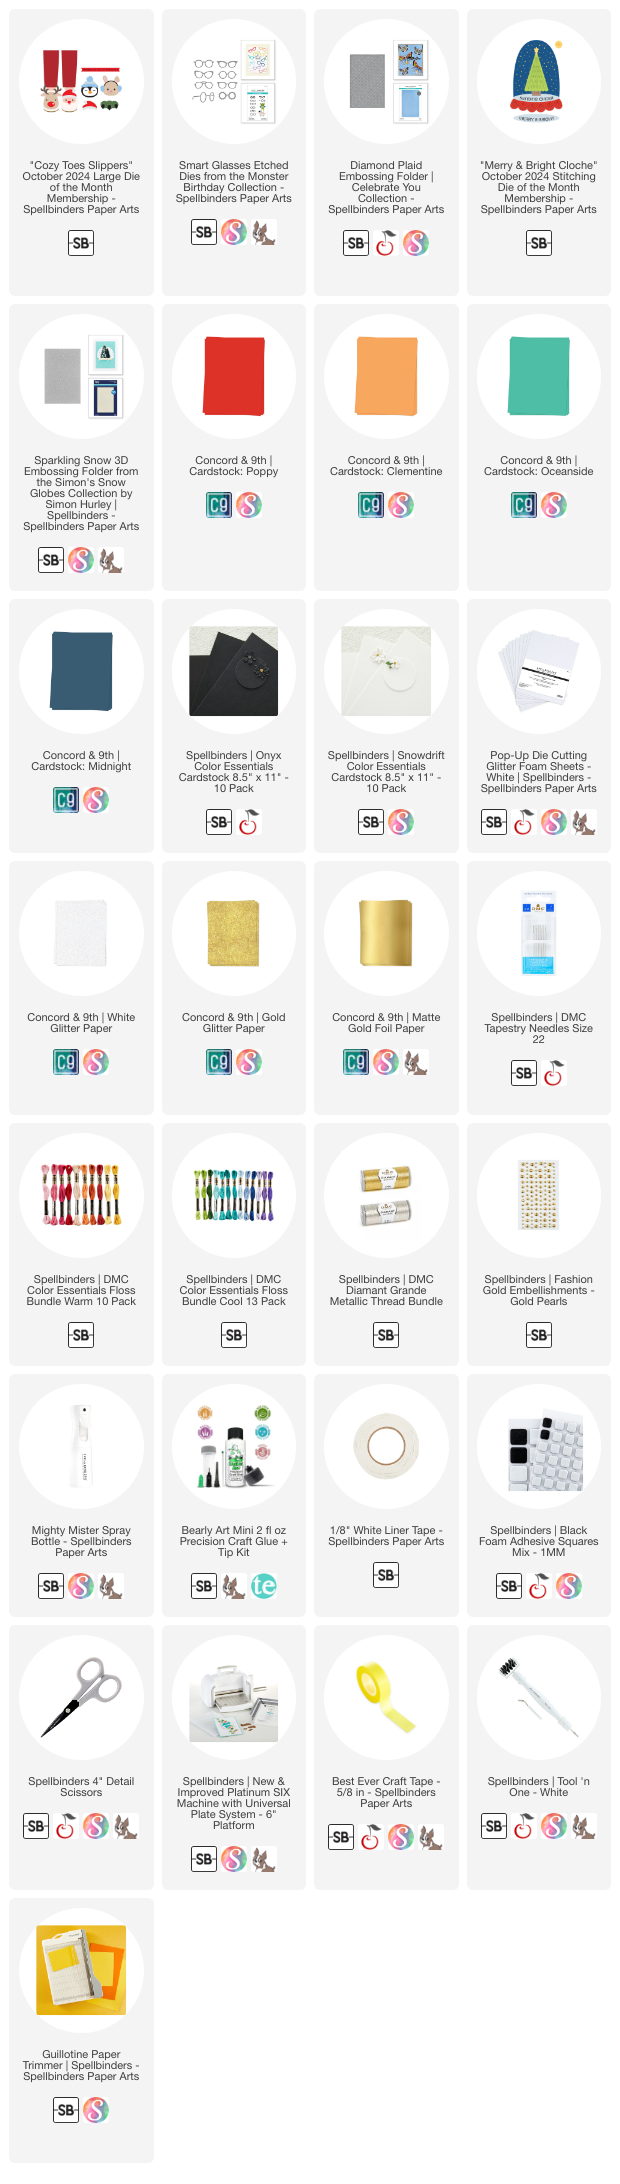
This month I have the pleasure of playing with the "Cozy Toes Slippers" Large Die of the Month and it makes me so giddy. I'm sure you've seen the pyjama pants and slippers with Santa and four other animals! I wanted to work more simply with just the penguin and dress it up with all the accessories.


The "Cozy Toes Slippers" Large Die of the Month comes with a toque, ear muffs, reindeer antlers and a Santa hat in both directions which is a bonus. I wanted to keep the colours simple and consistent throughout.


The colour palette I chose for this first card include Poppy, Clementine and Oceanside, with the basics Onyx, Snowdrift, Glitter White Foam and Matte Gold Foil Paper. After assembling all the penguins and die cutting the accessories, I added gold glasses cut from the Smart Glasses Dies.


I cut the sentiment from Snowdrift, along with shadow banners from Poppy and Matte Gold Foil Paper. Then I cut an A2 panel from Oceanside cardstock and embossed it with the Diamond Plaid Embossing Folder.


I popped up the penguins in a grid pattern with foam squares, then added the sentiment strip to finish the card.


My second card features the "Merry & Bright Cloche" Stitching Die of the Month. I always love each month's stitching die and this one is no exception. I adore cloches and I was so happy to see this one with a Christmas little tree.


This card also uses the colours PoppyClementine and Oceanside, just like my first card. I swapped out the black for Midnight and the plain white cardstock with Glitter White Paper. This card also features Gold Glitter Paper and Matte Gold Foil Paper


After stitching the base of the cloche, tree and trunk using coordinating colours from the DMC Warm Color Floss Bundle, DMC Cool Color Floss Bundle and DMC Diamant Grande Light Gold Metallic Thread, I assembled the cloche using a combination of white liner tape and foam squares.


Then I cut an A2 panel from Glitter White Paper, misted it with water and embossed it with the Sparkling Snow 3D Embossing Folder. This is the first time I tried dry embossing with glitter paper and love the results. It's so sparkly in real life!


After attaching the cloche on to the embossed base panel, I added Fashion Gold Pearls as ornaments on the tree to finish the card.


Here's a list of monthly club kits I share, as well as some of the value kits offered by Spellbinders:


If you're inspired, please shop my affiliate links below and remember to accept your cookies so I can be credited for the referral. Spellbinders would love to know that you were inspired by me. Thanks so much for your continued support!

Supplies