Monday, September 28, 2009

Ghostly Rodeo

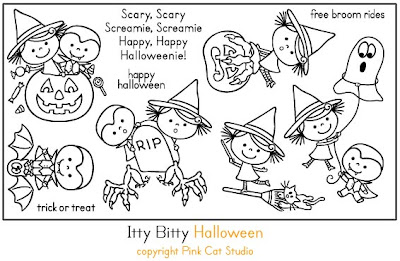
I decided I would make a Halloween card for my husband's nephew this year. Their family isn't really into cards but, as everyone knows, cards are very important to me! In fact, I get really upset when I don't get a card, even if I get a gift. ;) Don't laugh - I'm serious! I started this card last night while watching the season premiere of The Amazing Race and found the time to finish it this morning as it was pouring buckets for several hours. I had my BIL pick the image from the Pink Cat Studio Itty Bitty Halloween set. This is one of the sets my in-laws sent me for my birthday and this was its first inking.

My BIL said his son would love the roped ghost because of all the rodeos they enjoy out in the Denver area. I was giddy the entire time I was making this because I looked at the rope and knew I just had to try to replace it with a real rope. LOL Thank goodness for crystal effects because it's such a strong adhesive and holds instantly. I just hope it doesn't tear away from the card in the mail. Just to be sure, I'll have to use a protective mailer when sending this to the nephew.

I tried my best to keep the images in their original positions on the stamp and the same curves for the rope. I decided to completely remove Itty Bitty Betty's tufts of paper hair and replace it with real hair. Don't you love it?! I didn't add as much colour or blush to Itty Bitty Bobby's face because vampires are supposed to be pale. On the inside of the card, I stamped the sentiment "Scary, Scary, Screamy, Screamy, Happy, Happy Halloweenie" et voilà!

Sources: DCWV textured cardstock; TPH 111lb matte white cardstock; unknown dp; Fiskars Nostalgia corner edger; Pink Cat Studio Itty Bitty Halloween; Memento Tuxedo Black ink; Copics; Atyou Spica glitter pen; DMC embroidery thread; Darice hemp cord; SU crystal effects; dimension squares; SU large oval punch; SU silver brads
Sunday, September 27, 2009

In the Woods

I've already used one of the sentiments from the Pink Cat Studio Fairy Friends set but I decided I would really break in the set with two of the images and I was most definitely going to use the mushroom house! The hard part was deciding which animal because they're all extremely cute with their different wands. I settled on the bunny because it was the most neutral and I couldn't resist those long ears that look like they're flapping in the wind. LOL

I made this card for my friend Simmer. One of her sisters is turning 40 next week. She requested a lovie family type card but I searched high and low for a suitable digital image and shockingly there was none. Can you believe that? Someone's definitely going to have to design some because there's a real shortage of those types of images out there.

When I was putting my son to bed last night, I dreamt up this layout but I didn't quite make it the way I sketched it. That always seems to happen! I even left out a couple of elements to keep it from looking too busy and I moved the sentiment I prepared to the inside of the card. I almost never put anything on the inside of my cards! Anyway, since the birthday girl has three kids I'm sure they'll find this card irresistible. Who wouldn't? ;)

Sources: TPH 111lb matte white cardstock; DCWV green stack - owl; DCWV green stack - toadstools; DCWV green stack - wood natural; Martha Stewart picket fence punch; Q-Print smooth white cardstock; Pink Cat Studio Fairy Friends; Memento Tuxedo Black ink; Copics; Gutermann thread; dimension squares; SU 1-3/8" circle punch; SU scallop circle punch

Friday, September 25, 2009

Make A Wish

I think I really need to call in a photographer friend to tell me why I can't find the right angle when photographing my cards! The edges seem to distort and not look parallel no matter what angle or height I photograph the card. Hmmm...

I had this kitty all coloured for the Pink Cat Studio Digi Stamps launch on Tuesday but never got around to finishing her. Today I finally got the chance to and isn't she pretty with all those sparkles? :) I used one of the sentiments from the Fairy Friends set and it curves so nicely around the image. It's a nice subtle flourish that doesn't take away from the rest of the card but is still noticeable.

Sources: SU textured very vanilla cardstock; Cosmo Cricket Jolly By Golly dp; Q-Print smooth white cardstock; Halcraft smooth white cardstock; Pink Cat Studio Kitty Elf in Present digital image; Copics; PSX Stickles in green and red; dimension squares; Pink Cat Studio Fairy Friends sentiment; Memento Tuxedo Black ink

Thursday, September 24, 2009

It's All About Love

Love...that's what I'm here to talk about today. First of all, have you seen the DCWV Green Stack?! I was just browsing in Indigo the other day and noticed they restocked their craft corner. I nearly screamed out loud and you know how quiet bookstores are! I don't like to buy stacks anymore because I typically only like fewer than half the papers in them but this one? My, oh, my, I love every single sheet and they have the best texture, too. The hardest part was trying to decide what size stack I wanted. I wanted them all! We're an environmentally-friendly family and we love animals and the outdoors. To see that this stack had that theme and was made with 70% recycled paper, well, how could I resist? I settled on the 8X8 stack but I think I'll have to go back and get the 12X12 one...okay, maybe the 4.5X6.5, too, because I can totally see myself making a scrapbook for Lil' D out of the entire thing! LOL

This is a wedding card for a couple we met in Italian class three years ago and quickly became good friends. They're getting married up in gorgeous cottage country this weekend but we're not going since we felt the long drive and late nights would be too difficult on the little one. Anyway, as I was putting together this card, I couldn't help but use the same colours they used to make their own wedding invitation. I love brown and pale blue together. It's so retro and classic! I wish I could show you the gorgeous invitation they made but I can't for the life of me find it! I'm not surprised as I vaguely recall Lil' D getting his hands on it... All I can say is the brown was textured and the blues and golds were Japanese rice paper. It was a tri-fold package that opened to contain the details, maps and RSVP.

To make this card, I immediately thought back to this wedding card and wanted to equal or outdo it. Yup, the crazy things I do to challenge myself! I didn't use any stamps or ink on this card, just punches! I really wanted to use a polka-dotted ribbon that matched perfectly but couldn't decide where to put it and the third heart from the punch set also didn't fit anywhere so I just left them off. I didn't want to complicate things. I love the simplicity of this card and the papers do a great job on their own. I think the texture really completes the look. I can't help but love this card. I think it's stunning if I may say so myself! :)

Sources: SU chocolate chip cardstock; DCWV textured cardstock; DCWV Green Stack - Brown Ferns & Blue Wood; SU 1-3/8" circle punch; SU Heart To Heart punch; ICG alphabet punch set

Wednesday, September 23, 2009

Happy Birthday To Me!

Today's my birthday and I'm going to be celebrating in every way possible because it's been a great year! I'm not quite sure how or when but I'll be making some impromptu plans for lunch and/or dinner. That's life with a little one around!

For something a little different, instead of me showing you something that I made, I thought I'd show you two cards that were made for me. :) I receive a lot of cards every year but rarely are they handmade so I really, really appreciate and love those who take the time to make one for me because they're extra special!

This first one was made by my friend Lexy. I've always been crafty and made my own cards but Lexy's the one who got me seriously hooked on cardmaking so you all have her to thank for me having this blog to showcase my creations. If you have a moment, visit Lexy's fun blog and say hello. :)

The second card was made by none other than my hubby. He loves to sneak into my craft caddy when I'm putting Lil' D to bed or tinkering on the keyboard. Hubby said his card was inspired by this PCS card! Wow, that is going way back. I think if he had more time he would also have a blog. LOL

Hopefully tomorrow I'll have some new cards to show you. With the PCS digi store launch yesterday I've been falling behind on other birthday and wedding cards I have to make. Stay tuned!

Tuesday, September 22, 2009

Pink Cat Studio is Now Digital!

Good morning, everyone! I’m so thrilled to announce that Pink Cat Studio is going digital! Today Melissa is opening an online digital stamp store with a great selection of brand new Halloween and Christmas designs. Now Pink Cat Studio has two stores, one for rubber stamps and one for digital stamps. Both stores will offer completely different images. You'll want them all! Allow yourself to be tempted with über cuteness...CLICK HERE!

Be sure to check out all these blogs from the PCS Design Team and digi launch guest designers to see some fantastic cards and projects using the new digi stamps:

Becky Carafa
Emily Leiphart (that's me and you're already here!)
Inge Groot
Jodi-Ann Lee
Lauren Meader
Lauretta See
MacKenzie Bruckler
Maria Bell
Mariska van der Veer
Sparkle Smith
Suzanne J Dean
Tracey Cuccia
Vicki Garrett

Don't forget to keep scrolling for all of today's exciting posts related to the PCS digi store launch! I have to warn you though, make sure you have a big cup of coffee, tea, or pop - whatever your morning perk is - before you sit down! Also, your scrolling finger may start to hurt with all that I have to show you today. LOL Believe it or not, I have nine posts scheduled in one-minute increments. Thanks for looking and have a wonderful day! :)

PCS Digi Stamps Launch #1 - "Betty's Brew"

Can you imagine my excitement when Melissa asked if I would create some cards for her new digi store launch? I love, love, love Pink Cat Studio stamps so I quickly said yes! When I saw the Halloween images she created, I was totally giddy. I printed them out and started colouring immediately. I didn't know which one to start with!

After I selected Itty Bitty Betty and her Yummy Frogs to make my first card with, I matched the image up with some paper and did all the stitching in contrasting black and white. Since I planned to add a sentiment and the fancy ribbon, I didn't want to overpower the image with dimensions or glitter. I just used my Atyou Spica glitter pen on the frogs, spoon, crescent, fire, logs and cobweb. Then I added a thin layer of crystal effects to the frog eyes and spider.

This also marks the first time I ever bought novelty ribbon. The package came with four different styles and this one with black fuzzy balls was very fun. I decided to use it as a garland hanging in Itty Bitty Betty's cavern. As soon as I placed it on the card, I suddenly got the idea to put eyes on the balls. I think they're hilarious! So much for Halloween being scary. :D


If you'd like to purchase the PCS Itty Bitty Betty Yummy Frogs digital image, please CLICK HERE!

Sources: SU textured black cardstock; Q-Print smooth white cardstock; Provo Craft Hallo Palooza Halloween dp; Pink Cat Studio 'Itty Bitty Betty Yummy Frogs'; Copics; Atyou Spica glitter pen; SU Crystal Effects; Imaginisce 'Cobweb'; Memories Black ink; SBD 'Happy Halloween'; Vivid ButterScotch ink; Recollections Halloween printed ribbon; Craft Medley googly eyes; Gutermann thread

PCS Digi Stamps Launch #2 - "Witch Crossing"

Ever since I made this card here, I wondered when I would use the Q-tip trick again and here it is! I was reading a huge list of Halloween greetings online and when I saw "Caution: Witch Crossing" I knew what I was going to do with this image. I think I had a smile on my face the entire time I was making this card. I just couldn't wait to finish it!

Since the sign was going to be the focus, I kept the main image simple. I sparingly used my Atyou Spica glitter pen on the frog's eyes, the band on Itty Bitty Betty's hat, her broom stick, shoes, the inside of the pumpkin and the pumpkin face. Then I added the scary fence leaving an opening for Itty Bitty Betty to pass through. I coloured a Q-tip with a big silver Sharpie and cut off the ends. Once the crystal effects on the sign dried, I cut it out and plopped it on the card with dimension squares.

I love how simple this design is but still packs a punch with all the little details. The witch crossing sign also shows the versatility of using digital images. My husband couldn't stop laughing when he came home and saw this card. He said it could be the silliest thing I've ever made... next to our son, of course. :D

If you'd like to purchase the PCS Itty Bitty Betty Witch Costume digital image, please CLICK HERE!

Sources: SU textured going gray cardstock; SU textured black cardstock; Q-Print smooth white cardstock; Little Yellow Bicycle Frightful Collection Candy Dots dp; Pink Cat Studio 'Itty Bitty Betty Witch Costume'; Copics; Atyou Spica glitter pen; Martha Stewart Holidays scary fence edge punch; Q-tip; silver Sharpie marker; SU Crystal Effects; dimension squares

PCS Digi Stamps Launch #3 - "Trick or Treat"

The style of this card is a very different one for me and I've never made anything quite like it so I'm really loving it! I hope you like it just as much. :) I think my favourite aspect of it is the stitching which is a stitch I just discovered on my sewing machine. Doesn't it look like a cobweb? I think it's fantastic and I'll probably be using it more often!

I cornered the edges of the card and papers with a circle punch. I played around with the placement of the layers quite a bit, orienting them in different ways and even staggering them but finally settled on neat and traditional. I wasn't quite sure where to place the ribbon or even how to feature the image. I decided I would just start tearing off as much white as possible to show off as much of the dp as possible. I still don't have nesties but that's okay because I ended up loving the torn look which fits in nicely with the finished look of the card.


If you'd like to purchase the Itty Bitty Betty Ladybug Costume digital image, please CLICK HERE! There's a free BONUS that comes with this image. :)

Sources: SU kraft cardstock; SU textured whisper white cardstock; SU textured black cardstock; Halcraft smooth white cardstock; unknown Halloween dp; SU 1-3/8" circle punch; Pink Cat Studio Itty Bitty Betty Ladybug Halloween; Copics; ICG alphabet punch set; Recollections Halloween printed ribbon

PCS Digi Stamps Launch #4 - "Ghostly Siblings"

This Halloween image gets my vote for the cutest ever! I just love how the little ghost is holding on to the coattail of the older sibling and toting a sock monkey. Too funny! I knew this one would be a trick-or-treating scene. Don't you just love this paper? I love all the little details like how the doors and windows on the houses are different colours and there are pumpkins in different places. The tiny ghosts and shiny bats floating around are great! I knew I wanted to pair up this image and paper with another one of my new Martha Stewart punches. This one is perfect because it says 'Boo' and has ghosts on it!

After having to shade these two adorable little kids, I realized I need more gray Copics. I only have one cool gray and one warm gray. At first I thought I ruined the image as the shading was the last thing I did and looked so blotchy and unrealistic. I thought I'd have to reprint and start all over but thankfully my trusty colourless blender worked its magic and I was done! I added a little bit of glitter to the kids' eyes, shoes, pumpkin and sock monkey. The last steps were to sew some detail on the black road, distress the edges of the papers with scissors and adhere everything in place.

If you'd like to purchase the PCS Scary Siblings digital image, please CLICK HERE!

Sources: SU kraft cardstock; Halcraft smooth white cardstock; Imaginisce Hallowhimsy Velcome Inn dp; Provo Craft Slab IV paper; SU textured black cardstock; Martha Stewart 'Boo' & Ghost edge punch; Gutermann thread; Pink Cat Studio Scary Siblings; Copics; Atyou Spica glitter pen; dimension squares

PCS Digi Stamps Launch #5 - "Velcome"

This image with Frankenstein and Itty Bitty Bobby dressed as a vampire was so much fun to colour! I thought the doorway would make a perfect focal point for a little trick-or-treat scene. I popped Frankenstein's head and Vampire Bobby for some dimension. Then I made some tombstones by rounding the top corners with a circle punch and added RIP with my alphabet punch. I also added a bit of cotton for cobwebs. I used the scary fence punch and added grass, my usual combination! For the perfect scary house, I used my cobblestone background stamp to create a stone wall and cut the edges with my jagged scissors for a nicely worn look. I think the dp with stars and trick or treat words makes for a nice nighttime backdrop.


If you'd like to purchase the PCS Frank 'n' Vampire digital image, please CLICK HERE!

Sources: SU textured going gray cardstock; SU textured basic gray cardstock; SU textured whisper white cardstock; Provo Craft Trick or Treat dp; Pink Cat Studio FrankNVampire; Copics; dimension squares; Chapel Road Artstamps cobble background; SU basic gray ink; Craft Cut jagged edge scissors; SU 1-3/8" circle punch; ICG alphabet punch set; cotton ball; Martha Stewart scary fence edge punch

PCS Digi Stamps Launch #6 - "Swoosh into the Holidays"

Weeeee! There goes Itty Bitty Betty down the candy cane slide! Who knew that candy canes would make such great slides? Only Melissa! Isn't she genius? I really love this image but then again I love them all. How could you pick just one? Oh my gosh, I have to stop it with all these exclamation and question marks but I just can't help it! LOL

I love colouring Pink Cat Studio images and this one was no exception. Christmas is so colourful and I coloured this one with my new Cosmo Cricket papers in mind. I added a little glitter to the red areas on Itty Bitty Betty's elf costume and shined up the candy cane with crystal effects. It looks so real and yummy, doesn't it? :)

This was the first time I used the reverse corner on my Fiskars Nostalgia scissors to frame the card and I love how fancy and festive it looks. Do you remember curling ribbons with scissors? I can't even remember the last time I did this but it was probably in elementary school. As soon as I laid out this card, I knew I had to do that because it just fit so perfectly with the image and papers.

If you'd like to purchase the PCS Itty Bitty Betty Candy Cane Slide digital image, please CLICK HERE!

Sources: SU kraft cardstock; Q-Print smooth white cardstock; Cosmo Cricket Jolly by Golly dp; Fiskars Nostalgia corner edger; Pink Cat Studio Itty Bitty Betty Candy Cane Slide; Copics; Atyou Spica glitter pen; SU Crystal Effects; The Old Island Stamp Company sentiment; SU Garden Green ink; SU silver brads; Encore ribbon

PCS Digi Stamps Launch #7 - "Busy Fright Night"

It's October 31st and the streets are bustling with costumed kiddies seeking sweet treats. Mwuahahaha, creepy and crazy cute!

I picked up my new QuicKutz Epic Six today, my first ever die cut machine and couldn't wait to play with it. I couldn't help but purchase the house & tree die set while I was at Scrapbooks By Design and I decided to make a scene with it! The house is one big house but I decided to split it in two and make it look like two different houses. This has to be the most amazing tree and I'm already thinking about how versatile it's going to be throughout the year as it can be decorated with leaves, etc. I just love the branch detail on it. Since it naturally curves after being die cut, I didn't glue it down completely so it actually looks like the branches are coming out off the card.

I thought it was appropriate to use Halloween cats in the background since this was made for Pink Cat Studio! ;) It was so much fun to print tiny versions of these trick-or-treaters and colour them in. I added some glitter to different areas of each kid and then popped two of them for added dimension. The little fairy girl on the right is from the door version with Frankenstein. I love how the little witch fits in perfectly on the porch of the one house. Those ghostly siblings just make me laugh everytime I see them. They are way too cute!


If you'd like to purchase any or all of these PCS digital images, please CLICK HERE!

Sources: SU textured going gray cardstock; K&Company Halloween Whimsy Cats dp; SU textured black cardstock; SU textured basic gray cardstock; QuicKutz house & tree; Halcraft smooth white cardstock; Pink Cat Studio Itty Bitty Betty Ladybug Halloween; Pink Cat Studio Scary Siblings; Pink Cat Studio Itty Bitty Betty Witch Costume; Pink Cat Studio FrankNFairy; Copics; Atyou Spica glitter pen; dimension squares

PCS Digi Stamps Launch #8 - "Fa La La La La"

After seeing March of the Penguins, we all know that penguins do sing, right? :) I can just imagine this adorable little guy singing Christmas carols as he swings on his candy cane swing! I know I keep saying it but Melissa is genius! Her images are the cutest and not only do I love colouring them but they really inspire me to create.

I knew I wanted to add a sentiment to this image but how would I use the one I really wanted? Masking! I'm a huge fan of Michelle Bartnett's work over at Just Painting Around and she always uses the term masking. I don't think I even realized what exactly she meant by it until today. It's like a light went on in my head! I printed out a second image on thin paper and cut around it just enough to barely cover what I didn't want the ink to touch. I carefully placed that on top and then inked up the sentiment and stamped on it. When I removed the mask, the original image on the cardstock was left with these beautiful holiday words around it. I cut out the coloured penguin from a second version on thick cardstock and popped him up on dimension squares. Doesn't he look like he's really swinging out of the card?

Originally, this card wasn't going to have the red and green snowflakes in the background. It did look fabulous with a lot of the kraft cardstock showing around the main image but I decided to try a fragmented stainglass look in the background. I can't believe I never tried this before and I'll probably have to use it again because I love how it looks! It's embarrassing to say but I really impressed myself with this one. I wish all my Christmas cards would turn out like this one. :D

If you'd like to purchase the PCS Penguin Candy Cane Swing digital image, please CLICK HERE!

Sources: SU kraft cardstock; Cosmo Cricket Jolly By Golly dp; Paper Reflections red cardstock; Aitoh Silver Origami foil; Pink Cat Studio Penguin Candy Cane Swing; Copics; Atyou Spica glitter pen; dimension squares The Old Island Stamp Company Christmas Background; SU Garden Green ink

PCS Digi Stamps Launch #9 - "Itty Bitty Bobby is Ron Weasley"

Itty Bitty Bobby has decided to be Ron Weasley for Halloween! I just love the Harry Potter series and all the movies. I don't think I've created a redhead before and I love how this one turned out. I decided to try the freckled look from Melissa's colour samples after I saw this video by Amy Rysavy on how to create patterns with the Copic colourless blender. It's such a simple technique but makes a huge difference. I can't believe I never thought of it before! Isn't he adorable?

I've been dying to use this Imaginisce dp ever since I got it and this was the perfect boy image for it! I love how some of the pumpkins and candy corn have a gloss on them. There are also cats and crows on the dp but unfortunately they're covered by the centre border and main image. Since I loved the pumpkins so much, I cut out a few extra and popped them with different depths of dimension squares. Maybe you're wondering how on earth I made all those tiny little holes? I don't have a piercing tool or guides so I used one of my parchment craft tools. It didn't take long at all even though it looks like it may have taken forever. LOL


If you'd like to purchase the PCS Itty Bitty Bobby Wizard Costume digital image, please CLICK HERE!

Sources: SU textured whisper white cardstock; Imaginisce Spooky Town Boo Whooo?! dp; Halcraft smooth white cardstock; Pink Cat Studio Itty Bitty Bobby Wizard Costume; Copics; Pergamano Perforating 2 Needle tool; SU brads; Martha Stewart scary fence edge punch; Recollections Halloween printed ribbon; dimension squares

Monday, September 21, 2009

A Golfing Good Time

This is the second card from the order my boss placed a few weeks back. Her sister Karen's birthday is coming up and I was given another list of possibilities to choose from. I have to love my boss. She's so organized which is of course what makes her a great boss! Karen loves pink and is a golf addict. Hmmm... all the golf stamp sets I've seen are so masculine. Where would I find a golf-related image that is feminine? Again I turned to Squigglefly and found this perfectly cute digital image!

As I was colouring this card, I kept thinking to myself how inappropriate this girl's outfit was for golfing! LOL I only have four pink Copic markers and they never seem to match any pink papers I have and I really wanted to paper piece with this image but how? It's a digital image so I couldn't just stamp my image on the paper. I really didn't want to waste any of this gorgeous dp but cutting a piece large enough to run through the printer. What is a crafty girl to do?! CLICK! The light went on inside my head again. LOL I figured out how to paper piece with digital images and I'm so excited!!! I'm sure others have thought of this before. Have you? ;)

My boss again wanted the recipient's name on the card. I find it very difficult to personalize images that are already busy as I don't want the card to look too busy or tacky, especially tacky! I can't tell you how many times the scripted sentiments from the Hey There Cupcake set have saved the day. They are tiny enough that they don't really take away from the image and fit pretty much anywhere! Can you believe I didn't use any sparkles, ribbon, shine or dimensions on this card? :P I began working on this card with the desire to use kraft cardstock and challenged myself to make it feminine. I think I've succeeded!

Sources: SU kraft cardstock; EK Success Dotted Wave edger punch; Basic Grey lemonade pretty poppy field dp; Basic Grey lemonade pretty petals dp; SU chocolate chip cardstock; Halcraft smooth white cardstock; Squigglefly Tiny Tina Golf Caddy; Copics; Stampendous Hey There Cupcake sentiment; SU Pink Passion ink; ICG alphabet punch set

The Guests are Arriving!

Oh my! Look how many have already arrived at Itty Bitty Betty's big party! Gosh, I wonder what she's planning. She sure knows how to build up the suspense, doesn't she? One more day 'til the big surprise is revealed! :D

Sunday, September 20, 2009

A Lily Christmas

Phew! It's hard work keeping Itty Bitty Betty's secret. I can hardly contain my excitement and I'm bursting at the seams! I can't wait 'til Tuesday. ;) I needed to distract myself so I thought I'd make a Christmas card with Lily. I've been playing with my brand new QuicKutz Epic Six for the past few days and I can't believe I never had a die cutter before! LOL This little toque die was half price along with a million other dies at Scrapbooks By Design so I couldn't resist. I know it will come in handy when I go to make my many Christmas cards in the upcoming months.

I'm just loving the new Cosmo Cricket holiday paper! I framed these two patterns with distressed vanilla to make the card look warm and cozy as winter should be. ;) The toque would've made a cute little card by itself but I thought I would use it to dress up someone, even an animal! I quickly pulled out all my Pink Cat Studio stamps and tried the hat on every image. It turns out it was a perfect fit on this Sweetheart Lily. How cute is she? It looks like Lily can't wait for Christmas. She's already enjoying delicious hot cocoa and peppermint candy in the company of snowmen!

Sources: SU chocolate chip cardstock; SU textured very vanilla cardstock; Cosmo Cricket Jolly By Golly dp; Pink Cat Studio Lily & Billy Sweethearts; Copics; QuicKutz hat; Bazzill Basics textured red & green cardstock; dimension squares; Sunshine Designs sentiment; Darice hemp cord; Marvy Uchida 1/8" circle punch

Saturday, September 19, 2009

Itty Bitty Betty's New Friends

What's going on with the blinkie? I think it's hilarious that my son noticed Betty's new friends before I did! Did you notice the small gathering? Is Itty Bitty Betty having a party? What's the occasion? Hmmm, I wonder what she's celebrating. How many friends will be invited? Wow, it must be something super special! I really cannot wait for Itty Bitty Betty to reveal her secret on Tuesday. ;) Only three days left!

Thursday, September 17, 2009

IT'S COMING...but what is it?


Isn't Itty Bitty Betty adorable? She made her debut only yesterday and she has even more surprises in store for you! If you haven't already seen Itty Bitty Betty and Itty Bitty Bobby having loads of Halloween fun, you have to check out the new set called Itty Bitty Halloween over at Pink Cat Studio!

Itty Bitty Betty and Itty Bitty Bobby are super cute and ever so silly. If you love these new characters, you'll love what's coming just around the corner! Today is Thursday which means Itty Bitty Betty is going to be doing cartwheels for five days! She must be super excited about something. What could it be?! It must be something big because Itty Bitty Betty has been planning and hiding something from all of us which she'll reveal to everyone on Tuesday, September 22nd! Can you guess what it might be? Be sure to visit the Pink Cat Studio blog for a chance to win!!! :D

Wednesday, September 16, 2009

For You, Sonya

I made this birthday card for my fabulous friend and colleague Sonya who loves the same things as I do. Our birthdays are only four days apart! Our team is taking her out to lunch tomorrow to celebrate a little early since she's taking a few days off around her birthday. I wanted the card to be pretty and I've had this dress stamp from the Michael's $1 bin sitting unused in my craft caddy forever. Who says you can't do anything nice with those cheap stamps?! ;) I think Sonya will really like this dress but I'm pretty sure she'll joke that it's not her size. She might even say, 'Now why can't I find a dress like that?' LOL

This marks the first time I used faux stitching on a card. I couldn't be bothered to get out the sewing machine but I think it turned out better than it would've had I tried to stitch along that tiny area of blue! I stamped the dress on the same blue cardstock as the border and coloured in the dots with a white gel pen. Then I added sparkle to the flower, belt and hem. The dress stamp came with a clothes hanger but I decided to cut it off and make a real hanger out of wire. That was fun, too!

I decided that the white background behind the dress was lacking something so I added a yellow circle. It acts like a spotlight and also matches the dp. Little did I know it would look so great behind the dress. It's almost as if the dress belongs to someone famous and it's a museum piece! :Þ The ribbon was actually an afterthought which is why it doesn't wrap around the card. Some crafters suggest that ribbon is wasted when it's tied around the entire card but I'm not sure I like the way it looks. This doesn't look too bad but I think I prefer it to be wrapped around the edges.

Sources: SU textured whisper white cardstock; Paper Reflections coloured cardstock; DCWV glitter stack; Uni-Ball Signo Broad gel pen; Sarah Beise Dress; Stampendous Hey There Cupcake hearts and sentiment; Memories Black ink; Lewiscraft 24 gauge stainless steel wire; PSX Diamond Stickles; SU Crystal Effects (to attach the hanger to the dress); SU 1-3/8" circle punch; Fiskars Threading Water border punch; Celebrate It ribbon; dimension squares

Tuesday, September 15, 2009

Jazzy Feline Duet

This is the first of three cards my boss recently ordered. One of her good friends, a Minister, is turning 60 later this month! She wanted to celebrate Vivian's birthday with a very special card. I was given a list of possible things to feature on this card: jazz, cats, golf, dragonflies, pink, wine, Vivian, other birthday things. Wow, that is a long list to choose from! First I thought about the reasonable combinations. I couldn't feature cats with golf obviously. LOL Cats could be in a garden with dragonflies but I couldn't find any digital dragonfly images. Jazz and wine definitely go together but it would've been a little difficult to illustrate based on my love for scene cards. I was looking at cat images when I came across these piano cats and knew it was the one. It was so perfect!

This is my first time using a digital image. I purchased this one called Piano Cats from Squigglefly. If you haven't been to their site you should check it out! They have some really wonderful images. Of course the card was going to have a lot of pink because Vivian is crazy about pink. I really wanted to put a wine glass on top of the piano but left it off in the end because it wouldn't have fit in with the final layout of this card. I had to colour this image twice because I originally intended for the piano to be black but messed up the shading so badly that it looked like a rotting piano that no music could come out of. LOL Anyway, I decided to go with lighter shading the second time around and although I have a long way to go with Copics I think I did an okay job on this. I'm quite pleased with the way it ended up. I added Stickles to glitter up the cushion on the bench and crystal effects on the keys and top of the piano. Lastly, I used my Atyou Spica glitter pen to trace over the Happy Birthday script.

The best compliment of all was when my little guy saw the card, pointed at it with his chubby little finger and said, "Ca-!" :D

Sources: SU textured whisper white cardstock; Halcraft smooth white cardstock; Q-Print smooth white cardstock; Paper Reflections pink cardstock; SU textured basic gray cardstock; DCWV sweet stack; Fiskars Threading Water border punch; Fiskars Nostalgia corner edger; Squigglefly Piano Cats digital image; Copics; PSX Diamond Stickles; ICG alphabet punch set; SU brads; SU Crystal Effects; Imaginisce All Kinds of Happy; SU Basic Gray ink; SU large oval punch; SU scallop oval punch; dimension squares; Straight 'N' Narrow ribbon; Atyou Spica glitter pen

Wednesday, September 9, 2009

Happy Birthday, Sis!

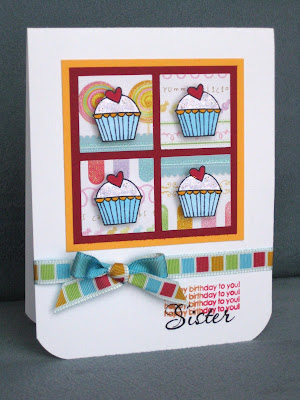
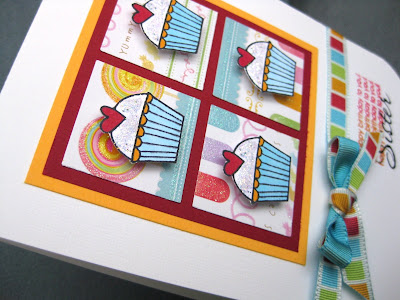
The title is self-explanatory. This card is for my sister whose birthday is tomorrow. She loves sweets so I knew ahead of time that her card would be dessert-oriented. LOL I wanted to use a particular sheet from the Sweet Stack collection and had the perfect ribbon to go with it so I based all the card colours around that paper. I wanted to round the edges of the base but don't have a big corner rounder so I used a circle punch. It's not perfect but it works. I punched out portions of the sweet paper with a square punch and cut the red and bright yellow paper to fit. Then I stamped and coloured in the cupcakes and popped them on with dimension squares. I added the sparkles afterwards so I wouldn't have to wait for it to dry before finishing the rest of the card which included tying a very difficult bow. Since the ribbon is double-sided it was hard to make a symmetric one but I finally got it. I almost gave up and did a regular knot instead but I really wanted to have a bow and finally got it. The sentiments were harder than I thought they would be. Thankfully, I actually did the sentiment on the card before gluing everything down because this was the third try. I smudged the ink the first time and stamped it really crooked the second time. It could be better but I like a little imperfection. ;) It's probably a good thing that I had a couple spare cards to practice tying the ribbon on since the cupcake glitter was still wet. I tied the ribbon on one of the extras and when it was perfect, I pulled it off and transferred it on to this final version. Happy Birthday, Sis!

Sources: SU (textured whisper white), Paper Reflections (coloured) & Q-Print (smooth white) cardstock; SU 1-3/8" circle punch; McGill 1-1/4" square punch; Studio G (cupcake); Verve Because of You (sister); Memories Black ink; Imaginisce All Kinds of Happy (happy birthday to you); Vivid ButterScotch & Red inks; Copics; PSX Diamond Stickles; dimension squares; Urban Scrapyard ribbon