Thursday, December 21, 2023

Spellbinders "My Heart Smiles" Glimmer Hot Foil Kit of the Month | December 2023


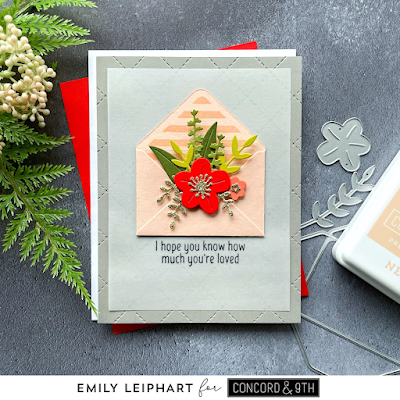
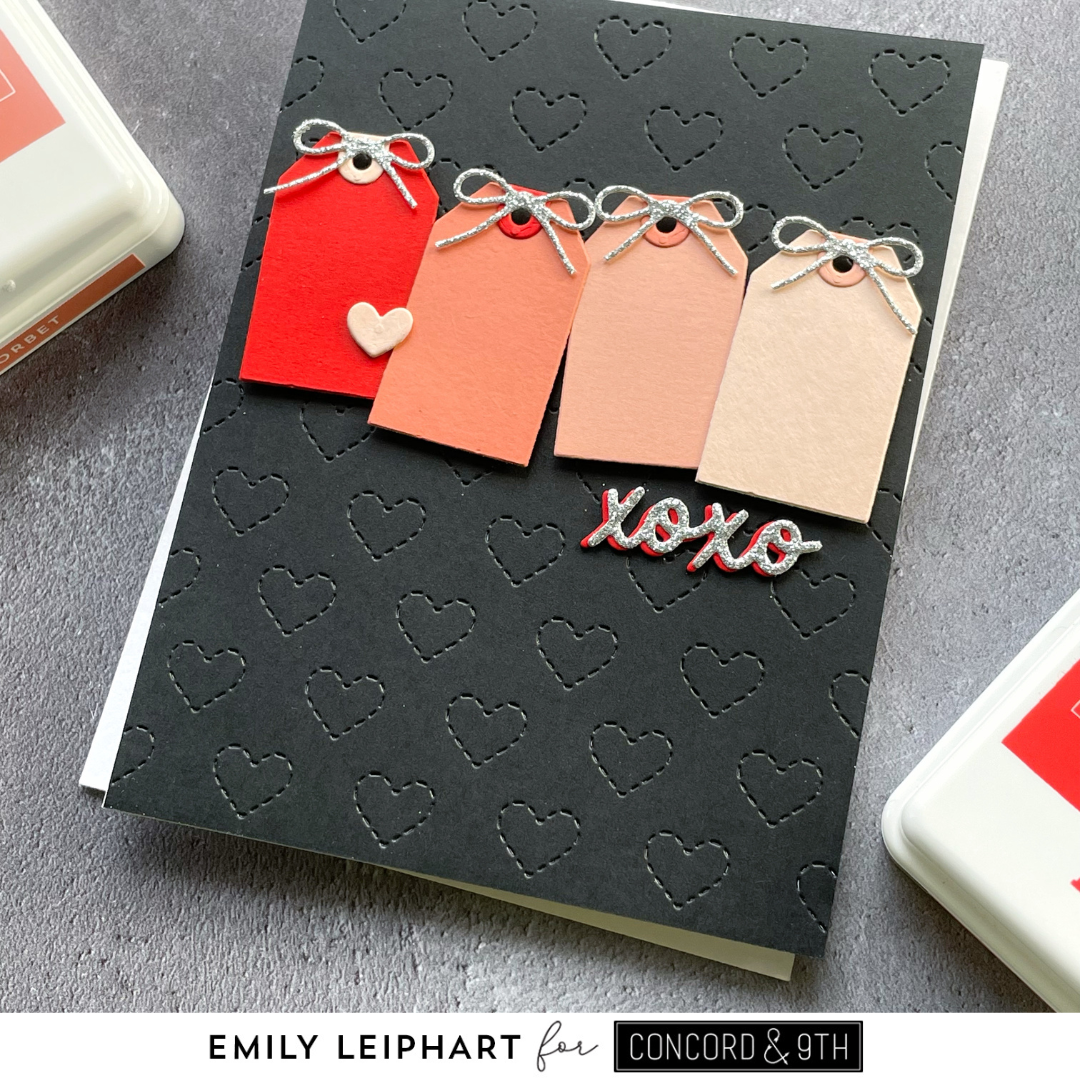
Hello, crafty friends! I'm back with two cards using Spellbinders December 2023 Glimmer Hot Foil Kit of the Month called "My Heart Smiles"! It's absolutely stunning and you can keep it simple or go all out. Originally, I only foiled this floral image once but then I decided to keep going!

I started with a 5.5" x 8.5" piece of Neenah White cardstock. I foiled the sentiment and large floral image twice using Matte Gold Hot Foil by turning the panel 180 degrees. This first card is a flat one-layer design, perfect for mailing. I wish you could see the matte shine in person because it's so beautiful yet subtle. 


Next, I coloured the flowers and leaves using a mix of Copic markers and Sketchmarker Brush Pro markers, both of which are alcohol-based markers. Since my Sketchmarkers were gifted by Ellen Hutson and that store has closed down, I prefer to recommend the OLO markers available at Spellbinders and listed in the supply links below.


After the colouring was completed, I used the largest of the Precision Layering A2 A Dies to cut out the panel and attach it to a white card base using liquid glue.


This card was so simple and quick to make. You could easily create a gift set with different colours and sentiments.


My second card with the December 2023 Glimmer Hot Foil Kit of the Month takes it up a notch. I'll admit that I made this card because I ended up fussy cutting the first panel of heat foiled flowers. Yes, I'm so crazy! Oh, how I wish this hot foil kit came with coordinating dies.


I made the attempt to design a card using just a single panel of popped up flowers. However, I didn't like how it looked so I re-foiled and coloured a second panel and cut it out.


Next, I used the same Matte Gold Hot Foil to heat foil the sentiment on a panel of Fig cardstock. Then I dry embossed the panel using the Floral Archway 3D Embossing Folder. To finish, I placed the flowers around the sentiment using foam tape, trimmed off the overhanging pieces and added a few gold pearls.


I just love all of the details and texture on this second card, which is quite different from the first design. What's your preference? Do you like the first clean and simple design or the elevated design more?


The December Club Kits are only available until December 27, 2023. Be sure to check out all of the amazing deals during Spellbinders Holiday Collections 50% Off Sale, now through 11:59pm PST on December 26, 2023.


Here's a list of monthly club kits I share, as well as some of the value kits offered by Spellbinders:


I hope you enjoyed today's projects. I appreciate you stopping by and, if you're inspired, please shop my affiliate links below. Thanks so much for your continued support!

Supplies

Tuesday, December 19, 2023

Don't Forget Bundle from Concord & 9th + GIVEAWAY!


Today is my last guest post for Concord & 9th's December Release and I'm featuring the Don't Forget Bundle which is my absolute favourite bundle of this month's release! Those of you who know me well should know. It's because of the hand! LOL I can't really explain why but I love all sets with hands and find them so fun and versatile.


The Don't Forget Stamp Set includes sentiments for all occasions from reminders to sympathy and encouragement cards. The Don't Forget Dies can be used to create hands adorned with bandaids, bracelets, a bow, a watch, various sizes of fingernails and a sleeve that can be decorated with stripes.


My colour palette for this card includes Poppy (finger nail), Nectar (hand), Tidepool (base panel), Juniper (bow), Midnight (sleeve), Black (die cut sentiment), Gold Glitter Paper (three diamond bracelets) and Matte Gold Foil (single gold bangle). 


I stamped and heat embossed white stripes on the Midnight sleeve for the ultimate French girl look, especially with those red nails and the gold bracelets. I mean, seriously, who wouldn't love to have that stack of gold and diamond bangles in real life?!


After assembling the hand, I die cut the scripted part of the sentiment from Black cardstock and glued it to the Tidepool panel. I also used Black ink to stamp the secondary sentiment which makes for a really nice encouragement card for any friend in a slump. I finished the card by rounding the corners and attaching the hand with foam tape.


GIVEAWAY DETAILS

Concord & 9th is generously offering a $25 gift certificate to one of my readers and that giveaway is taking place on Instagram HERE.

********************

I hope you enjoyed today's project. You can find all of my December Release guest posts here:


If you're inspired by my work, please shop my affiliate links below. Thanks so much for your continued support!

Supplies

Monday, December 18, 2023

Parcel of Petals Bundle from Concord & 9th


Hello again, crafty friends! Today's post for Concord & 9th's December Release features the Parcel of Petals Bundle and it's absolutely stunning. I love the darling little envelope that can be filled with beautiful flowers. Who wouldn't love that in their mailbox?!


When it came time to create the envelope from the Parcel of Petals Dies, I immediately reached for Nectar cardstock. I just couldn't resist! I also wanted to make it from Poppy cardstock but I'll save that for Chinese New Year cards.


Using the Parcel of Petals Stamp Set, I stamped the lines on the inside of the envelope using Nectar ink before assembling the envelope. Next, I die cut the large flower from Poppy cardstock, the small flower from Sorbet, and the foliage from Lemongrass, Avocado and Artichoke cardstock. I added sparkle by die cutting three smaller sprigs and the centres of the flowers from Gold Glitter Paper.


I arranged the bouquet on the envelope, glued all the pieces together and popped it on with foam tape. For the sentiment, I cut a panel of vellum and heat embossed my favourite sentiment from the Parcel of Petals Stamp Set. To finish, I die cut an A2 panel of Cobblestone cardstock with the Quilted Card Front Die and attached all of the layers to the white card base.


I hope you enjoyed today's project. If you missed my previous posts, you can find those here:


I'll see you again tomorrow with more inspiration featuring the Don't Forget BundleIf you're inspired, please shop my affiliate links below. Thanks so much for your continued support!

Supplies


Sunday, December 17, 2023

Short & Sweet Dies from Concord & 9th


Today's project for Concord & 9th's December Release features the Short & Sweet Dies, which is seriously the most amazing set of die cut sentiments! Of the eight cards I made for this month's release, this might be my favourite. I'll admit it's extremely hard to love one more than the rest but how could I not love this one? After all, it once again features my obsessive pairing of Poppy and Nectar. Haha!


I kept this one simple but with visual interest and subtle textures throughout. I hadn't used the Stitched Hearts Card Front Die much since I bought it so this was a great opportunity to use it, this time in Black cardstock for a dramatic look.


I cut the gift tags and their hole reinforcers from Poppy, Sorbet, Grapefruit and Nectar cardstock using the All Wrapped Up Dies. I placed the tags in ombre order and shifted the reinforcers to the right before glueing them on so there would be a slight contrast to the tags themselves.


I played around with the position of the tags before deciding on colours for the bows and sentiment. Initially, I wanted to place the sentiment over the last two tags but that didn't look right. 


Since I ended up choosing Silver Glitter Paper for the bows, I also layered it over a Poppy shadow for the sentiment. The bow is from the Don't Forget Dies and the sentiment is from the Short & Sweet Dies.


I felt that something was missing so I added a cute little heart from the All Wrapped Up Dies. I cut this from Nectar cardstock and layered it thrice for dimension. Do you agree that it's the perfect way to finish this card?


I hope you enjoyed today's project. If you missed my previous posts, you can find those here:


I'll see you again tomorrow with more inspiration featuring the Parcel of Petals BundleIf you're inspired, please shop my affiliate links below. Thanks so much for your continued support!

Supplies

Saturday, December 16, 2023

Enchanted Garden Dies from Concord & 9th


Hello again! Today's project for Concord & 9th's December Release features the Enchanted Garden Dies and this set comes with its own wow factor. It looks amazing no matter how you use it, which is exactly what we want from cardmaking, right? ;)


This card features all inlaid pieces so it was truly a labour of love! I started by choosing my colour palette which includes Sprout, Juniper, Harbor, Blueberry, Midnight and Silver Glitter Paper.


I die cut the floral card front from SproutJuniperHarborBlueberry and Midnight cardstock. Only the Midnight panel had a customizable inside piece. After I glued the Midnight panel on to a white card base, I sorted the other pieces into a tray to make the inlaying process easier.


I started by glueing the Juniper leaves into place, then added the Sprout petals and dots. After these two colours were in place, it was easier for me to choose the remaining colours. I added the carpels and petals of the daisies in Harbor and Blueberry, respectively.


To finish, I filled in the remaining pieces with colours that looked best, meaning I made sure that all four colours were well represented in each area of the card front. I used the separate die for the sentiment to create inserts from Silver Glitter Paper to add some bling to the card. This sentiment would work for any celebratory occasion and I love that the card is flat and easy to mail!


I hope you enjoyed today's project. If you missed my previous posts, you can find those here:


I'll see you again tomorrow with more inspiration featuring the Short & Sweet DiesIf you're inspired, please shop my affiliate links below. Thanks so much for your continued support!

Supplies

Friday, December 15, 2023

Deco Stencil Pack + Quirky Stripe Stencil from Concord & 9th


I'm back with another project for Concord & 9th's December Release and today's post is a long one because I have two cards to share using the Deco Stencil Pack and Quirky Stripe Stencil.


This first card features the Deco Stencil Pack which consists of two layering stencils. You can also use them separately but they so cute together! 


I started with a Nectar cardstock panel and placed it on a grip mat. I placed the arches stencil on top and started ink blending from the top down using Poppy, Sorbet, Grapefruit and Nectar inks, creating an ombre gradient as I moved down the panel. For the inside of the arches, I used SorbetGrapefruit and Nectar and a lighter hand.


After the panel was completed, I die cut the sentiment from the Short & Sweet Dies with Harbor and Blueberry cardstock. The flowers and leaves were cut from the Parcel of Petals Dies with Poppy, Nectar and Mushroom cardstock.


I glued the leaves directly on the stencilled panel and popped up the flowers and sentiment with foam squares.


I was so in love with this clean and simple design that I ended up using the same colours to make a slightly different version featuring the Quirky Stripe Stencil.


For this second card, I started with a Harbor cardstock panel and ink blended the Quirky Stripe Stencil on an angle using Harbor ink for a subtle tone-on-tone look.


The stencil wasn't long enough to extend from one diagonal corner to the next so I shifted the stencil up to the top right corner but forgot that the stripes are quirky and thus don't match from one to the next. Don't look too closely or you'll see a slight offset. I left it as is since it just adds to the quirkiness. ;)


This time, I used a different sentiment from the Short & Sweet Dies with Poppy and Nectar cardstock. The flowers and leaves were cut from the Parcel of Petals Dies with BlueberryWhite and Silver Glitter paper.


I used a slightly different and more full floral arrangement on this card because the background is more plain than the first card.


As with the first card, I glued the leaves flat on the panel and popped up the flowers and sentiment with foam squares.


I hope you enjoyed today's projects. If you missed my previous posts, you can find those here:


I'll see you again tomorrow with more inspiration featuring the Enchanted Garden DiesIf you're inspired, please shop my affiliate links below. Thanks so much for your continued support!

Supplies