Tuesday, April 25, 2023

Spellbinders | Seahorse Kisses Collection + Warehouse Sale

Hello, crafty friends! I'm on the Spellbinders Blog with three vibrant aquatic cards featuring the new Seahorse Kisses Collection by Dawn Woleslagle. This collection includes hot foil images and sentiments, photopolymer stamps and sentiments, and my new favourite 3D embossing folder. Whether you're into aquatic themes or not, you're sure to fall in love with these new products.

Affiliated product links are listed below at no extra cost to you. Details on how I made each card and more photos are on the Spellbinders Blog.

Don't forget to grab all the deals during Spellbinders Spring Cleaning Warehouse Sale, on now through April 28, 2023. Thanks so much for stopping by! 

Supplies

Tuesday, April 11, 2023

VIDEO | Taylored Expressions | Create-in-Quads Ever in Bloom Collection

I am over-the-moon excited about this release because it's just so beautiful! The Ever in Bloom Collection is curated around the newest Create-in-Quads - Ever in Bloom Stencil Set from Taylored Expressions. There are seven unique products in this entire collection, all for the newest quad stencils. Yes, that's right! 


I especially love how each quad panel is so different from the next. All of my designs and the uses of the colour palette make each of these cards look like they were made from completely different products. I just love the variety of designs made possible by the Create-in-Quads - Ever in Bloom Stencil Set.


The colour palette for all of these cards includes Lavender Glaze, Plum Punch, Salt Water Taffy and Gumball. Gumball is one of those colours I shied away from for a long time but I've been reaching for it more and more.


After using bitty blender brushes and pastel blender brushes to stencil the four panels, I cut them up and used A2 Layer Stacklets and Additional A2 Layer Stacklets to trim down the first panel, as well as create a gold foil frame. The inside was die cut using the Create-in-Quads Ever in Bloom Frame Die.


All of the sentiments from the Hello Lovely Stamp Set were stamped with Versamark Watermark ink on Sugar Cube cardstock, then heat embossed with gold embossing powder. I die cut a shadow from Lavender Glaze cardstock, glued it to the sentiment and popped up both the frame and sentiment with foam tape.


When photographing multiples, it's always ideal to create two portrait cards and two landscape cards. I was really happy that these panels and dies made it ideal for that. This second design features the single array which comes with its own coordinating Create-in-Quads Ever in Bloom Sprays Die.


Much like both the Autumn Array Stamp & Stencil Combo and Spring Array Stamp, Stencil & Clear Combo, which come with coordinating dies, this singular spray shines all on its own. The background panel was created with one of my often-used favourites, the Diamonds Piercing Plate.


I added gold foil shadows to both the spray and the sentiment, popping them on with foam tape. I added one gold matte metallic enamel dot to the centre.


Going back to a portrait orientation, this card base was cut from Gumball cardstock and the fully-stencilled panel was trimmed down with the Additional A2 Layer Stacklets. The sentiment needed something behind it to distinguish it from the busy background.


I used glue dots to attach the sentiment to the Stitched Rectangle Stacklet cut from vellum. Then I used more glue dots to attach the vellum to a shadow cut from Black Licorice cardstock. The whole piece was popped up on foam tape to give the illusion that it's floating above the stencilled panel.


To finish, I decorated two corners with gold matte metallic enamel dots in two sizes.


My last card is also a landscape design and I love the way the second die in the Create-in-Quads Ever in Bloom Sprays Die cuts these corners. They also look amazing on a Lavender Glaze card base. It's such a simple design but with a serious wow factor!


In order to create some dimension, I used double-sided tape on the outermost edges of the die cut pieces and popped up the innermost die cut edges with foam tape. I love this trick to clean card edges with a bit of visual interest.


This time, I added two shadows to the sentiment, one in Plum Punch and a second in gold foil. To finish, I also added a few gold matte metallic enamel dots to this card and all of my Create-in-Quads - Ever in Bloom cards are done!


Thanks so much for stopping by and, if you're inspired, please shop my affiliate links below!

Sources

Monday, April 3, 2023

Taylored Expressions | Stamp & Stencil Sympathy Card Ideas

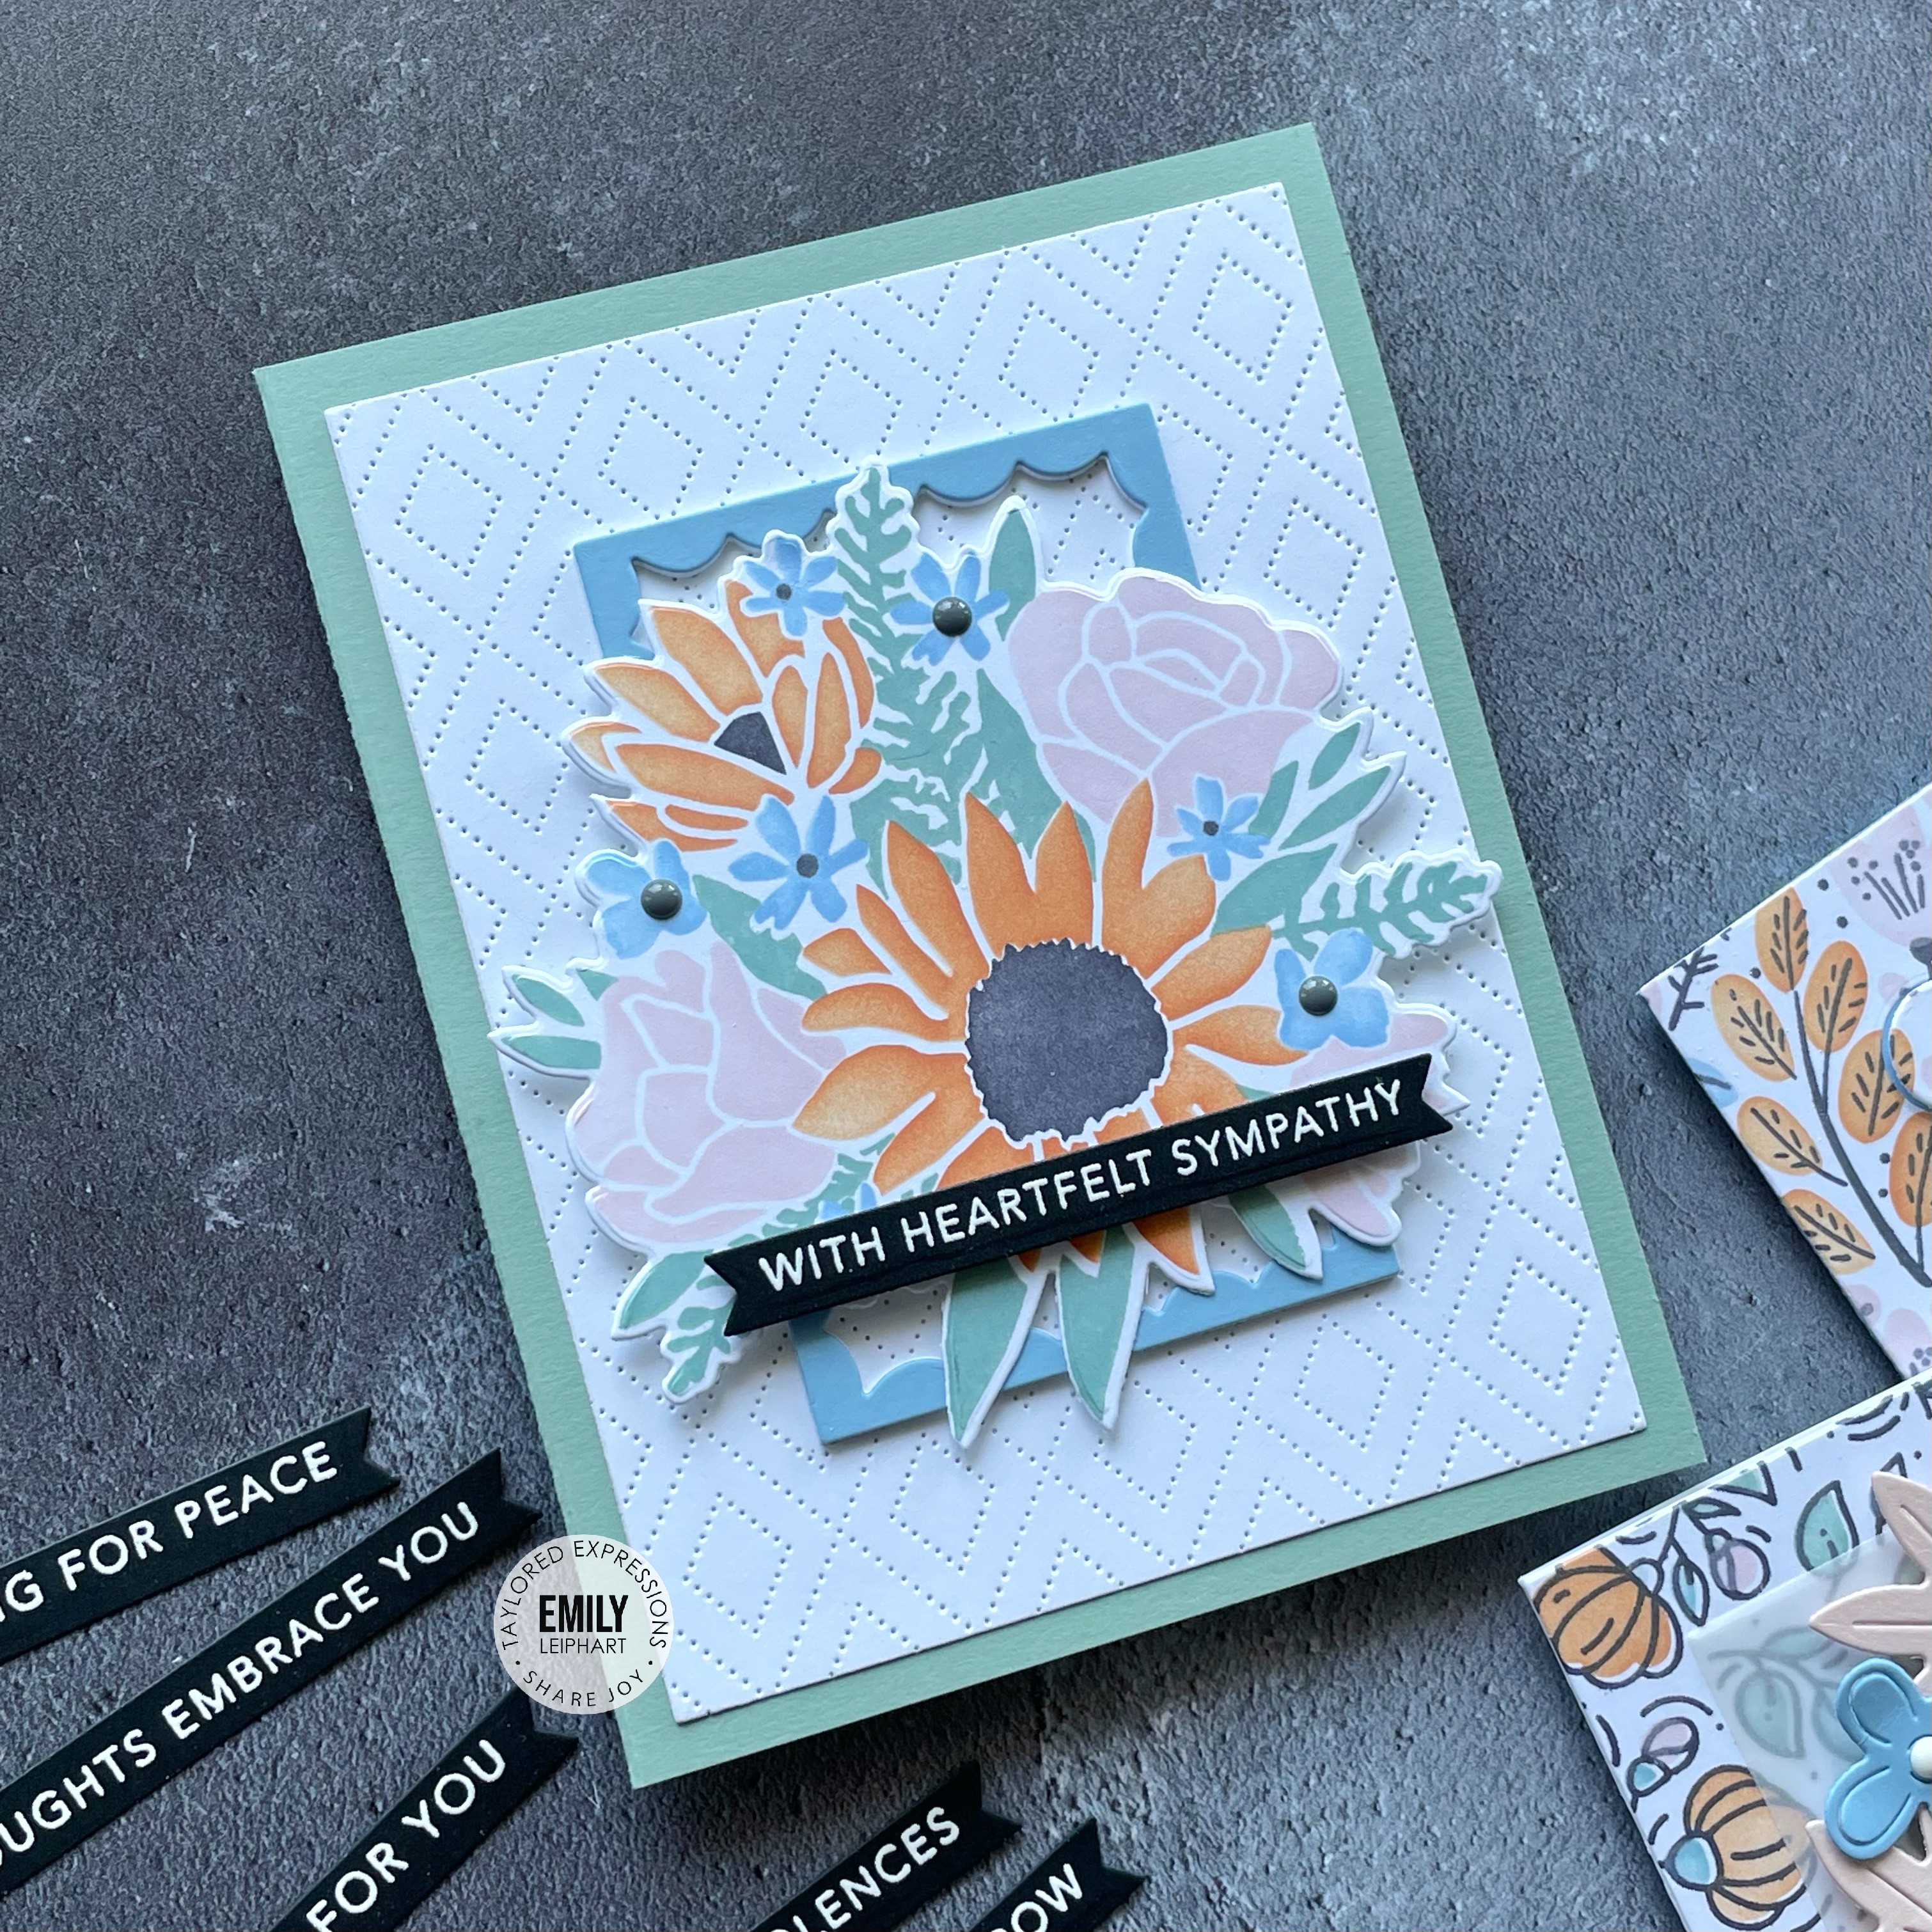
It's been a tough year for so many who have lost loved ones to cancer. I know that none of us enjoy making sympathy cards but they eventually must be made. To make it easy, I decided to use some new-to-me stamp and stencil combos from Taylored Expressions that would make this process easier.

My first card features the Autumn Array Stamp & Stencil Combo which I think works beyond autumn in so many ways. If you have the Spring Array Stamp, Stencil & Clear Combo or prefer this arrangement, you can stretch the versatility of this set as well. 

After stamping the base layer with Spearmint ink, I use Single and Bitty Blender Brushes to blend Rose WaterCandy CornGumball and Poppy Seed inks with the coordinating stencils. After cutting out array with the coordinating Autumn Array Die, I set it aside to prepare the background layers.

I cut the A2 card base from Spearmint cardstock, and the Sugar Cube panel from both the Diamonds Piercing Plate and the Additional A2 Layer Stacklets, which I glued to the card base. Next, I cut the smallest of the Frame in Frame 3 Cutting Plate from both Gumball and three Sugar Cube layers, stacking them together and gluing them to the pierced panel. 

Next, I stamped the Simple Strips - Sympathy with Sugar Cube ink on Black Licorice cardstock, heat setting it with white embossing powder. I used the coordinating Simple Stripes Die to cut out all the strips, of which three are featured in this post.

I popped the Autumn Array on to the card with foam squares and added one of the heat embossed sentiments with black foam strips. To finish, I added a few grey enamel dots to the centres of the Gumball-coloured flowers.

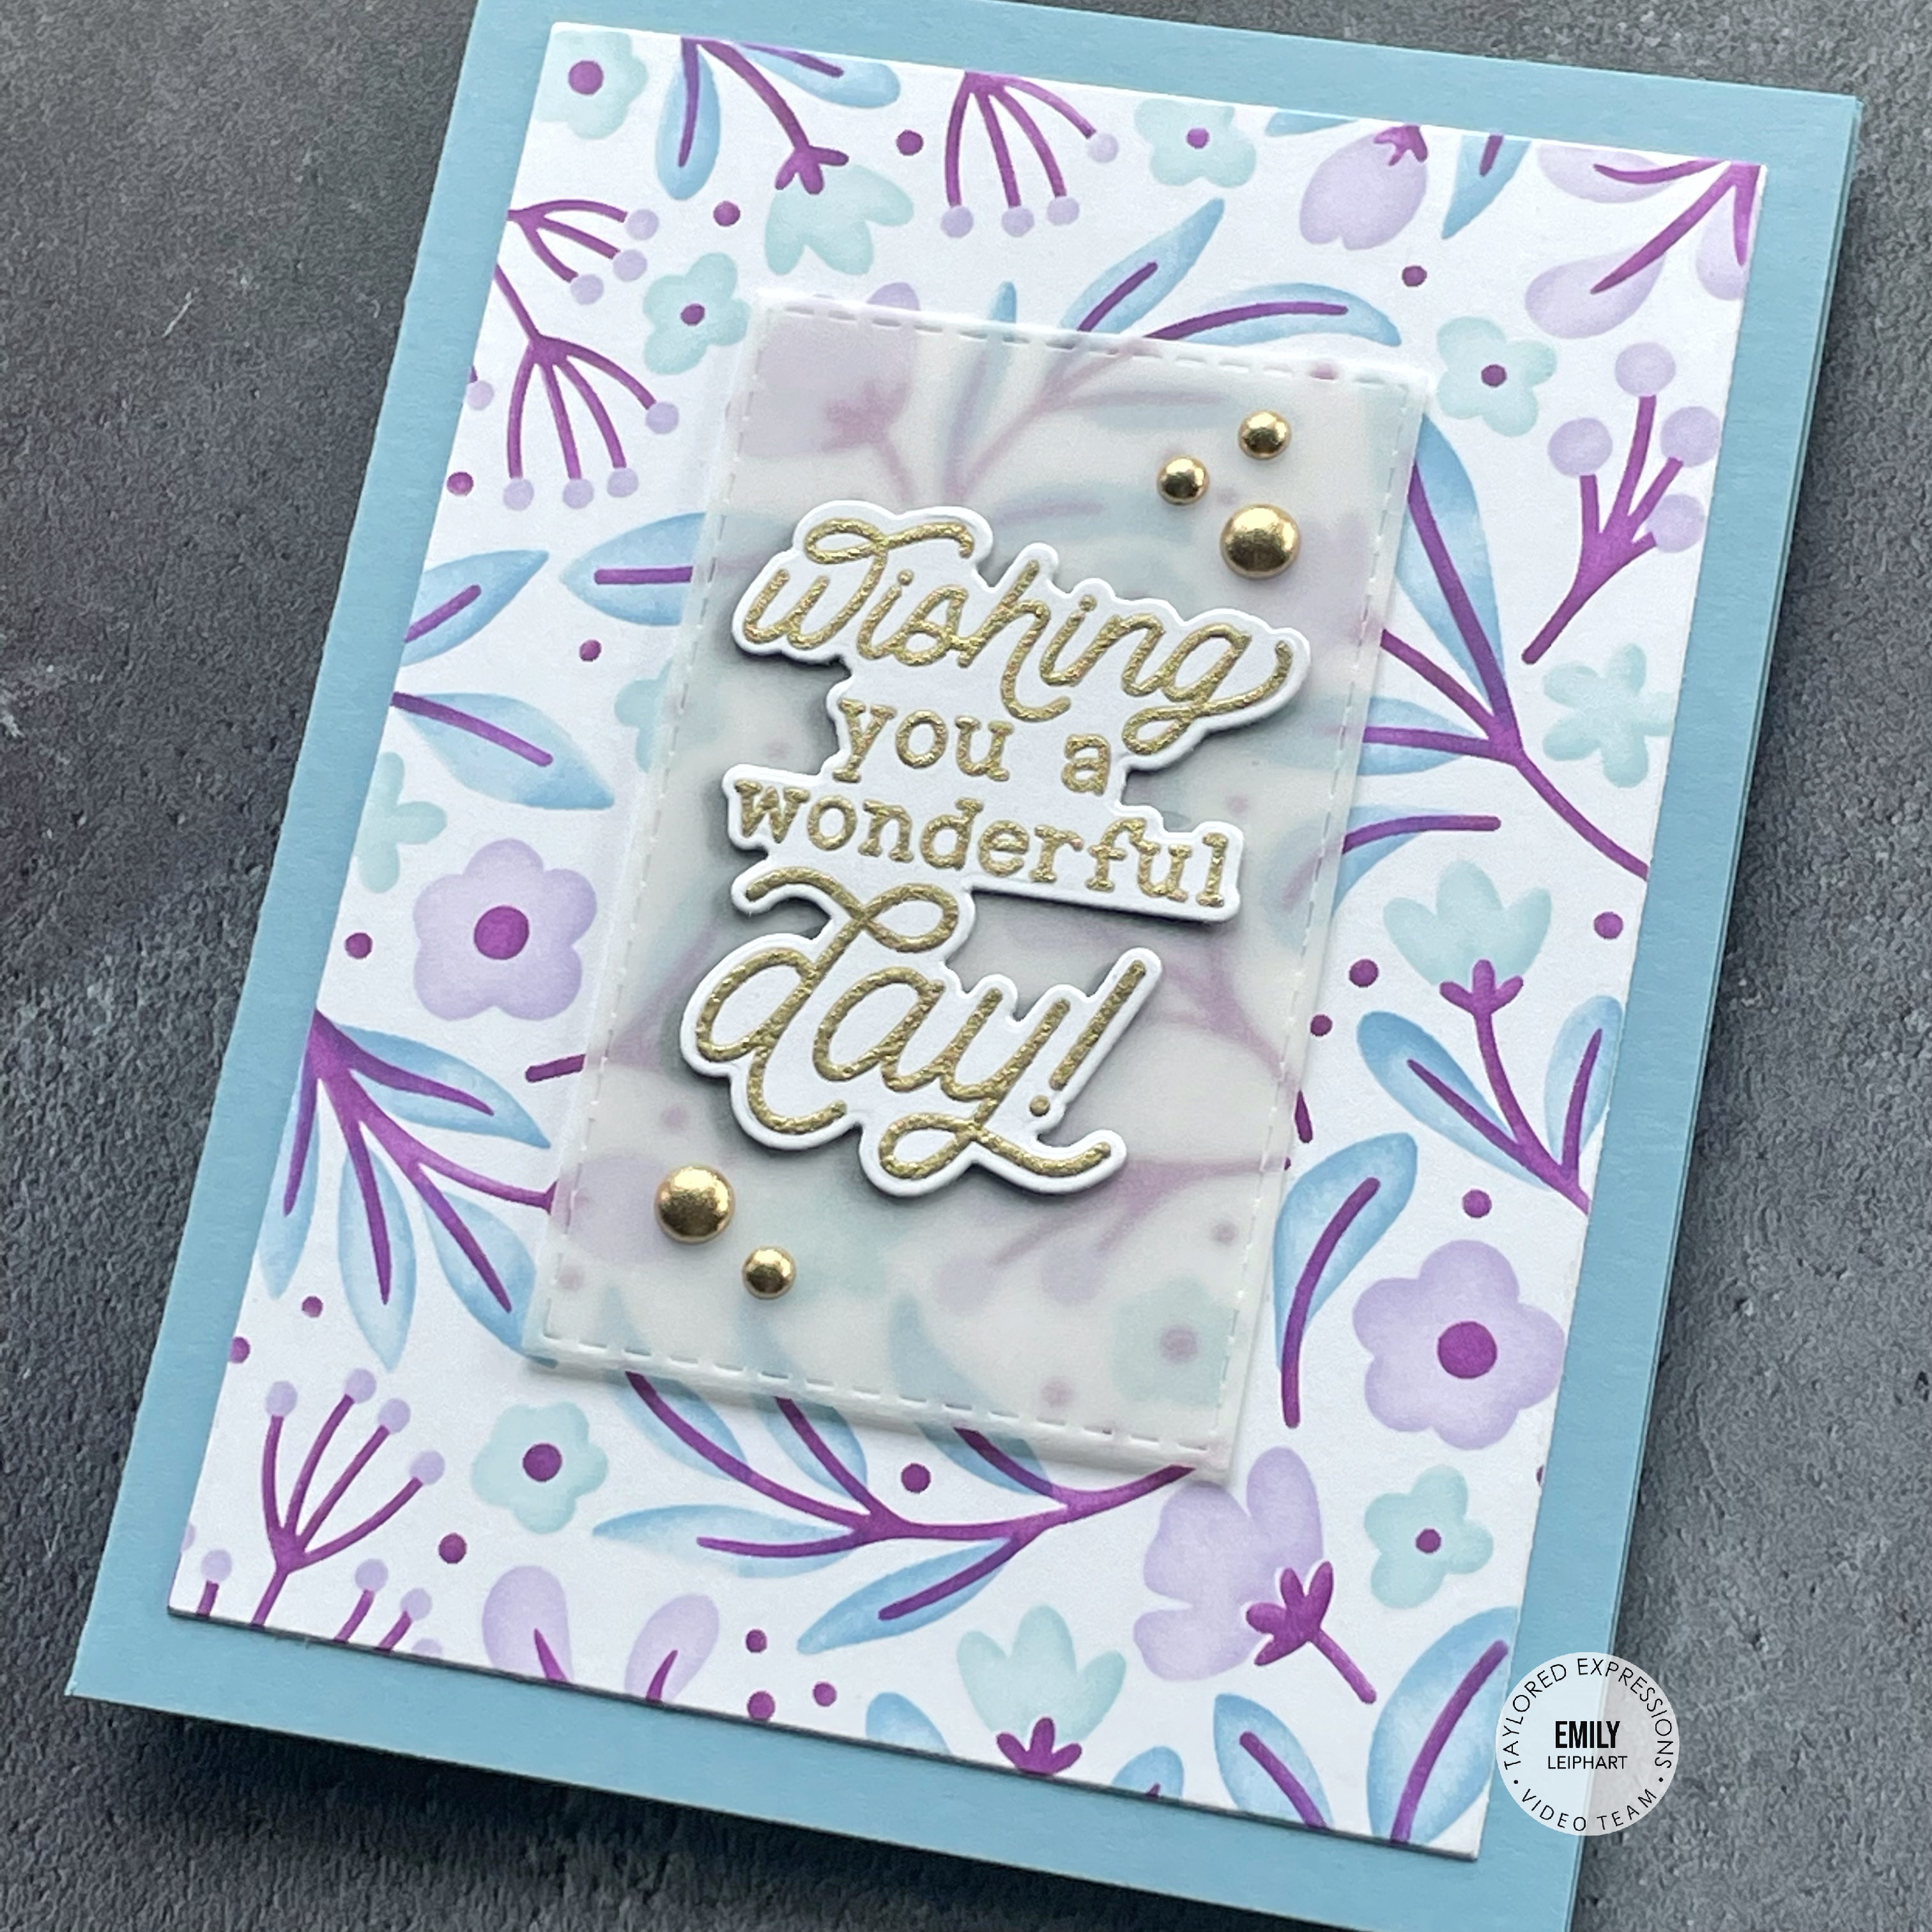
For my second card, I used the landscape orientation of the Flower Patch Background. The Flower Patch Layering Stencils are sold separately for this background, in case you want to do your own colouring using your favourite medium.

Since there are only three stencils, I used an ombre effect with the leaves. It's a bit harder to see the Gumball colour but the leaves were stencilled in both Gumball and Spearmint. The large buds were blended with Candy Corn and the small buds were stencilled with Rose Water ink.

I used the A2 Layer Stacklets to cut a vellum panel. Then I cut several of the Garden Variety Dies from Rose WaterCandy Corn and Gumball cardstock, and the stems from Garden Variety Bouquet Builder from Spearmint and Poppy Seed cardstock. Once I had the arrangement finalized, I used a combination of double-sided tape, foam squares and glue dots to attach the bouquet to the vellum panel. 

After popping up the sentiment with black foam strips, I used double-sided tape to attach the vellum panel to the stencilled background. This time, I added a few white enamel dots to the centres of the Gumball-coloured flowers.

You can find more inspiration for the Flower Patch Background and Flower Patch Layering Stencils in this BLOG POST and you can find more inspiration for the Garden Variety Dies in this YOUTUBE VIDEO.

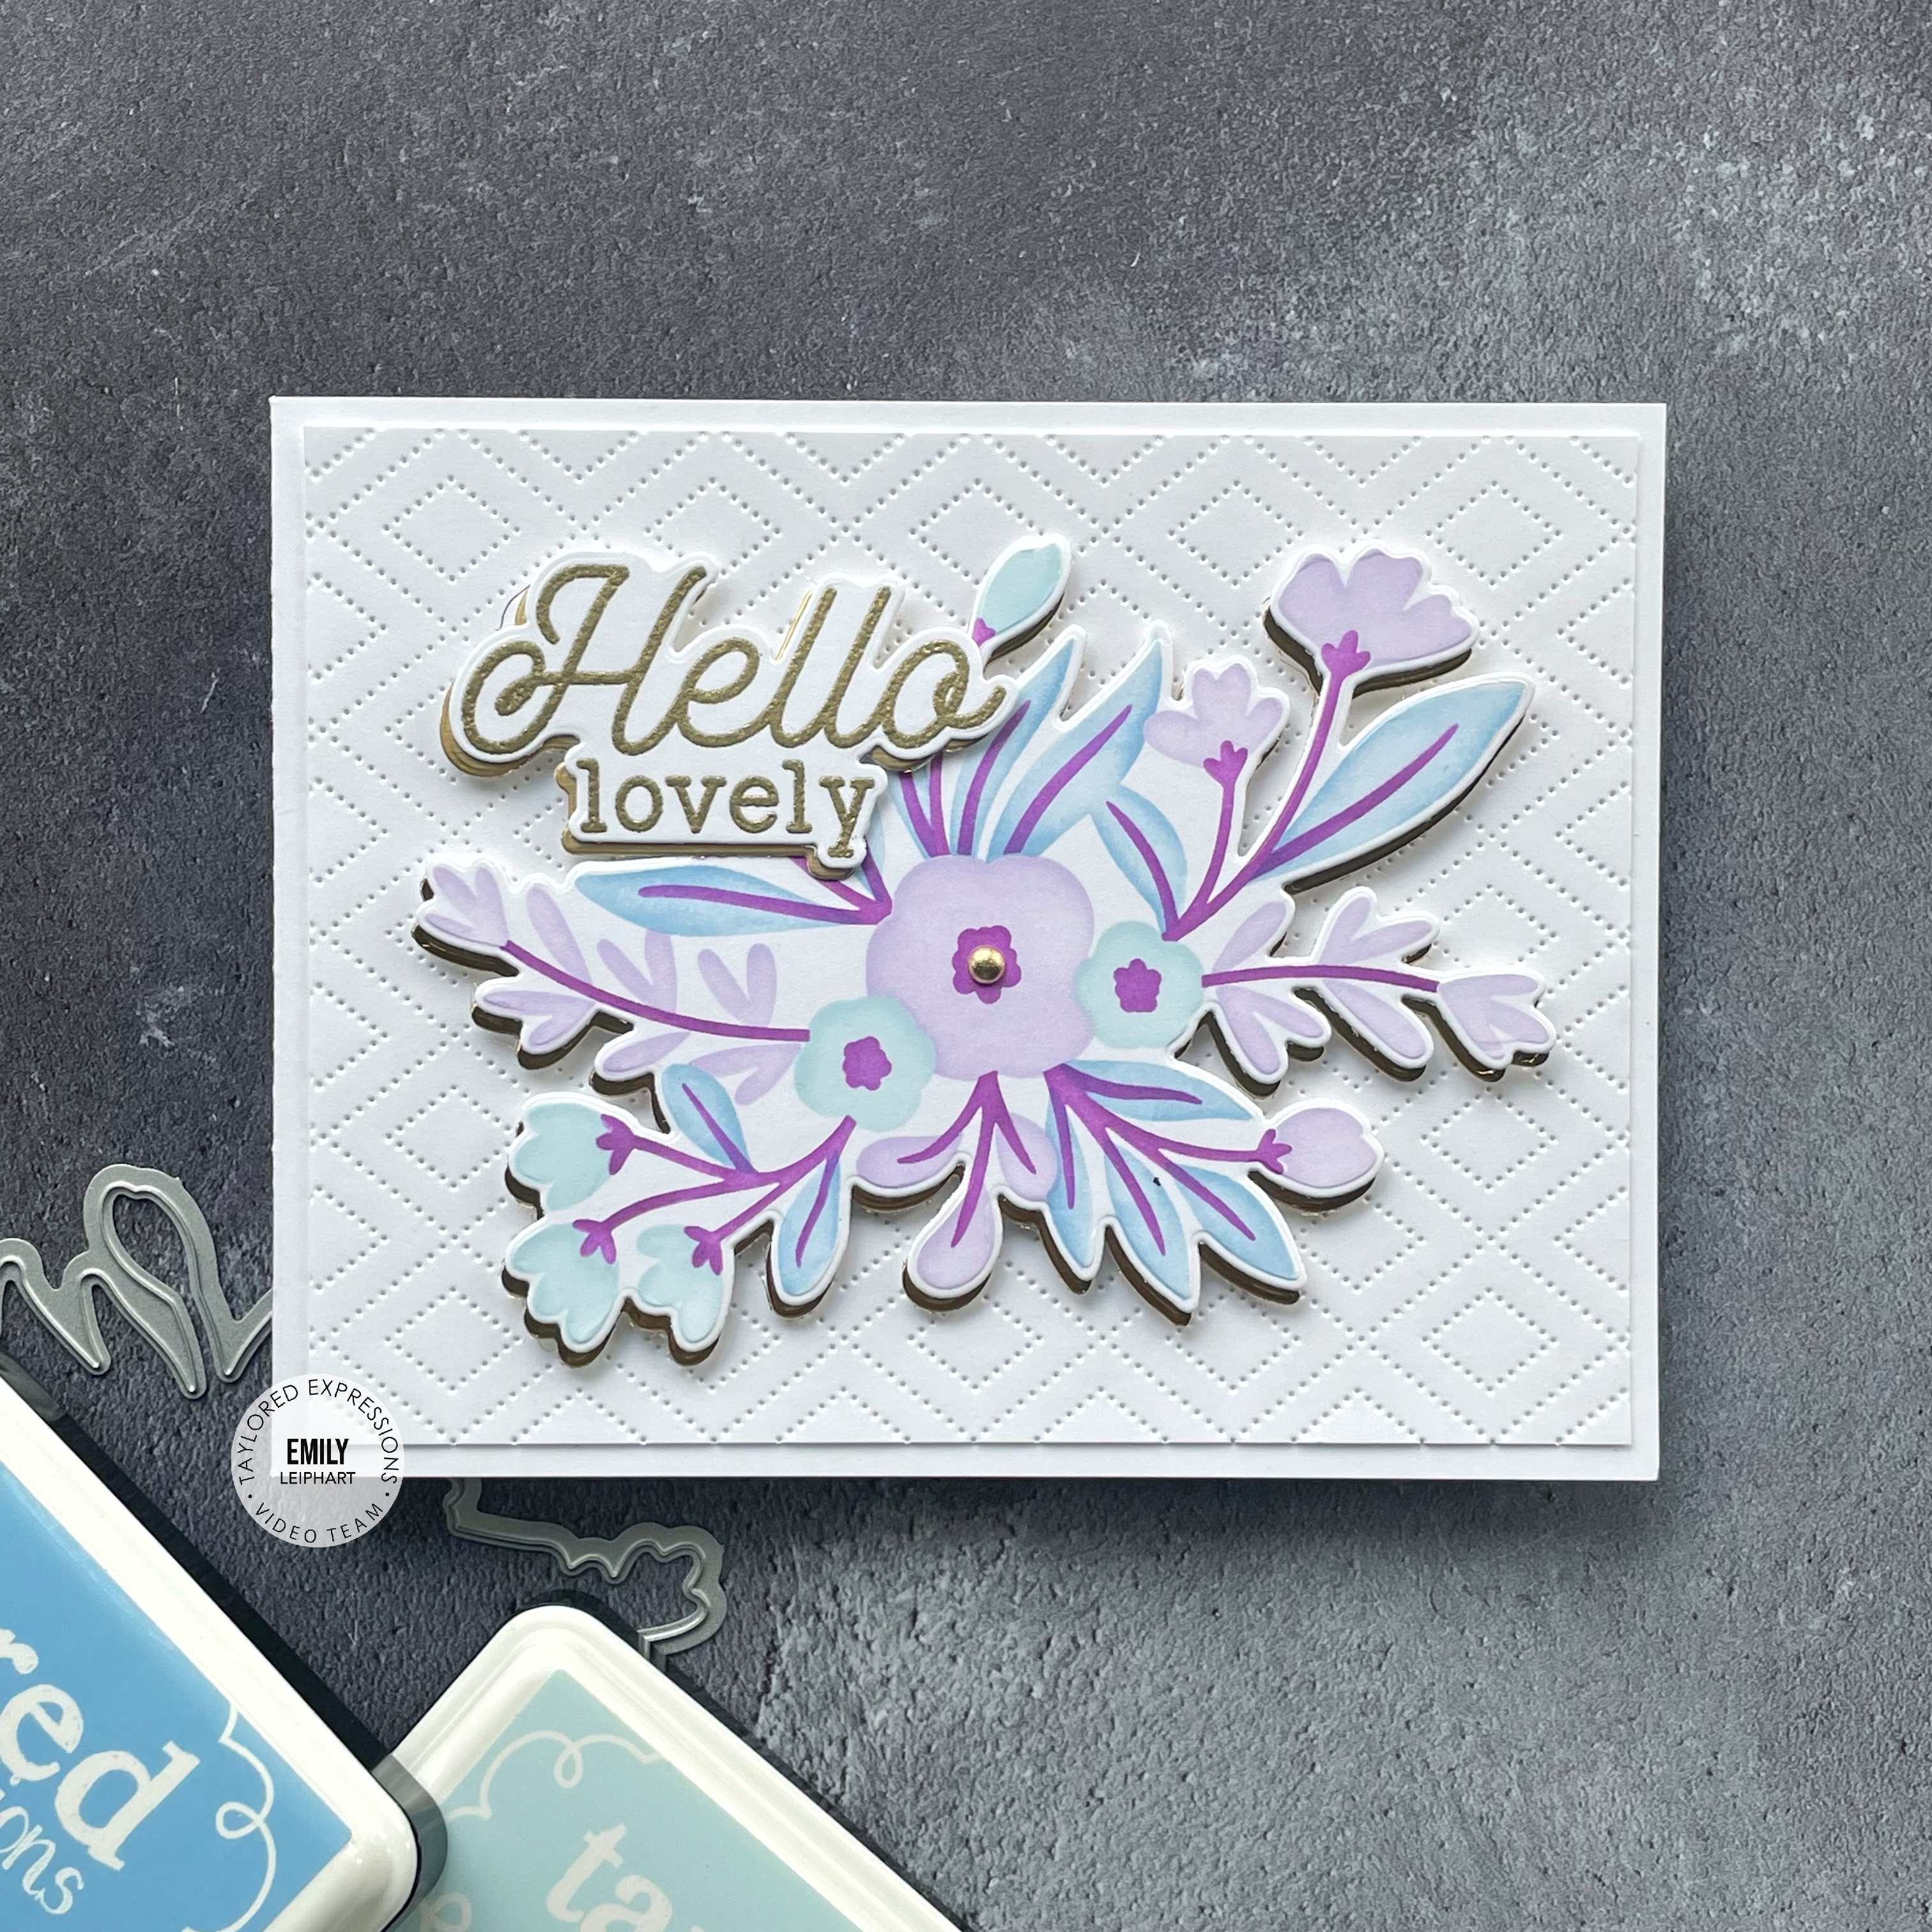
My last card features the Four Seasons Stamp & Stencil Combo, which is so beautiful! You can see that I used the same four colours as the two previous cards and I couldn't resist letting this shine without any distractions. 

I used the Frame in Frame 2 Cutting Plate to cut out the centre and attached all three pieces to a Gumball card base, popping up the frame itself with foam strips.

I chose a sentiment from Handlettered Sympathy and white heat embossed it on Black Licorice cardstock and found the perfect pairing from the many Simple Strips - Sympathy stamped earlier.

To allow both sentiments to stand out against the busy background, I recut the Frame in Frame 2 Cutting Plate from vellum and attached the sentiments to the centre piece with foam tape. Then I attached the vellum insert to the panel with double-sided tape.

I hope you found inspiration in today's post. Since sympathy cards are hard to make, I felt that gathering a few of my stamp & stencil products with the same colour palette were a great way to make a bunch of them all at once. I plan to go back and create a few more with similar designs but switch up the colour combination.

Thanks so much for stopping by and, if you're inspired, please shop my affiliate links below!

Supplies