Monday, January 29, 2024

Spellbinders | "You're the Best" feat. Wendy Vecchi's From the Garden Collection


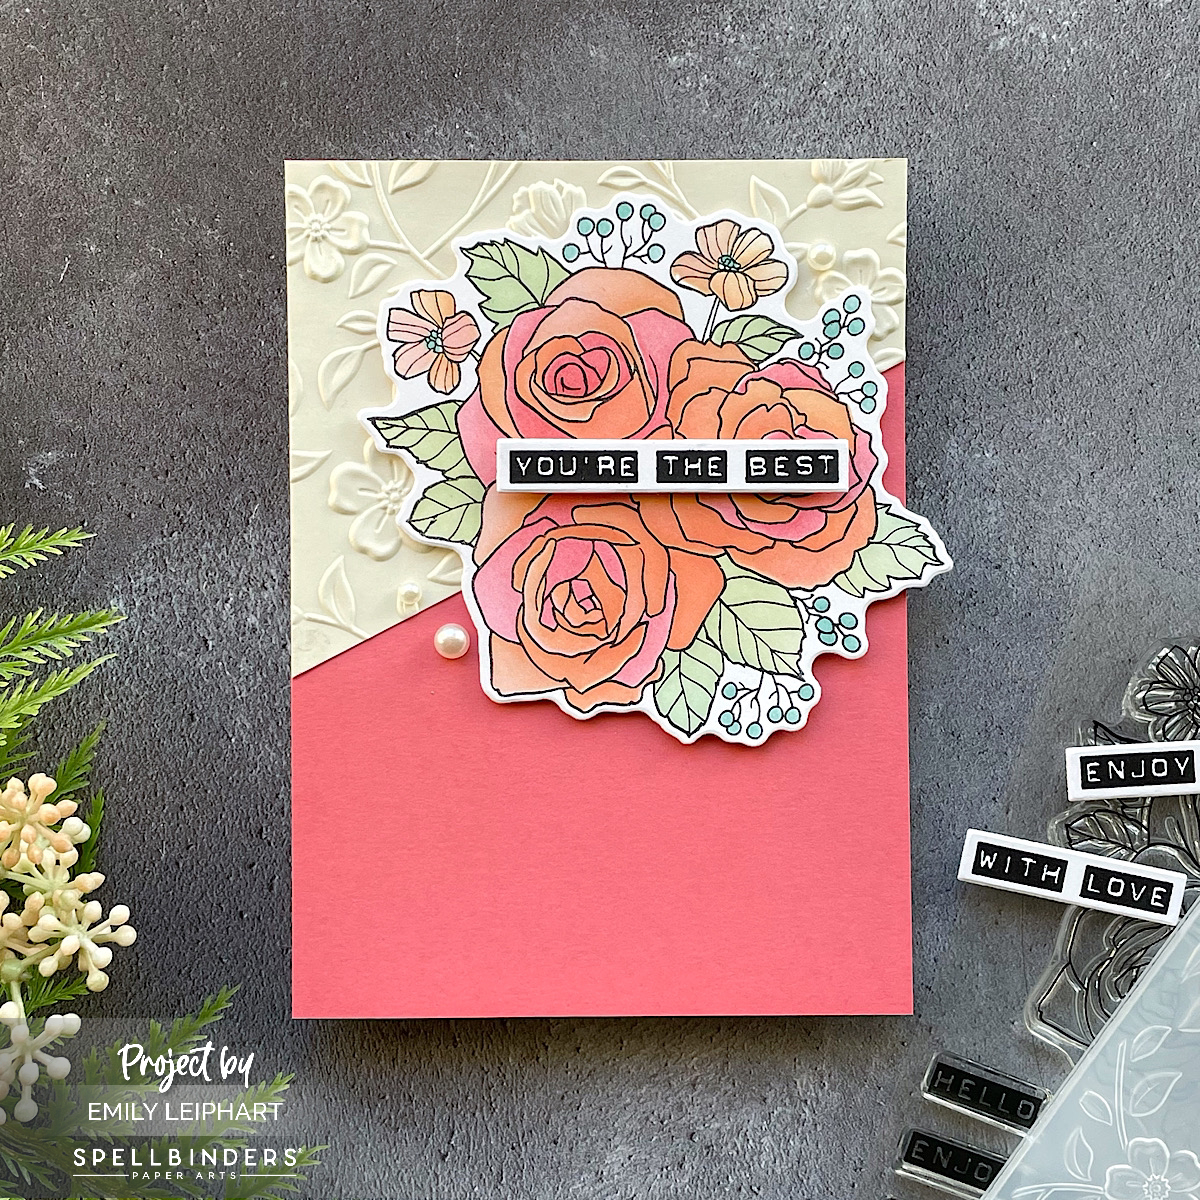
Spellbinders sent me Wendy Vecchi's new From the Garden Collection to play with and I must say that I'm madly in love with the Garden Party Stamp & Die Set and Stencil Bundle! It's true, I started in this industry as a colorer and while I still enjoy colouring occasionally, I prefer not to colour these days. LOL


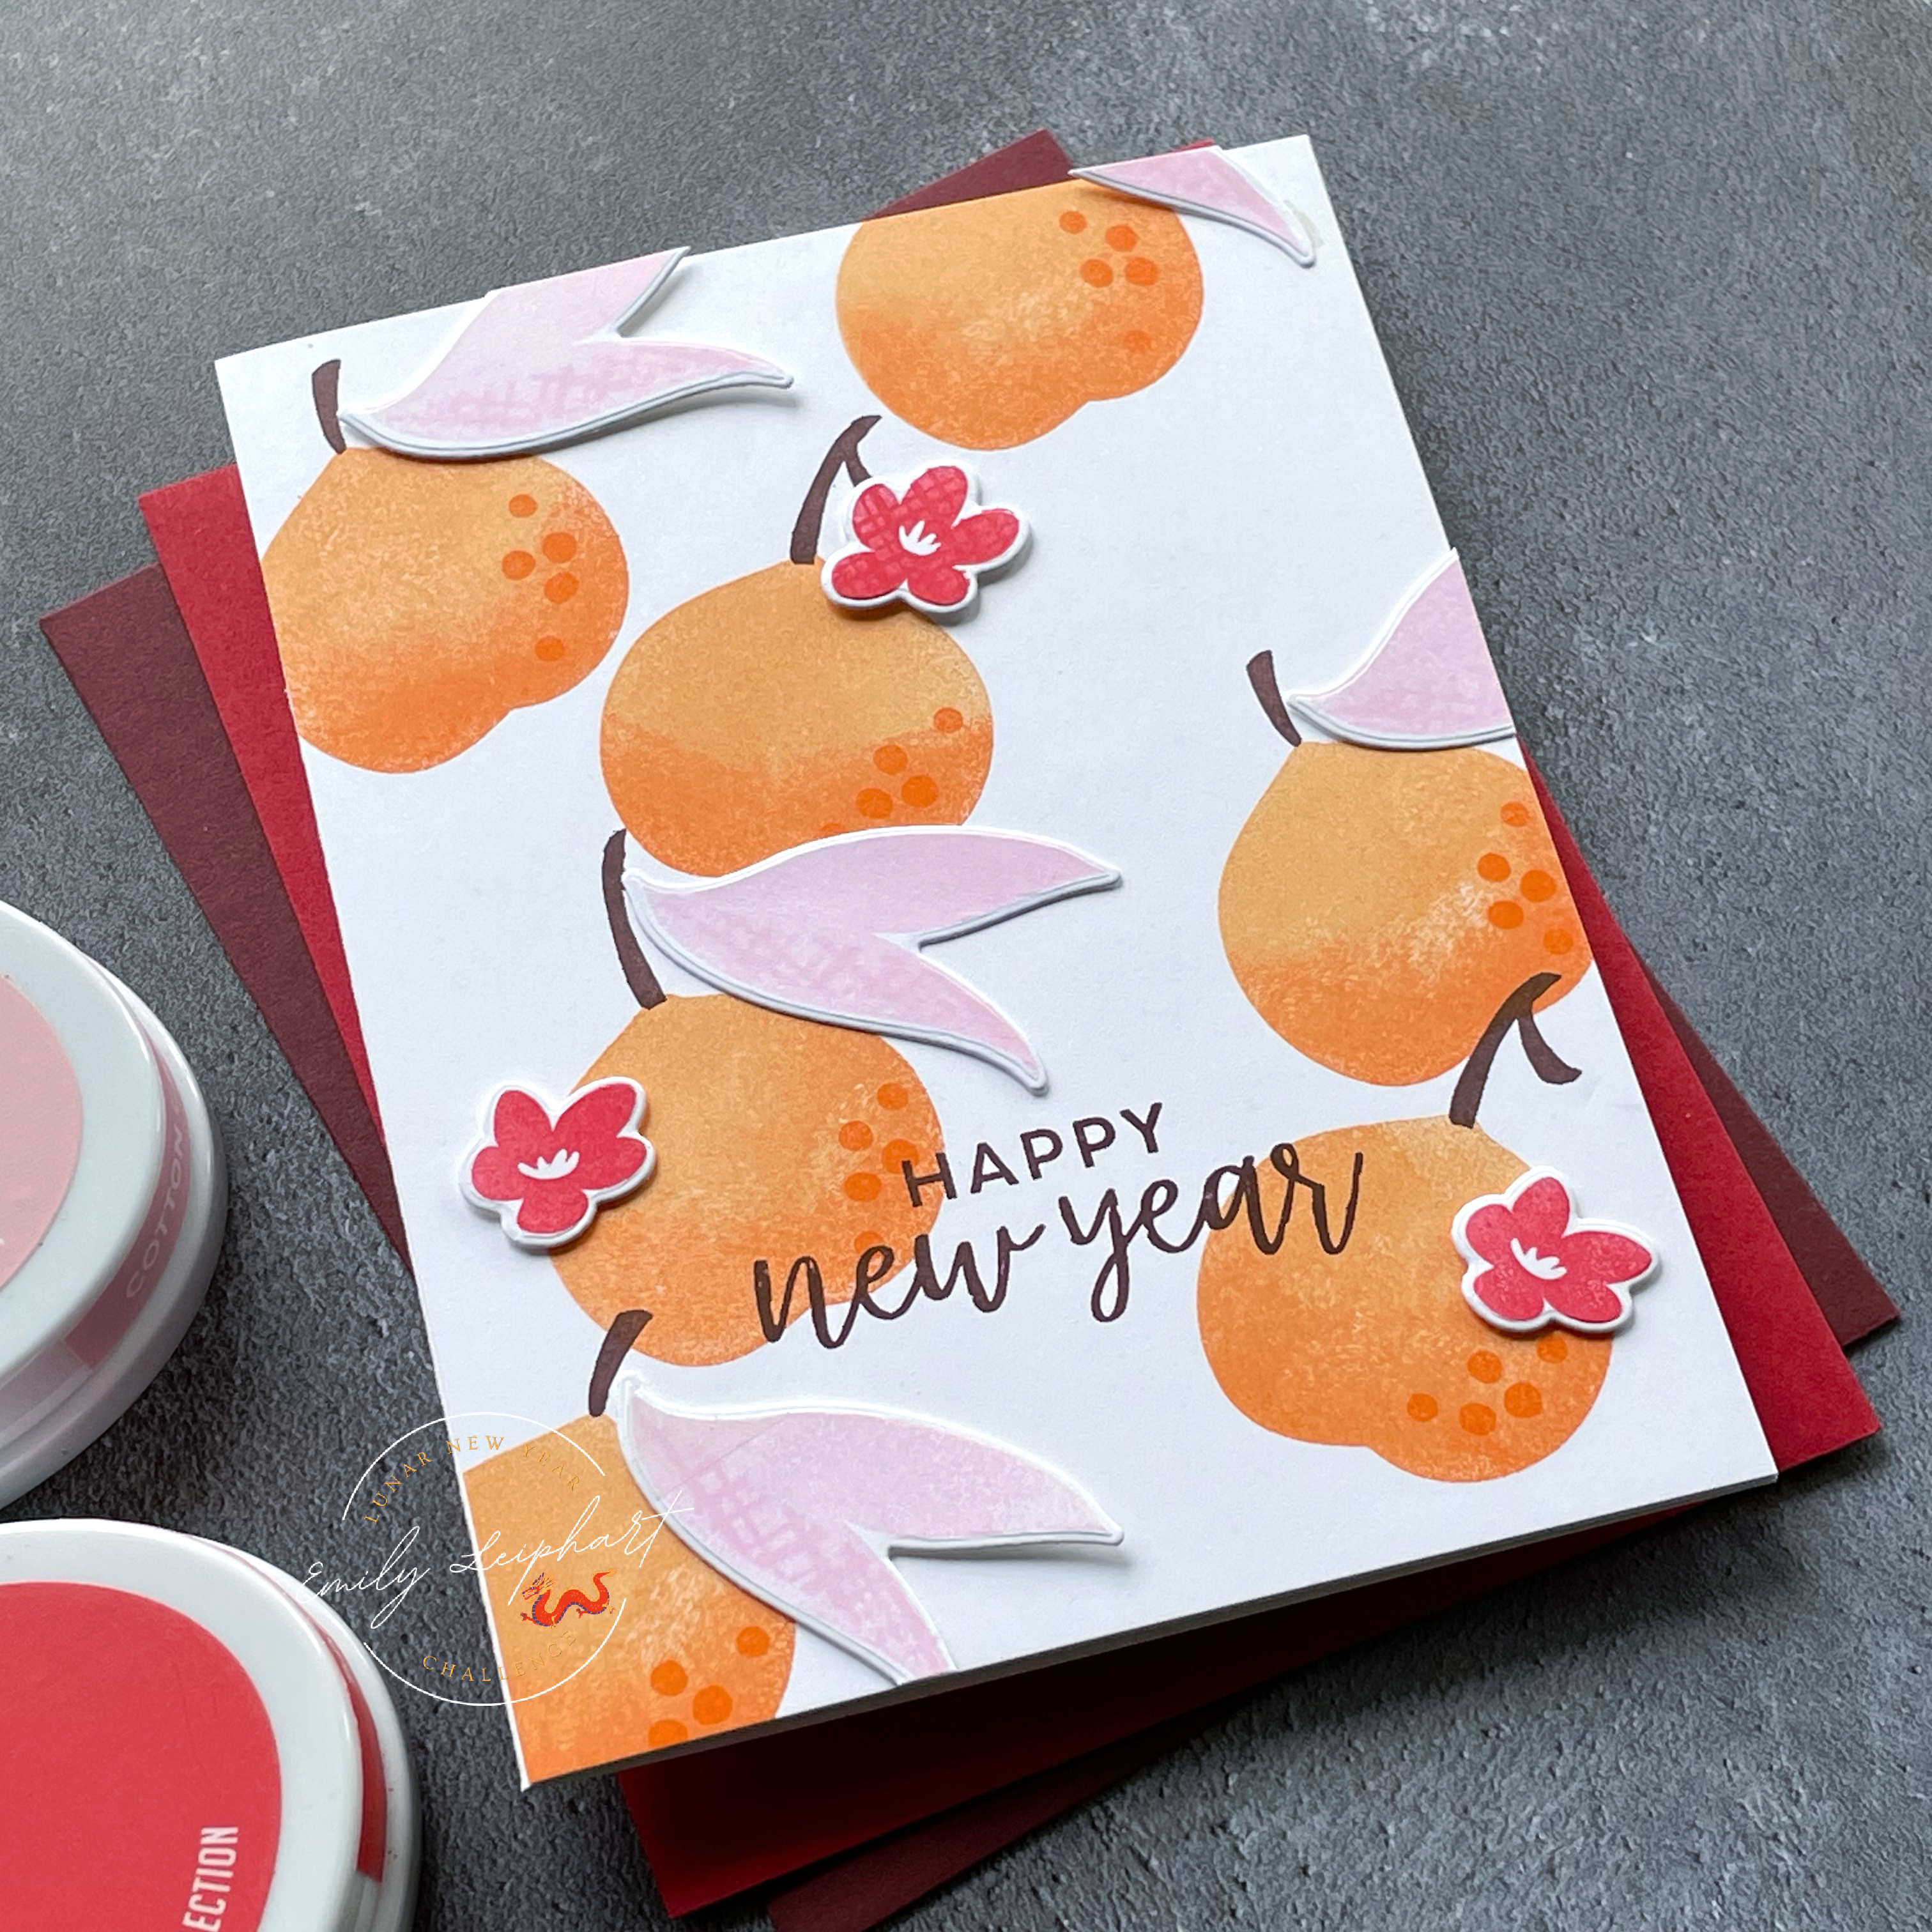
I thought these roses would make the prettiest "just because" card. I could easily use this as a Valentine's card, too. There are five layering stencils for the roses and small flowers and the other two are for the leaves and berries. I used Polished, Apricot and Buttercream inks for the roses, Matcha and Wintergreen for the leaves and Skylight for the berries and centres of the small flowers.


Next, I stamped one of the "Dymo" label-style sentiments with Jet Black ink and die cut both the roses and sentiment with the coordinating dies. You could cut up the individual words and stack them, depending on where you want to place the words. I love that each sentiment string is a single stamp since it's hard to line up a bunch of tiny stamps if you wanted to place them on a single line like I did here.


To create the background, I cut two 4" x 5.5" panels. On the first, I used the Flowers & Foliage 3D Embossing Folder on Alabaster cardstock and the second was cut from Dahlia cardstock, which turns out to be a perfect match for Polished ink. For more inspiration, I also used the same embossing folder in my last post HERE.


I trimmed the dry embossed panel on an angle and glued both panels to the card base. Then I used foam tape to attach both the roses and sentiment strip. Since the card base is 4" x 5.5", I was able to overhang the leaf 0.5" and it would still fit into an A2 envelope. To finish, I embellished the card with three Oyster Pearls.

Thanks so much for stopping by and I'll see you again soon!

Supplies

Saturday, January 27, 2024

Spellbinders "Bee Stitched" Stitching Die of the Month | January 2024


Today, I'm sharing a card using Spellbinders January 2024 Stitching Die of the Month called "Bee Stitched"! January Club Kits close today so this is your last chance to grab these kits before they're gone. There's always a chance that some of them will be released individually in a few months but there's no guarantee. If you love a kit, grab it now!


I decided to feature my bee in Wild Berry and Dahlia with Alabaster wings. I used the coordinating embroidery floss bundle on the body, glued the layers together and added Fashion Bella Pearls to finish.


For the base panel, I cut a piece of Teal Topaz cardstock and dry embossed it with Wendy Vecchi's new Flowers & Foliage 3D Embossing Folder.


To create the laurels, I cut four of the curved branches from mirror gold cardstock and the buds from Peridot cardstock. I glued those directly on to the embossed panel and heat foiled a sentiment from All You Need Sentiments using Matte Gold Hot Foil. Both the bee and sentiment strip are popped up with foam squares.


Here's a list of monthly club kits I share, as well as some of the value kits offered by Spellbinders:


Thanks so much for stopping by and I'll see you again soon!

Supplies

Friday, January 26, 2024

Catherine Pooler | Retirement Sale + Chinese New Year Card


Hello, crafty friends! I'm back after a few days filled with administrative work in getting my new challenge up and running. I've been absolutely thrilled with the response and level of participation in the Lunar New Year Challenge and hope to see many more entries throughout the year! Today's card was inspired by one of my all-time favourite retired products from Catherine Pooler, a former Club Sursee stamp set called Just Peachy.


Last month, my husband bought a crate of clementines that looked like this. They were the strangest shape I'd ever seen and, trust me, he never heard the end of it! Even my son laughed so much over their shape. I turned the peach stamp upside down to mimic that shape. Anyway, both my husband and son did not think my card featured clementines, which are one of the luckiest fruits to eat at Chinese New Year. My son thought they were apricots and my husband thought they were pears and asked why they were orange and short. (insert eye roll here) LOL


In my original MISTI with a grip mat, I inked up the peaches with Orange Peel ink, then rock 'n' rolled the bottom using Orange Twist ink. I used a blending brush to blur the transition line between the two colours before stamping. Next, I used a small acrylic block to stamp the stamps with Merlot ink and added dots on the clementines with Orange Twist.


Both the base layer of the leaves and the crosshatch detail were stamped with Cotton Candy ink, my first time using this newish ink colour! I've waited an insanely long time to add this to my collection and I can't believe it took so long. Both styles of blossoms and the crosshatch layer were stamped with Samba ink. After I adhered the die cut leaves and blossoms with two layers of glue dots, I stamped the sentiment from Cocktail Party using Merlot ink. I really love this fresh, easy-to-mail design!


Be sure to check out Catherine Pooler's Retirement Sale with so many of my all-time favourites. I'm quite sad about these since they've been part of my crafty stash for a long time! I still don't know if I can part with them but, as you know, there will always be plenty of new products to love and covet. ;)


Thanks so much for stopping by and I hope to see you again soon!

Supplies

Sunday, January 21, 2024

Taylored Expressions | Bold Text Lunar New Year Cards


Hello, crafty friends! For the next little while, you'll be seeing loads of Chinese New Year cards from me an I hope you don't mind. I had all of my Taylored Expressions bins out and, after my last set of cards, realizing that On the Block - Happy had been retired, I was quite sad. I decided I had to use some of my other large sentiments and numbers to create more cards.


The new Lunar New Year Challenge is off to a great start and I hope you'll join us, either by linking up a new creation to the January Link-Up Party, following us on Instagram or by leaving a comment on our posts and entries!


Of course, I had to make another another two-for using the same supplies because why not? It's convenient and after die cutting the Cap It Off Numbers, I was able to swap the Cherry Pop Cardstock and Gold Glitter Paper to create two versions anyway.


I stamped Get the Word Out - Happy using Cherry Pop and Mulled Wine ink cubes to create an ombre effect. I also cut a shadow from Black Glitter Cardstock.  This particular sentiment strip from Mini Strips - Holiday was gold heat embossed on Black Licorice Cardstock.


The gold glitter stars were cut from the Starstruck Dies and the textured background was created using the Diamonds Piercing Plate. The stars and numbers were glued directly to the textured panel and the other two elements were popped up with foam strips.


This second design features a lot more black than I normally like to have on a Chinese New Year card so I definitely won't be sending it to an elder. I do love the impact it has on the overall design though.


This time, I gold tinsel embossed Get the Word Out - Happy on Black Licorice Cardstock and love how it turned out!


The top sentiment strip is from Mini Strips - Easter and the bottom sentiment strip is from Mini Strips - Grad. Both were gold heat embossed on Black Licorice Cardstock and, like the first card, die cut using the Mini Strips - Flag Die. The background features the Rays Pierce & Cut Plate, which I used on my last set of cards.


Please visit the Lunar New Year Challenge blog to see what the amazing design team has created and I hope you're inspired to play along. We look forward to seeing what you make.

Thank you for stopping by and I hope to see you again soon!

Supplies

Monday, January 15, 2024

*NEW* Lunar New Year Challenge | January 2024


Hello, craft friends! I'd like to introduce you to the Lunar New Year Challenge which I decided to create. The Year of the Dragon begins on February 10, 2024. Anyone born through February 9th is still a bunny but that's only this year! The Chinese calendar changes every year so you may want to Google your full birth date to confirm, especially if you were born in the first two months of the year. I celebrated a friend's birthday last week and she had always thought she was a horse but she's actually a snake! It was quite the revelation and her whole personality makes more sense now. LOL


My team will be hosting a challenge every month on the new blog, Lunar New Year Challenge, which you can access by clicking on the text link, the badge shown above or on my sidebar. All you have to do is get inspired, create a new card and attach it to the InLinkz Party! We aren't picky so you can make a Lunar New Year card for this year or feature any other zodiac animal, a regular New Year card (for your holiday stash) or anything inspired by one of the team member projects. We can't wait to see what you make!


I love making multiples with one design so this is a two-for! It should've been a three-for but I ran out of time and will use my extra dragons for a different layout. The cutie is from a Taylored Expressions stamp set called Little Critters and I totally forgot that there was a dragon in that set but, luckily, my friend Thanh reminded me of it because now it's finally getting some love!


I coloured the dragons with Copic markers and all of the colours are listed in the supply links below. It's been a long time since I used my Copics and this small and adorable image was very satisfying to colour. I did have to practice a bit to find the right combination of colours.


To create the sentiment, I ombre stamped On the Block - Happy with WatermelonCherry Pop and Mulled Wine ink cubes, using a sponge dauber to blur the lines between colours. I repeated this twice to get a perfect inking.


I created the secondary sentiment by gold heat embossing the On Repeat - New Year stamp on Eggplant cardstock. Sadly, this stamp and die bundle are now retired. Excellent alternatives, which I also own and am happy to recommend, include Building Blocks - Happy Additions and Mini Strips - Holiday.


To create the background, I die cut the Sugar Cube panel using the Rays Pierce & Cut Plate, one of my favourites for adding a tiny bit of visual interest.


Next, I die cut both the Gathered Stars and Starstruck dies from Cherry Pop, Eggplant and gold glitter paper. After creating Cherry Pop and Mulled Wine base panels, I used a combination of liquid glue and foam strips to adhere all of the elements.


Please visit the Lunar New Year Challenge blog to see what the amazing design team has created and I hope you're inspired to play along! We look forward to seeing what you make!

I hope you enjoyed today's projects. I appreciate you stopping by and, if you're inspired, please shop my affiliate links below. Thanks so much for your continued support!

Supplies

Thursday, January 11, 2024

Pigment Craft Co. | Christmas Cards in January


Is anyone still eating candy canes? I don't eat a lot of candy or sugar anymore but I love the flavoured candy canes so I always try to get those before the holidays. I recently found these Pigment Craft Sweater Weather pieces at the bottom of a bin and remember stamping them in late fall of 2022. I never finished them so here they are a year later! Better late than never, right? ;)


Please note that most of the supplies listed in this post are available at either Pigment Craft Co or Scrapbook.com. Every stamp and die set featured here is currently on clearance at Scrapbook.com. If they're on your wish list, I highly recommend grabbing them at these amazingly low prices!


I stamped the sweaters with Blush ink (shop PC or SBC) and the patterns with Himalayan ink. The add-ons for the sweater are from a mini set called Got You a Card-Again (shop PC or SBC) and it's so super cute!


I stamped the heart-shaped candy canes and the sentiment for this first card with Rosewood ink (shop PC or SBC) and the berries were stamped with Seagrass ink. The foliage was stamped with Ficus ink (shop PC or SBC) and Fir ink (shop PC or SBC).


The sentiments for all three cards are from the Falala (shop PC or SBC) stamp set. The coordinating Falala Dies (shop PC or SBC) not only cut around the sentiments but there are also large bubble backings, too (not shown here).


To create the backgrounds, I cut the Scallops and Strips Die from coloured cardstock, in Midnight Green, Arctic and Candy Corn, respectively.


The layering piece behind the sweaters was cut from vellum using the Tile Pattern Background Cover Plate Die (shop PC or SBC). 


The sentiment for the second card was stamped with Fir ink (shop PC or SBC) and the sentiment for the third card was stamped with Salt Water Taffy ink


I realize the Salt Water Taffy ink doesn't coordinate with the Arctic cardstock (alternative exact matches are listed below) on the second card but it looked so much better with the Candy Corn cardstock.


In addition, I cut both the sweaters and sentiments from silver glitter paper to create shadows with a bit of shimmer. After all, they are holiday cards! ;)


All of the layers were adhered to the card base using liquid glue to keep these cards as flat as possible for mailing. The centres of the sweaters are obviously a little bulky but I think they'll survive in regular envelopes.


I hope you enjoyed today's projects. I appreciate you stopping by and, if you're inspired, please shop my affiliate links below. Thanks so much for your continued support!

Supplies