Saturday, March 31, 2018

{Technique Tuesday} April 2018 Release Countdown: Day 2


Welcome to Day 2 of Technique Tuesday's April 2018 Release Countdown! The design team is featuring a variety of release products and you're sure to love them so be sure to head over to the Technique Tuesday blog for the full reveal and links to all of the amazing projects. All of the product links will go live on April 1, 2018 for your shopping pleasure.


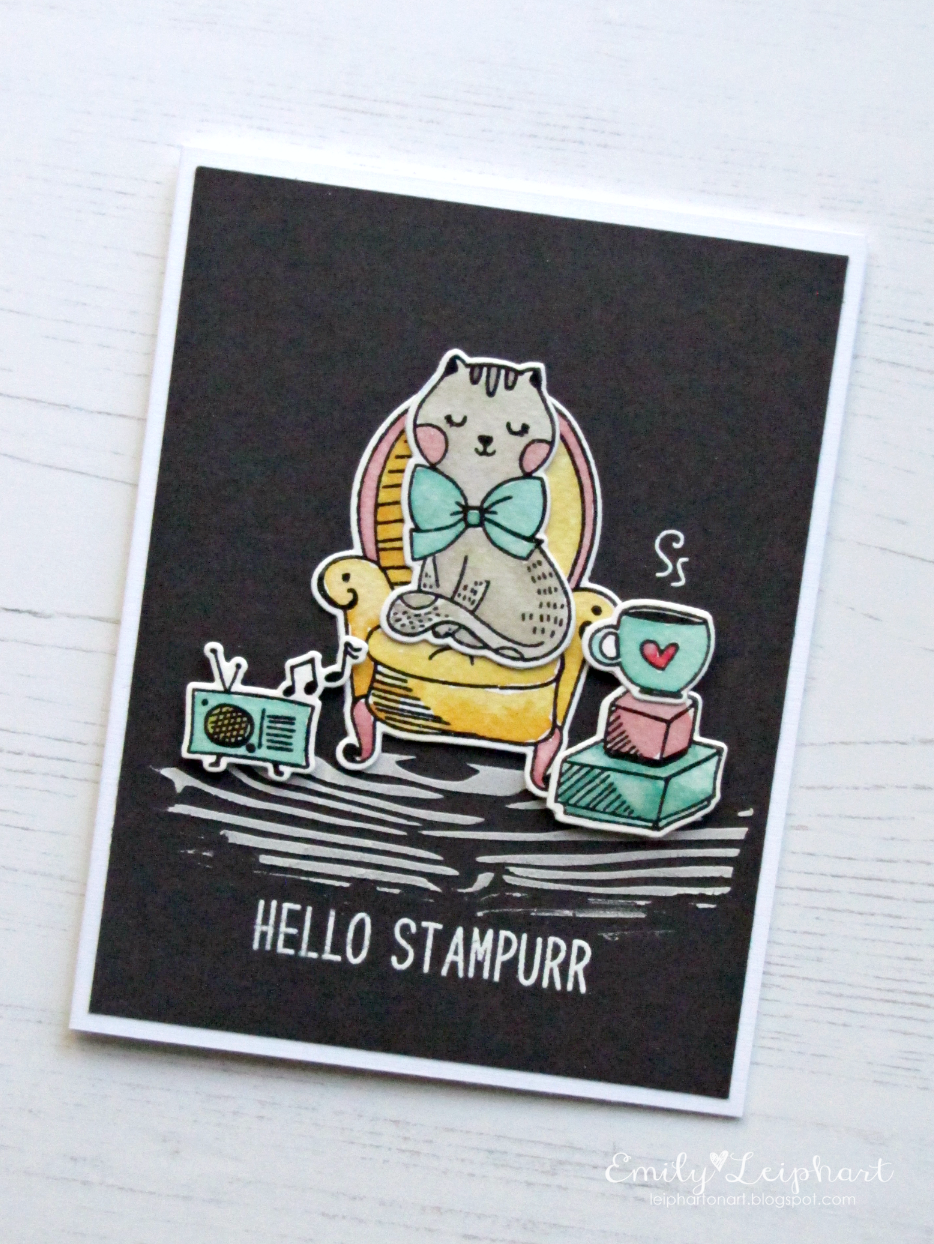
Today, I'm showcasing Planner Beauty, combined with Sassy Girl Thoughts and a couple of add-on sentiments from Flowers For Her. I used many images from both Planner Beauty and Sassy Girl Thoughts. They're such fun sets and, if you don't use a planner, can easily be used for cards!


The butterflies are from Grandma Blessings. I stamped the butterfly with watermark ink on vellum and heat embossed it with white embossing powder. I die cut the glitter white butterfly with the coordinating die and attached to the panel with two staples from a tiny attacher.


See you tomorrow for Release Day!

Sources:

Friday, March 30, 2018

{Technique Tuesday} April 2018 Release Countdown: Day 1, Part 2


Welcome to Day 1, Part 2 of Technique Tuesday's April 2018 Release Countdown! The design team is featuring a variety of release products and you're sure to love them so be sure to head over to the Technique Tuesday blog for the full reveal and links to all of the amazing projects. All of the product links will go live on April 1, 2018 for your shopping pleasure.


Since it's Easter weekend, I wanted to share a card using Bailey the Bunny but I also wanted to share how to use this set for a non-Easter card. This adorable sentiment is perfect for an every day friendship card featuring sweet Bailey.


I tucked Bailey amongst flowers from Flowers For Her. All flowers and leaves were heat embossed with gold tinsel embossing powder on vellum and I added white cardstock behind the flowers so they could be layered without a see-through mess. The leaves were left as a single vellum layer.


I coloured Bailey's ears and nose with a white pencil and since I don't have the coordinating dies for this set, I trimmed him with scissors. I made two of these cards since they were easy to make and I'm sure I can find two friends to send them to. ;)


See you tomorrow for Day 2 of the April Release Countdown!

Sources:

{Technique Tuesday} April 2018 Release Countdown: Day 1


Welcome to Day 1 of Technique Tuesday's April 2018 Release Countdown! The design team is featuring a variety of release products and you're sure to love them so be sure to head over to the Technique Tuesday blog for the full reveal and links to all of the amazing projects. All of the product links will go live on April 1, 2018 for your shopping pleasure.


Today, I'm showcasing the Just Us Girls stamp set and coordinating dies with a scripted word from the Flowers For Her stamp set. All of the flowers and main sentiment are from Just Us Girls and the scripted 'smile' is an add-on from Flowers For Her


I fell in love with Just Us Girls as soon as I saw it and it's sure to become one of my go-to favourites for encouragement cards. The large corner stamp is absolutely stunning and I love that all of the flowers have individual die cuts for layering. You can layer all of the flowers as I have on the bottom of the card or add single die cuts to pop up individual flowers.


The flowers were stamped with grey pigment ink and heat embossed with sparkle embossing powder.  The sentiment was stamped with black pigment ink and heat embossed with clear embossing powder. I watercoloured all of the flowers with distress inks and I painted the frame in bundled sage and evergreen bough to coordinate with the leaves. To finish, I embellished with sparkling clear sequins.


See you tomorrow for Day 2 of the April Release Countdown!

Sources:

SaveSave

Monday, March 26, 2018

{Spellbinders} Shapeabilities Eau de Lavande Label Etched Dies


I made a couple of cards using a gorgeous set of dies from Spellbinders called Shapeabilities Eau de Lavande Label Etched Dies. It's a set of four dies made to layer together but they can also be used on their own. There are so many ways you can use these dies and this is just one of those fun ways! 


I used all four of the dies on both these cards. The largest of the dies is quite large, being bigger than a standard A2 card so you can actually make a shaped card from it. I wanted to feature the intricate scrolls from the biggest die without making an over-sized card so I decided to use just the ends to frame the other three dies, which I layered together in the centre.


Running the die cut pieces through the Platinum 6 Die Cutting and Embossing Machine with the embossing plates adds so much detail to the shapes! I used distress inks and a brush to paint the lilacs and then I used a blending tool to sponge the other two panels. I used glue dots to adhere all the layers together for a bit of dimension but kept it relatively flat for mailing.

Thanks so much for stopping by!

Sources:

Wednesday, March 21, 2018

{Waffle Flower} Fun Anniversary Card


My husband and I celebrated our 14th wedding anniversary yesterday and it's been quite the rollercoaster ride over the years! We met in Indianapolis, had our first date in Italy, got married in San Diego and now call Toronto home with our favourite nine-year-old. There's no one I'd rather be sharing life's adventures with.


I got these fun stamps a while back and they hasn't seen ink. I thought this was the perfect time to use them. After all, these jello-y people from Hooray make me laugh and remind me of the daily antics at our house! Plus, how perfect are the little drinks from Currently Drinking in their hands? I purposely bought them to make cards like this. ;) The only reason they have a drink in each hand is because I couldn't decide which drink to hold. LOL


Thanks so much for stopping by!

Sources:

Thursday, March 15, 2018

{Spellbinders Video} March 2018 Card Kit of the Month Inspiration


I had the opportunity to play with Spellbinders' March 2018 Card Kit of the Month and I want to share the unboxing with you, as well as the three cards I made using the beautiful supplies provided in the kit! I won't go into too much detail since it's all explained in the video so here it is:


On my first card, I used the rectangle frame die to create the background for the other elements, which includes an ephemera die cut and sentiment stickers. The floral die cuts were embellished with pearls, included in the kit. A flag tag cut from patterned paper breaks up the monotony of the frames and anchors the flowers.


My second card showcases one of the acetate pieces, as well as the largest ephemera with foil accents. I used some of the ribbon and embellished with the tiny hearts from the wreath die.


Once again, the gold foil stickers make it easy to customize the card with a unique, personal sentiment. I really love the textured cardstock in this kit! It adds so much to the background.


My third card features my favourite patterned paper in the kit, as well as flag tag dies in an unconventional way, to pop the floral ephemera from the patterned paper. I tucked in the heart wreath and added a pre-printed sentiment. This card was the easiest to make.


The Spellbinders Card Kit of the Month Membership is available for $30 plus shipping but if you aren't interested in the subscription and wish to buy the kits separately, they are available for $50 the next month, provided it doesn't sell out. It's a great deal so be sure to grab yours today!


Thanks so much for stopping by!

Sources:

SaveSave

Wednesday, March 14, 2018

{Altenew Video} March 2018 Inspiration Challenge featuring Build-A-Flower: Sakura Blossom


I needed to make a couple of sympathy cards and I thought that the colours from Altenew's March 2018 Inspiration Challenge would be a great place to start. When I was asked to feature the Build-A-Flower: Sakura Blossom at release time, I wanted to share a video tutorial but I didn't have time so I thought this would be a great opportunity to share how easy it is to create these beautiful 3D flowers.


Since I go into detail on video about how these cards were made, I won't write too much about it. The ink colours that I thought matched perfectly with the challenge colours are Caramel Toffee, Coral Berry and Dusk. I chose the remaining shades based on the sets those colours belonged to.


I used pearlescent embossing paste and sparkle embossing powder with the Watercolor Stripes Stencil. On both of these cards, I also used sentiments from Thinking of You


I used white glitter dots in the centres of the flowers on the first card to match the embossing paste. Enamel dots in coordinating colours were added to the second card since it was a more clean and simple design.


Altenew's March 2018 Inspiration Challenge runs for the duration of the month - and there's a new challenge every month - so be sure to play along! You can enter as many times as you like. Four lucky winners will receive a $30 gift certificate to the Altenew store.

Thanks so much for stopping by!

Sources:

SaveSave

Sunday, March 11, 2018

{Technique Tuesday} Sassy Birthday with Chicken Family + Easter Sale


I'm always going to need birthday cards so I thought I'd make another funny card using the Chicken Family with Sassy Birthday and Simply You 2.0. Don't you just love the chickens' faces? The rooster is annoying the hen who is completely exasperated by his birthday wishes. LOL


The first and third lines of the sentiment are from Chicken Family and the middle segment is from Sassy Birthday. The cake is also from Sassy Birthday. The three little exasperation marks above the hen's head are from Simply You 2.0. I masked off part of the little bouquet icon to symbolize the hen's emotions.


Did you know that Technique Tuesday offers discounts on stamp and die bundles? The Chicken Family stamps and dies can be purchased together for a 10% savings!


Today through Tuesday, March 13, 2018, Technique Tuesday is having a great sale on Easter and Faith-themed products! Click on the link or banner below to start shopping. :)


Thanks so much for stopping by!

Sources:

Sunday, March 4, 2018

{Waffle Flower} Watercoloured Cat Trio


Two 30-day colouring challenges ago, I coloured the Hello Stampurr set and I've finally turned them into cards! I mixed and matched these images - some had to be redone in different colours - and combined them with images from Popping In. It's ridiculous how long it takes me to use some of the stamps I buy! There are never not enough hours in a day.


For each of the backgrounds, I used white embossing paste with three different Tim Holtz stencils - latticework, speckles and woodgrain, respectively. I have so many of these amazing stencils and rarely use them but I'll have to use them more often now that I've fallen in love with them again. The debossed background is a retired Tim Holtz Candy Stripes embossing folder.


All of the sentiments and images were heat embossed, then watercoloured with distress inks. Now, I just have to address them to friends - that's even harder than getting through my supplies. ;)


Thanks so much for stopping by!

Sources: