Tuesday, July 23, 2024

Spellbinders | Glimmering Peonies Duo + Christmas in July Sale!


Hello again, crafty friends! You may recall my Glimmering Buttercups POST featuring the Glimmering Flowers Collection from Spellbinders. Today, I'm sharing two clean and simple, same-but-different cards I whipped up featuring the Glimmering Peonies Glimmer Plate and Stencil Bundle.


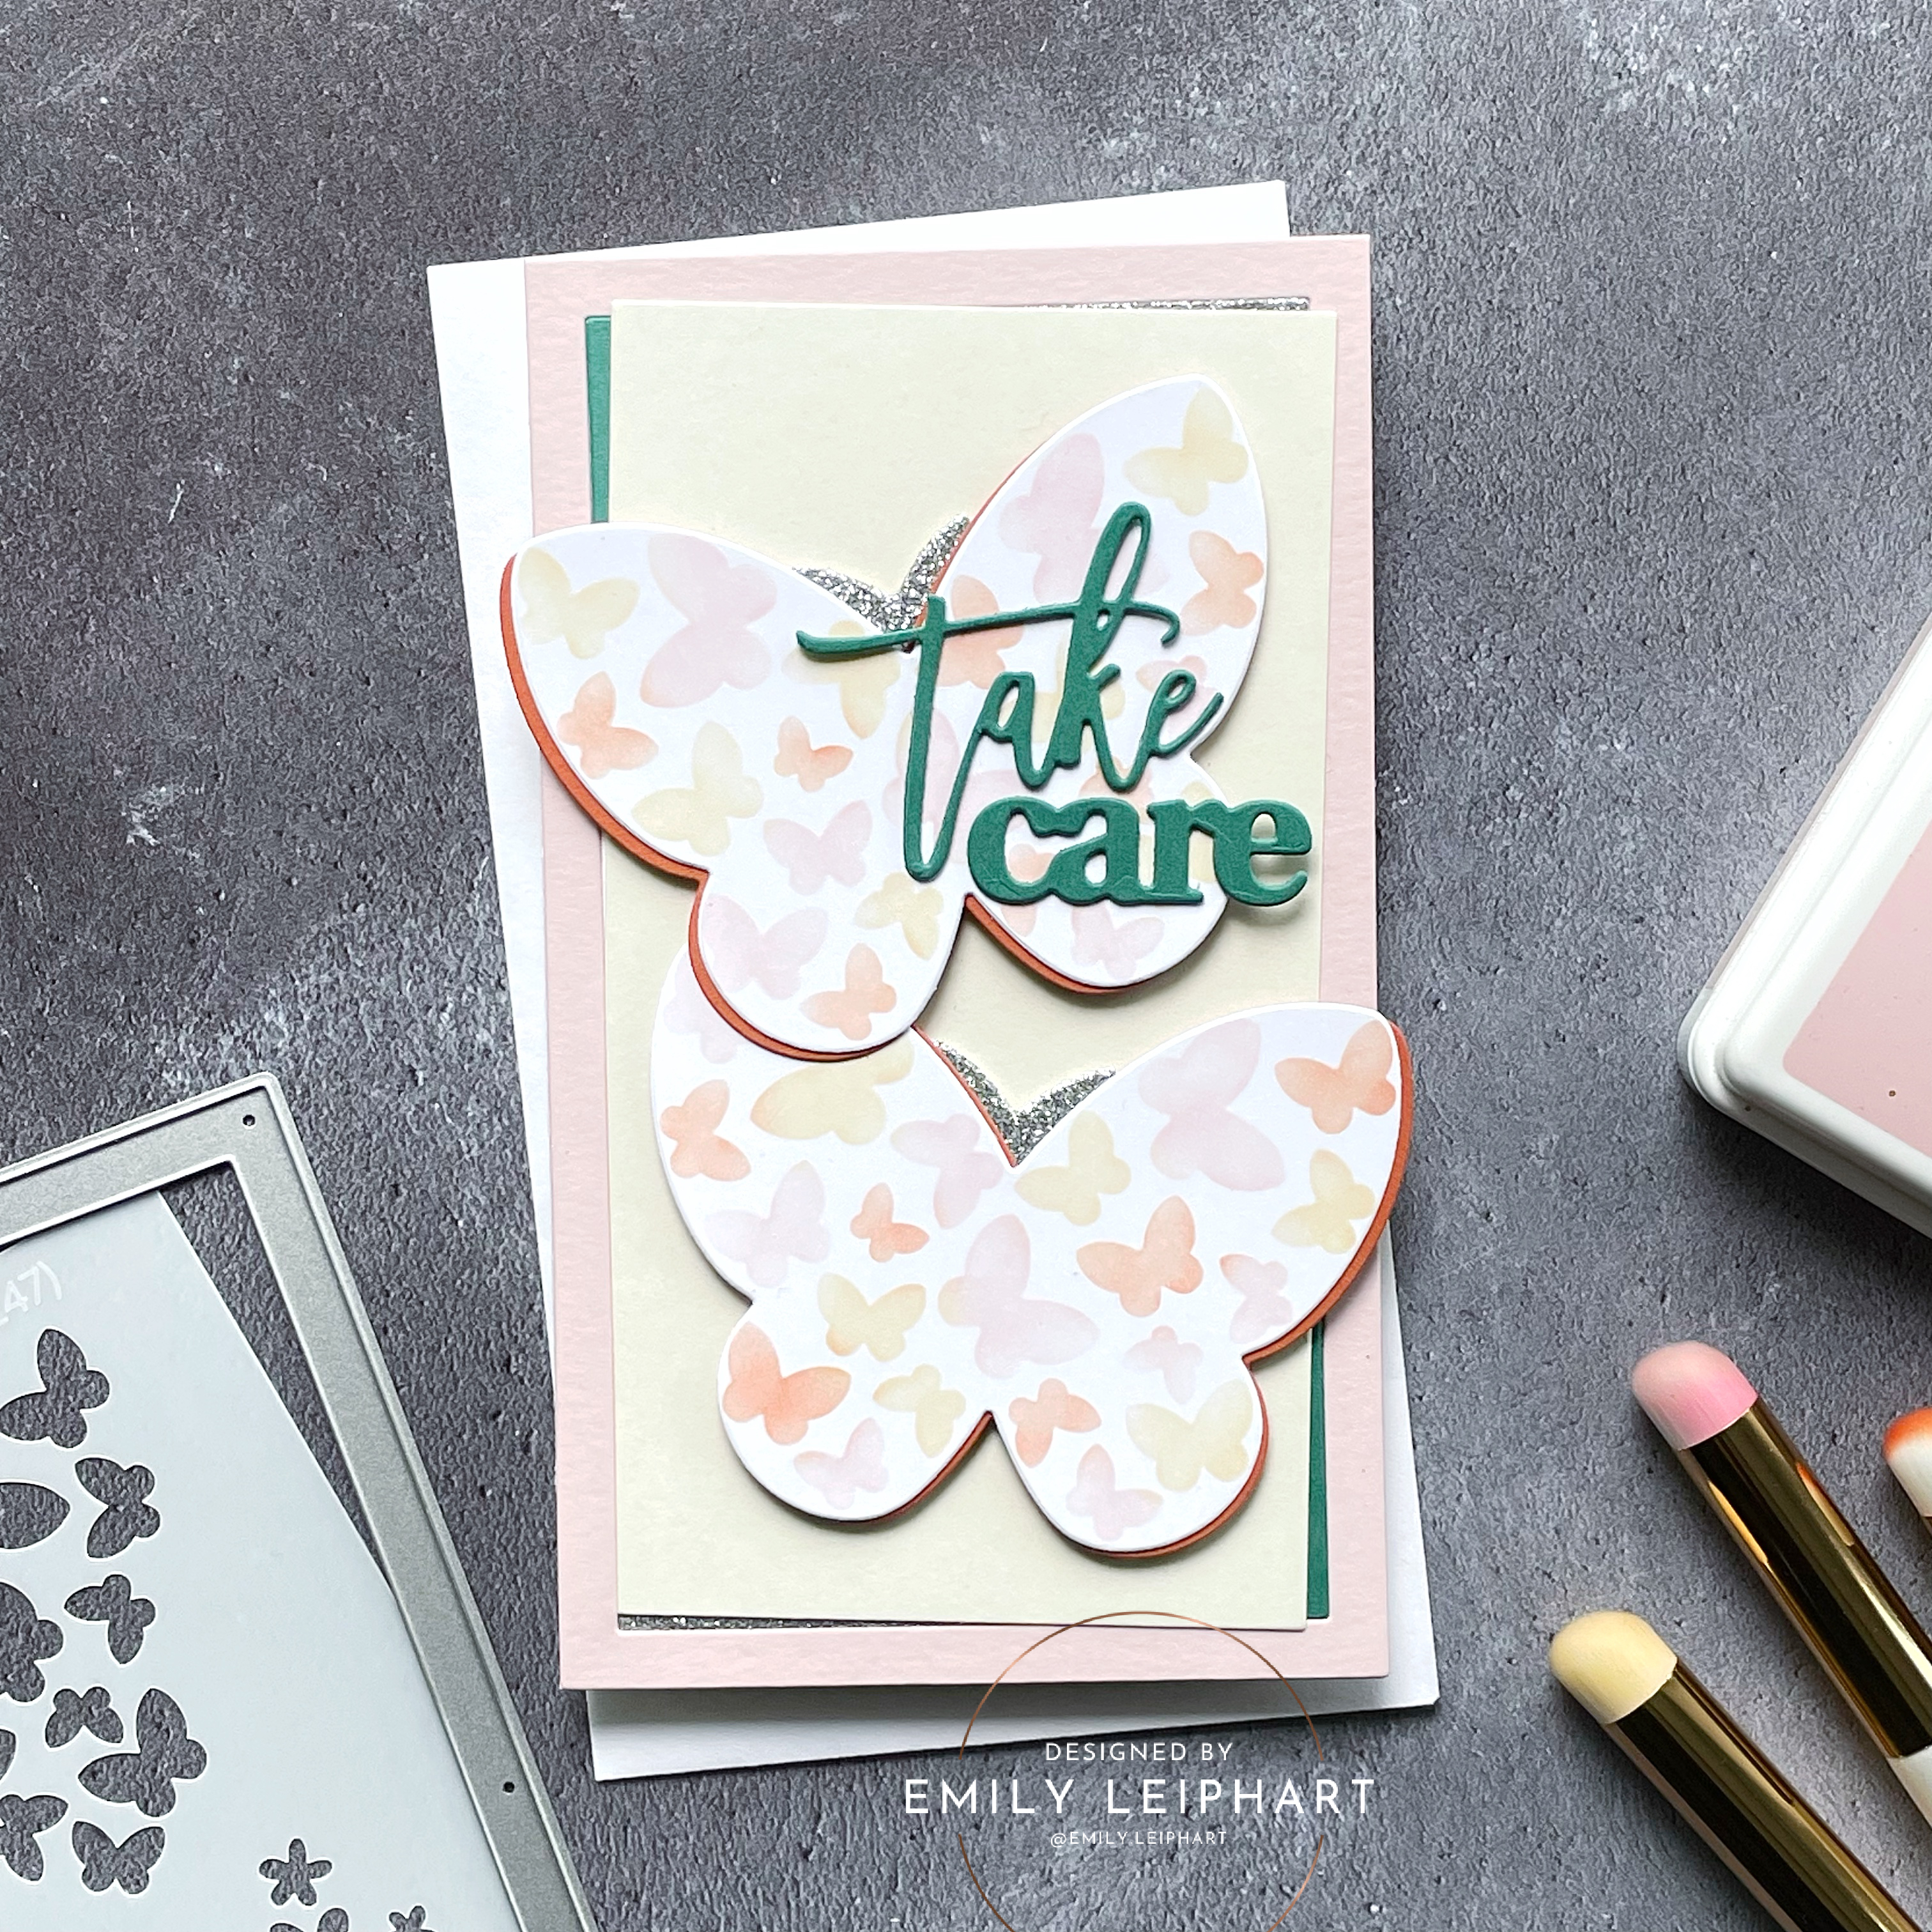
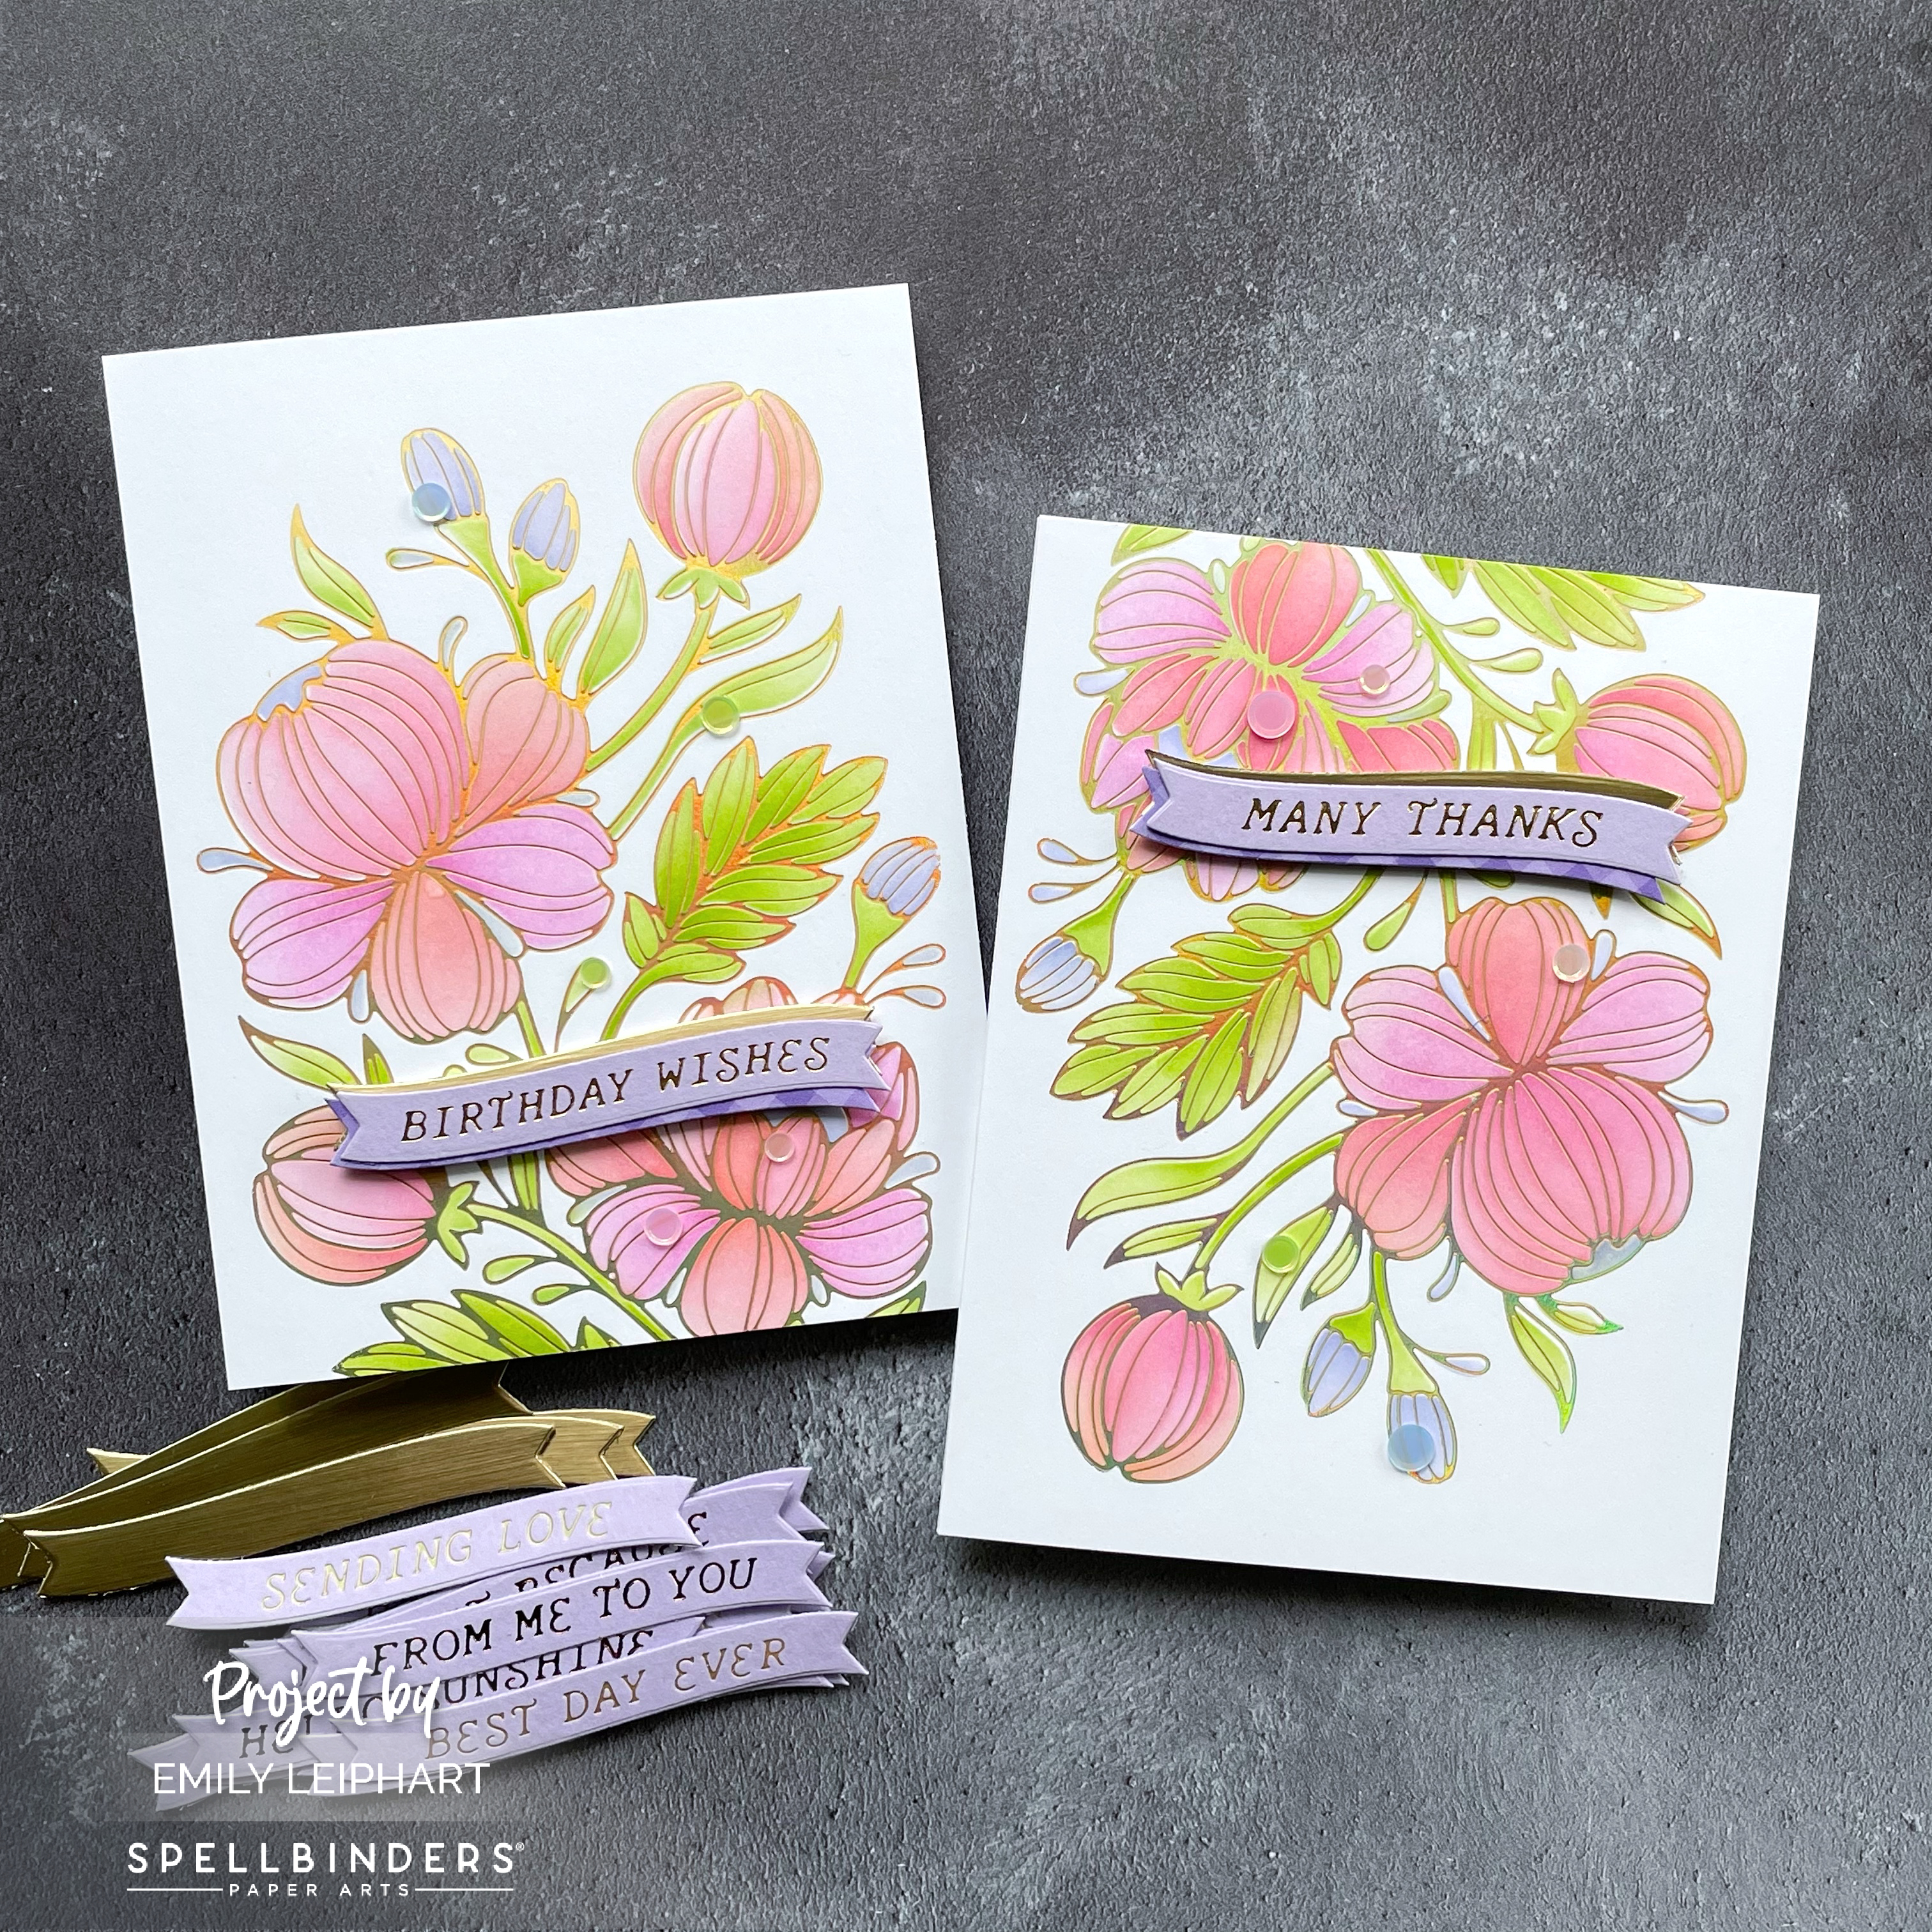
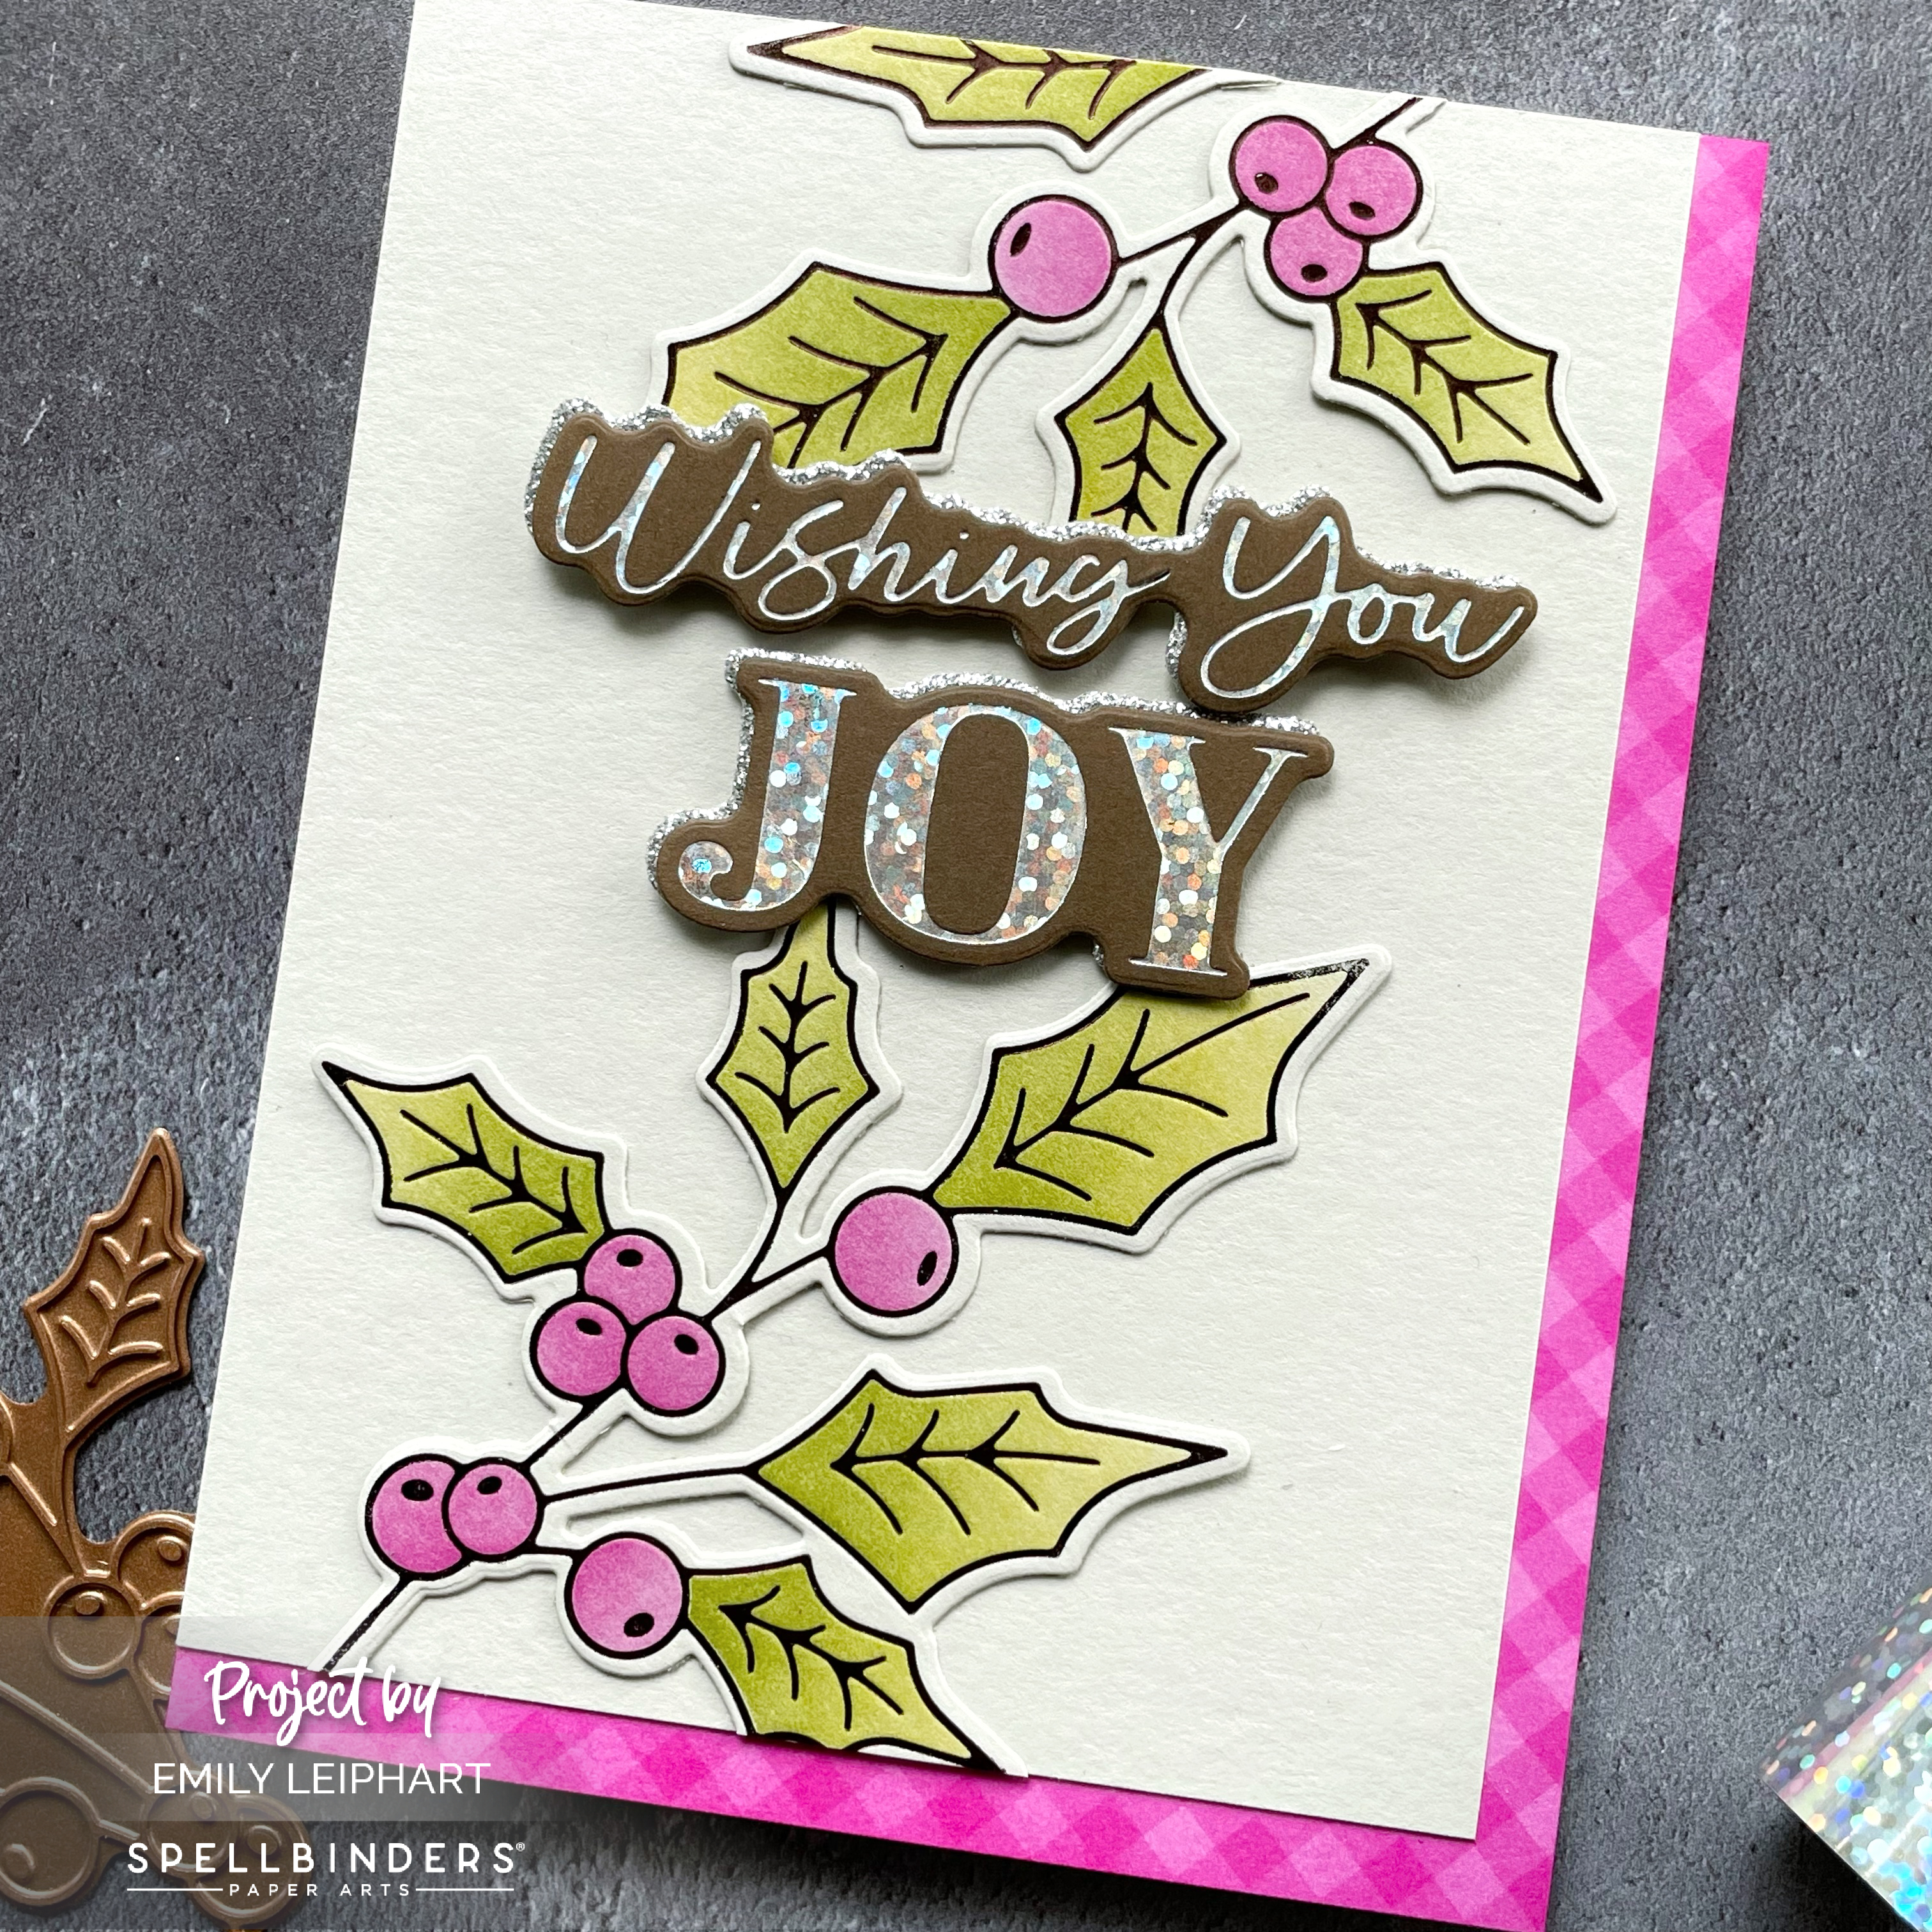
I needed a couple of quick cards and love having coordinating stencils to colour large, floral images such as this one. Even though I have quite a collection of birthday and thank you cards in my stash, none of them are ever quite right. Do you ever feel that way or is it just an excuse to make more cards? ;)


I started by heat foiling the Glimmering Peonies with Aura Hot Foil on Neenah 80lb White cardstock. Then I used Catherine Pooler's Color Wheel Download to select my colour palette and the ink colours I used are Be Mine, Do-Si-Do, Bellini, Frosted, Serenade, Garden Party and Lime Rickey.


If you don't have the coordinating stencils, you can colour these peonies with your favourite medium or simply heat foil them on dark cardstock and leave them uncoloured as I did in the past.


I loved mixing Be Mine with Do-Si-Do and Bellini on the larger flower petals. I love the way Frosted and Serenade work with the other colours. I went as light as possible with Garden Party and Lime Rickey, but I think I could've gone lighter or perhaps even left the foliage uncoloured for something different.


For the sentiments, I heat foiled the Curved Everyday Sentiments with Polished Brass Hot Foil on Simon Says Stamp Lavender cardstock. I actually tried two other foil colours before choosing this version.


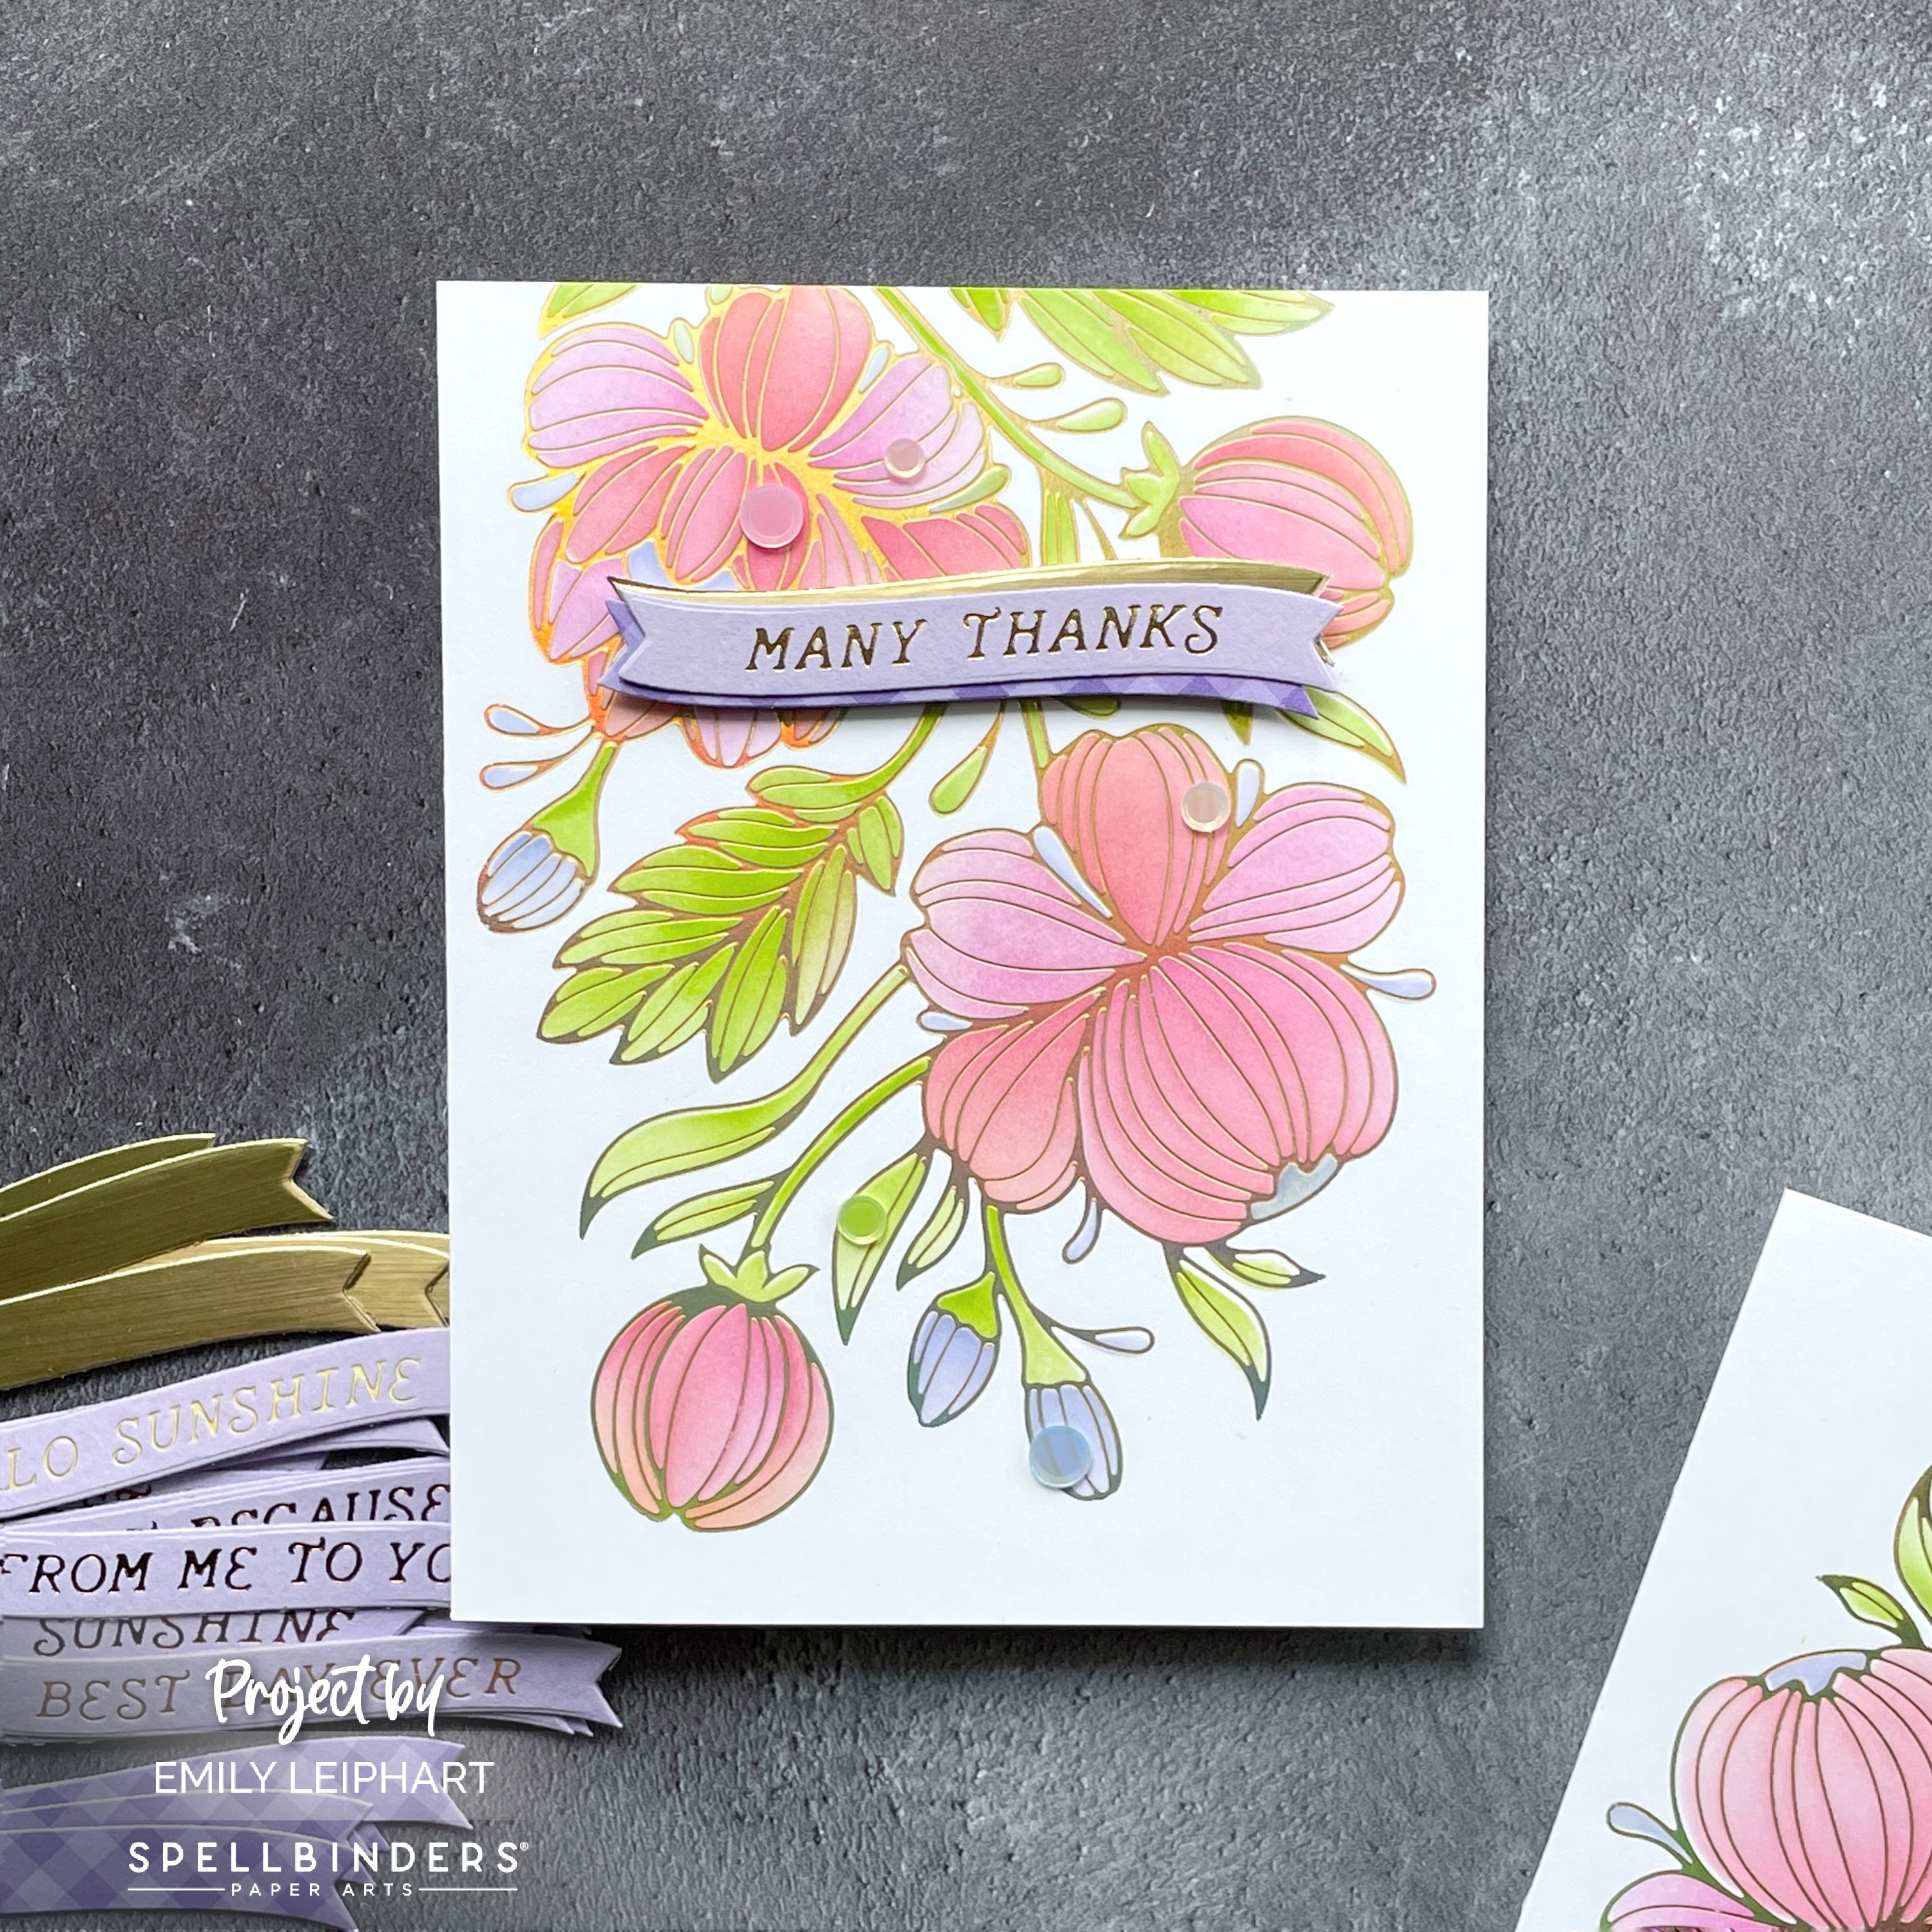
I cut the sentiment banners again from both Brushed Metallic cardstock and Gingham Lilac patterned paper. These were layered behind both sentiments to complement the foiling and the bits of purple in the buds.


As you can see, the Glimmering Peonies Glimmer Plate is significantly bigger than an A2 panel so I decided to leave some of it off the bottom edge. You'll also notice that I flipped the thank you panel upside down for a bit of variation between the two cards.


I almost adhered the banners flat to the ink blended panel to make it super easy to mail but I decided to foam mount it for a tiny bit of dimension. I just couldn't resist! Again, I almost stopped there but I decided to use some flat sequins to add visual interest.


The sequins I used are from Studio Katia's Pastel Rainbow Confetti but you can find similar sequins in the Spellbinders store, available in Aura, Pink and PurpleAura is a great colour that fills in the gaps nicely when you don't have matching sequins for every colour.


Do you like to make batches of cards using the same design and colour palette? I only thought to flip one of the panels at the last minute. Otherwise, I would've had both designs exactly the same but with different sentiments. What other ideas do you have for same-but-different card designs?


Please check out the NEW Christmas in July Sale, on now through July 28, 2024. You can save up to 50% select products. Prices are as marked. The sale also features discounts on select Clearance items. 


I appreciate you stopping by and, if you're inspired, please shop my affiliate links below. Spellbinders would love to know that you were inspired by me.

Thanks so much for your continued support!

Supplies:

Monday, July 22, 2024

Spellbinders | July 2024 Monthly Club Kits


Hello, crafty friends! Today, I'm showcasing the July 2024 Monthly Club Kits from Spellbinders. The first card features the "Stitched All Wrapped Up" Stitching Die of the Month and the second card features the "Joyful Holly" Glimmer Hot Foil Kit of the Month. Club Kits close on the 27th of each month so get them while you can!


I was inspired by a colour palette on page 142 of Lauren Wager's Palette Perfect, Vol. 2 and used the same colours on both cards. Essentially, the Stitched All Wrapped Up is for holiday cards but I love that bows are so versatile, this product can be used year-round!


Both the products and the colours inspired this retro design. The cardstock I used include Concord & 9th Dragonfruit, Lemongrass, Nutmeg and Silver Glitter Paper as an accent, plus Simon Says Stamp Fog Gray for the card base.


I cut the bow from Dragonfruit cardstock, stitched it with Dark Cranberry 301 from the DMC Color Essentials Warm Bundle and set the pieces aside to work on the background.


After cutting the Fog Gray card base and glueing the Lemongrass hoops, I randomly glued circles die cut from Nutmeg and Silver Glitter Paper. The patterns on the bottom are mirrored on the top half of the card.


After assembling the bow on the card base with a combination of double-sided tape and foam squares, I heat foiled a sentiment from Mini Everyday Sentiments, using Espresso Bean Hot Foil on Fog Gray cardstock and popped it on to the card with foam strips.


My second card features the the "Joyful Holly" Glimmer Hot Foil Kit of the Month. I don't usually get too much of a head start on my holiday cards but I love that I've added this one to my stash! Plus, I almost never use brown so this is probably the most prominent brown will ever be featured on one of my cards.


I started by heat foiling the Joyful Holly with Espresso Bean Hot Foil on Fog Gray cardstock. Then I used Concord & 9th Dragonfruit, Lemongrass and Avocado inks to colour the image using the coordinating Joyful Holly Stencil, which is one of the BONUS items in The Deluxe Caboodle Value Club this month!


I repeated this process and die cut them using the die included in this month's kit. Then I set them aside while I cut a 4 x 5.25" Fog Gray panel. Next, I cut a panel of Gingham Bubblegum from the Doodlebug Gingham-Linen Rainbow Petite Prints 12x12"Cardstock Paper Pack


I wanted the pink darker to match the bow on the other card so I ink blended some Dragonfruit ink on the edges before glueing the panel down. To finish the card, I heat embossed the sentiment using Speckled Prism Hot Foil on Nutmeg cardstock. I layered a shadow cut from Silver Glitter Paper and popped on the sentiment with foam squares.


I've never worked with this colour palette before and I was pleasantly surprised at how well the brown fit into it. I actually tried to use as little of it as possible but, as noticeable as it is, I really love how these cards turned out.


Here's a list of monthly club kits I share, as well as some of the value kits offered by Spellbinders:


I appreciate you stopping by and, if you're inspired, please shop my affiliate links below. Spellbinders would love to know that you were inspired by me. Thanks so much for your continued support!

Supplies

Monday, July 1, 2024

Lunar New Year Challenge + Giveaways | July 2024


The Lunar New Year Challenge is back and we've partnered up with your favourite craft companies all year long so that means there are giveaways every month! This month, we're giving away ONE $25 gift certificate to Simon Says Stamp, ONE $25 gift certificate to Lawn Fawn, ONE $25 gift certificate to My Favorite Things, and ONE $25 gift certificate plus a mystery box of goodies from Hero Arts. That's a total of $100 in giveaways in July!


I'm always excited when a new month begins because it means I get to dream up something special for the challenge. My first card for this month features our July special sponsor Hero Arts who was kind enough to share a few products with the team.


My colour palette includes Peony, Papaya, Coral and Azalea cardstock from Hero Arts. To create the background, I cut three A2 panels from PapayaCoral and Azalea cardstock, cut them at an angle and taped them together to form a full A2 panel.


I cut the Cherry Blossom Cover Plate from Peony cardstock, twice, and glued the layers together. After attaching the blossom panel to the card base, I die cut the small flowers from the Bonsai Fancy Die from PapayaCoralAzalea and Silver Glitter cardstock.


After laying the coloured flowers on silver glitter cardstock and attaching them to the cherry blossoms, I white heat embossed the sentiment from Crane Wishes and popped it on to the card with foam tape.


The rules are simple. You must create a new Lunar New Year, Chinese New Year or a 2024 Dragon Birthday card and add the link to your post in the link-up party. Multiple entries are allowed. Backlinking to an older project is strictly prohibited.

Our July Lunar New Year Challenge will run from 12:00am EST on July 1, 2024 through 12:00pm EST on July 31, 2024. We would love to see you using products from our four generous sponsors! The four lucky winners will be randomly selected from all eligible entries and announced at the start of the August Challenge. 

(save and share with your project)

Visit the July Link-Up Party post HERE to see all of the design team projects and be inspired to create your own! When sharing your challenge entries on social media, feel free to save this badge and post it along with your project. Please tag us @lunarnewyearchallenge on Instagram and use the hashtag #lunarnewyearchallenge so everyone can find and be inspired by all your amazing projects.

Thanks so much for stopping by and I'll see you again soon!

Supplies

Friday, June 28, 2024

Waffle Flower | Stencilled Butterflies Mini Slimline + NEW Grip Mat Review


My awesome friends at Waffle Flower sent me their *NEW* Grip Mat - Big Mini Bundle to review and I love them so much! I already own and love the grip mats that fit inside both original and mini MISTIs so I was more than excited to try the two newest sizes - the 7.5x11" Grip Mat and 4x4" Grip Mat - which are now the largest and smallest sizes available.


Waffle Flower also sent me a few products to play with, perfect for pairing the 1+ Shader Brushes I already have and love. Featured here are the Butterfly Shaker Die and coordinating Butterfly & Daisy Stencil.


After die cutting the butterflies from Snowdrift and Sweet Potato Pie cardstock, plus antennae from Silver Glitter cardstock, I used Buttercream, Mandarin Spice and Ballet Slipper to ink blend the small butterflies on the die cut.


To frame the mini slimline, I cut the largest of the Mini Slimline Nesting Rectangle Frames from both Alabaster and Ballet Slipper cardstock. After cutting small corners from Juniper and Silver Glitter cardstock, I assembled the background and popped on the butterflies. To finish, I added a sentiment from the Print & Script Take Care Die, stacked two layers in Juniper, and glued it in place.


The 7.5x11" Grip Mat is a great size for the 9x12" Media Mat (was Stencil Mat) and the 4x4" Grip Mat is the perfect compact size to leave on your craft desk for stencilling small die cuts. I hope you'll check out all of these products in the Waffle Flower Shop.

Thanks so much for stopping by and I hope to see you again soon!

Supplies

Sunday, June 23, 2024

Spellbinders Guest Post feat. Bayfair Card Maker's Kit from the Bayfair by Rosie's Studios Collection


Hello, crafty friends! I'm on the Spellbinders Blog with three cards featuring different ways to use the Bayfair Card Maker's Kit and add-ons from the Bayfair by Rosie's Studios Collection, one of many awesome releases now available in the Spellbinders store!


Affiliated product links are listed below at no extra cost to you. Details on how I made each card and more photos are on the Spellbinders Blog. Thanks so much for stopping by!

Supplies

Saturday, June 22, 2024

Lunar New Year Challenge | And a Happy New Year feat. Taylored Expressions + $50 Giveaway!


I'm back with my second card for the June Lunar New Year Challenge featuring products from our sponsor Taylored Expressions. If you missed my first card for the June Challenge, please head to this post HERETaylored Expressions is sponsoring a $50 Gift Certificate this month so you'll definitely want to play along for your chance to win!


You may recall other variations of these products posted in January HERE and HERE. I had stamped, coloured and heat embossed both the Little Critter dragons and Mini Strips - Holiday sentiments back then, then saved them for this card. 


I used the largest of the Diagonal Stitch Rectangle Stacklets to create  the frame on the card base. This adds a subtle texture without being too distracting from the rest of the elements. 


Next, I cut a bunch of stars using both the Starstruck and Gathered Stars Dies from Cherry Pop and Gold Glitter cardstock and arranged the dragons inside the largest gold stars. 


After gold heat embossing the sentiment from Mini Strips - Holiday on Black Licorice cardstock and popping it on the card with foam strips, I embellished the card with a few gold pearls.


Visit the June Link-Up Party post HERE to read the rules, see all of the design team projects and be inspired to create your own! Please tag us @lunarnewyearchallenge on Instagram and use the hashtag #lunarnewyearchallenge so everyone can find and be inspired by all your amazing projects.

Thanks so much for stopping by!

Supplies