Sunday, February 25, 2024

Lawn Fawn | Happy Purrthday!


I made this custom birthday card for one of my son's friends who just turned 16. You may recall THIS POST last year when my son was too embarrassed to give that card to the same friend. Well, things have completely changed and we now know that his friends all enjoy the cute things in life. They are, after all, cat owners!


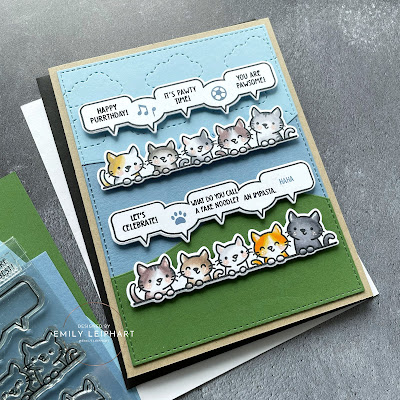
I used six different stamp sets from Lawn Fawn to create the images and sentiments for this card! The adorable cats, speech bubbles and some of the sentiments are from the ever-so-popular Simply Celebrate Critters clear stamps and dies. The remaining sentiments, including the joke, are from the Dad Jokes stamp set. I love that Lawn Fawn offers so many different critter sets and add-on sentiments that you can mix and match to customize your cards. 


The cats were all coloured with Copic markers and I've listed all the colours in the supply links below. There are a lot but that's what it took to get the shading and colour variation perfect! I also used a white gel pen to add highlights to the ears and pink cheeks. The extra images stamped in Cove Blue ink are from Critter Concert (music notes), Tiny Sports Friends (soccer ball) and Meow You Doin' (paw print).


To create the background, I cut panels from Moonstone, Cornflower Blue and Noble Fir cardstock using My Favorite Things A2 Stitched Rectangle STAX Set 1 Dies. Then I cut both the Moonstone and Noble Fir pieces using Spellbinders Color Block Scenic Scape Dies. After running the the Moonstone panel through with Concord & 9th's Cloudy Double Card Front Die, I glued all the pieces on to a Kraft card base and popped up the die cuts with foam squares.


Thanks so much for stopping by and I'll see you again soon!

Supplies

Saturday, February 24, 2024

Spellbinders | Through the Arbor Garden Collection


Hello, crafty friends! Today, I'm sharing two cards made with products from the Through the Arbor Garden Collection by Susan Tierney-Cockburn. I'm not great with real life or card-based floral arrangements so using these products was definitely way out of my comfort zone. Still, it was fun to have the opportunity to use these products!


I needed a new baby card so that was my drive for both of these card designs. This first design features my favourite product from this collection, the Arbor & Ivy 3D Cut & Emboss Folder. I just love that gorgeous archway in Sea Salt cardstock! 


I die cut the flowers from Nasturium and Galvanized Wash Bucket in Doll PinkBurnt Orange and Peach Sorbet. I used centres from Vintage Florals because I wanted them to be flat and mailable, even though I'm sure I'll deliver this card in person.


I used the coordinating sentiment die to cut a second piece from Mirror Gold cardstock to create a shadow that matched the centres of the flowers. Any extra bits of gold are always a nice touch and, since the sentiment panel blends well into the background, this shadow helps to highlight the sentiment a bit more.


The sentiment from Sentiments for Everyday was heat foiled with Aura Hot Foil on Sea Salt cardstock to blend in with the elegant archway background. After arranging the flowers, I popped up the pink flowers with foam squares and glued the others flat on the panel.


My second card features flowers and leaves from the Mock Orange die set from the Through the Arbor Garden Collection. For the colour palette, this card also features Burnt Orange and Peach Sorbet, like on the first card, but I swapped out the pink for Bermuda


I just love all the details on the flower petals and leaves! For both cards, I used shader brushes and coordinating inks in Be Mine, Terracotta, Bellini and Uptown to add shading to all the die cuts.


This card also features a sentiment from Sentiments for Everyday, which was heat foiled with Aura Hot Foil directly on to the Burnt Orange cardstock. To finish, I embellished the centres of the flowers with Oyster Pearls.

Have you heard about SpellbindersCardmaking Super Star Contest? It's running from February 13th through March 13, 2024 and you could win a $300 shopping spree! Visit this link HERE or click on the image below for all the details.


Be sure to check out the current Die-lightful Die Cutting Sale running February 20-28, 2024. You can save up to 40% on select products, including many of my favourites! Visit this link HERE or click on the image below for all the details.


Thanks so much for stopping by and I'll see you again soon!

Supplies

Saturday, February 17, 2024

Spellbinders | February 2024 Monthly Club Kits


Hello again, crafty friends! Today, I'm sharing projects featuring the February 2024 Monthly Club Kits from Spellbinders. My first card features the "Stitched Floral Focal Card Front" Stitching Die of the Month and the "Daffodil Spray" Glimmer Hot Foil Kit of the Month.


I love designing several cards with the same colours and it was so easy with this amazing colour combination. The Spellbinders cardstock colours featured on both cards are Barely Peach, Dahlia, Wild Berry and Teal Topaz.


For this first card featuring the "Stitched Floral Focal Card Front" Stitching Die of the Month, I cut the base panel from Teal Topaz cardstock.


Then I cut the A2 leafy panel from Wild Berry cardstock and stitched the four largest leaves with Light Silver Metallic Thread. After glueing it on to the Teal Topaz base, I added Bella Pearls in three different sizes.


Next, I die cut the large centre flower from Dahlia cardstock and stitched it using Light Silver Metallic Thread. I popped up this panel on foam squares.


The sentiment was created by heat foiling one of the sentiments from the "Daffodil Spray" Glimmer Hot Foil Kit of the Month. I used Pewter Hot Foil on Barely Peach cardstock and also popped that on to foam squares.


For this second card featuring the stunning "Daffodil Spray" Glimmer Hot Foil Kit of the Month, I cut pieces of Barely PeachDahliaWild Berry and Teal Topaz cardstock and taped them together at the back.


Then I heat foiled the "Daffodil Spray" on to the panel using Satin Champagne Hot Foil. This foil is pinkish gold so it was the perfect shade for the peachy pink shades of cardstock. It's subtle and still makes quite the impact on this simple design.


I needed a Get Well card so I chose a sentiment from All You Need Sentiments, which was the November 2023 Glimmer Hot Foil Kit of the Month and now available for purchase.


I heat foiled the sentiment using Pewter Hot Foil on Teal Topaz cardstock. I also die cut an extra banner from Black Glitter cardstock and offset it before popping it on to the card panel with foam squares. To finish, I embellished the card with a few carefully placed Silver Pearls.


Here's a list of monthly club kits I share, as well as some of the value kits offered by Spellbinders:


Have you heard about SpellbindersCardmaking Super Star Contest? It's running from February 13th through March 13, 2024 and you could win a $300 shopping spree! Visit this link HERE or click on the image below for all the details.


Thanks so much for stopping by and I'll see you again soon!

Supplies

Wednesday, February 14, 2024

Spellbinders | Panda Valentine's Day Cards


Hello, crafty friends! I'm popping in to share the Valentine's cards I made for my husband and son. In our household, I'm actually the panda boss so it was the perfect opportunity to make some nerdy panda cards featuring my favourite products from the Monster Birthday Collection by Spellbinders


The Dancin' Birthday Panda is the absolute cutest, isn't she?! I've been wanting to use her forever and this was the perfect time. Of course, I had to add some nerdy glasses using the Smart Glasses Dies which fit on all the animals and monsters in the Monster Birthday Collection.


One of the things I love most about using pandas is that they require zero or very little colouring when it comes to stamps but I also don't have to think about colours at all when it comes to die cutting! It was a no-brainer to use Snowdrift and Onyx cardstock for the panda pieces. I also cut the bows from Mirror Gold cardstock for a flash of shine.


Next, I cut out the door mat and tiny envelop from Open House Valentines. This set was retired by Spellbinders but is still available at Scrapbook.com and I'm sure you can find it at other stores. For these pieces, I used Pink Sand and Pomegranate cardstock.


I also cut the Smart Glasses from both Pomegranate and Mirror Gold cardstock, opting for Pomegranate ones on the pandas.


To create the background, I used the Precision Layering A2 A Dies to cut panels from Waterfall cardstock before dry embossing them with the Head in the Clouds embossing folder. I also used the Heartfelt Thanks & Scallops Dies to cut panels from Teal Topaz cardstock and glued both those layers onto white linen card bases.


To finish, I cut hearts from both the Heartfelt Thanks & Scallops Dies and Open House Valentines in Pink SandPomegranate and Mirror Gold cardstock. All of the pieces were popped on to the cloud panel with foam squares, except for the two smaller hearts which were adhered with micro glue dots. These pandas do not swing but I hope to make other cards where they are swinging. ;)


Have you heard about SpellbindersCardmaking Super Star Contest? It's running from February 13th through March 13, 2024 and you could win a $300 shopping spree! Visit this link HERE or click on the image below for all the details.


Thanks so much for stopping by and I'll see you again soon!

Supplies

Saturday, February 10, 2024

Spellbinders | Warm Wishes for the Coming Year (of the Dragon)


Happy New Year! According to the Chinese Zodiac, the Year of the Dragon begins today! Do you know any dragons? That person would be turning 12, 24, 36, 48, 60, etc. between today and January 28, 2025. Wow, that seems like ages in the future, doesn't it? LOL 


Today's cards feature four products from Spellbinders and they include the Dancin' Birthday Dragon, Stitched Numbers, Starburst Glimmer Plate and A Merry Little Christmas Sentiments.


First, I cut the two A2 base panels from Barely Peach and Pomegranate cardstock. I used Opal Hot Foil with the Starburst Glimmer Plate at the top of the Barely Peach panel and Red Hot Foil at the base of the Pomegranate panel. I love that they're so different and equally beautiful!


Both of the sentiments were foiled with Matte Gold Hot Foil and one of the sentiments from A Merry Little Christmas Sentiments. I love that there are so many Christmas sets that include appropriate sentiments for the Lunar New Year.


I stitched the numbers on the Barely Peach card using Light Gold Metallic Thread, which I doubled up for thickness.


Finally, I created the Dancin' Birthday Dragon from Mirror Gold and black cardstock. For the crown and gift details, I used the same Pomegranate cardstock with Gold Glitter cardstock to make those little details extra special. My son wanted a black dragon but I'll have to make that for him outside of the Chinese New Year celebrations.


Since the directions of the heat foiled background were reversed on this second card, the sentiment appears at the top and therefore the stitched numbers are on the other side to make use of the space around the sentiment.


For this card, I stitched the numbers with Red Ruby Metallic Thread to match the background. Again, I doubled up on the thread to give the stars a fullness. I really love the brightness of this card! 


I'm including a close-up of those tiny gifts from the Dancin' Birthday Dragon set because the dragon didn't look right on this design and I wasn't able to flip him like I usually can with some simpler dies. I do love how those little gold gifts make cute embellishments!


If you were to receive one of these cards, which one would it be? I honestly can't pick a favourite. I love the lighter background on the first card but I've been obsessively making dragon cards that I almost like this simpler design better. ;)


If you are celebrating these next two weeks, I hope you are blessed with a very lucky, happy, healthy and prosperous year!

(save and share with your project)

Visit the February Link-Up Party post HERE to see all of the design team projects and be inspired to create your own! When sharing your challenge entries on social media, feel free to save this badge and post it along with your project. Please tag us @lunarnewyearchallenge on Instagram and use the hashtag #lunarnewyearchallenge so everyone can find and be inspired by all your amazing projects.

Thanks so much for stopping by and I'll see you again soon!

Supplies